How to Multitask on iPad with Split Screen and Stage Manager
Master iPad multitasking! Learn how to use Split View, Split Screen, Slide Over, and Stage Manager to boost your productivity. Perfect for iPadOS users looking to multitask like a pro.

Feeling lost in the chaos of iPad multitasking? Between Split View and Stage Manager, it can get confusing fast. But don’t worry—this article will show you how to take control of multitasking on your iPad and boost your productivity. Let’s dive in!
Before we begin:
- Check out these iPad Pro cases compatible with Magic Keyboard
- Take a look at these best M4 iPad Pro screen protectors
Table of content
- What is multitasking and why it’s important
- Multitask on iPad with Split View
- Enhance iPad multitasking with Slide Over
- Multitask on iPad with Stage Manager
- How to enable Stage Manager on iPad
- How to Use Stage Manger on iPad
- Multiple Stages of Stage Manager
- Adding multiple apps to a Stage
- Multitasking via the three-dot menu
- Switching between apps and stages in Stage Manager
- Adding multiple windows of the same app
- Adding an app in multiple stages
- Accessing hidden Dock and recents app strip
- Stage Manager with an external display
- Stage Manager tips and tricks
- Stage Manager vs Split View
What is multitasking and why is it important
Multitasking is the ability to use two or more apps simultaneously, so you don’t have to switch contexts while working. For example, when writing scripts or articles, I have Ulysses and Apple Notes apps open side by side. It helps me refer to my notes without switching between the apps.
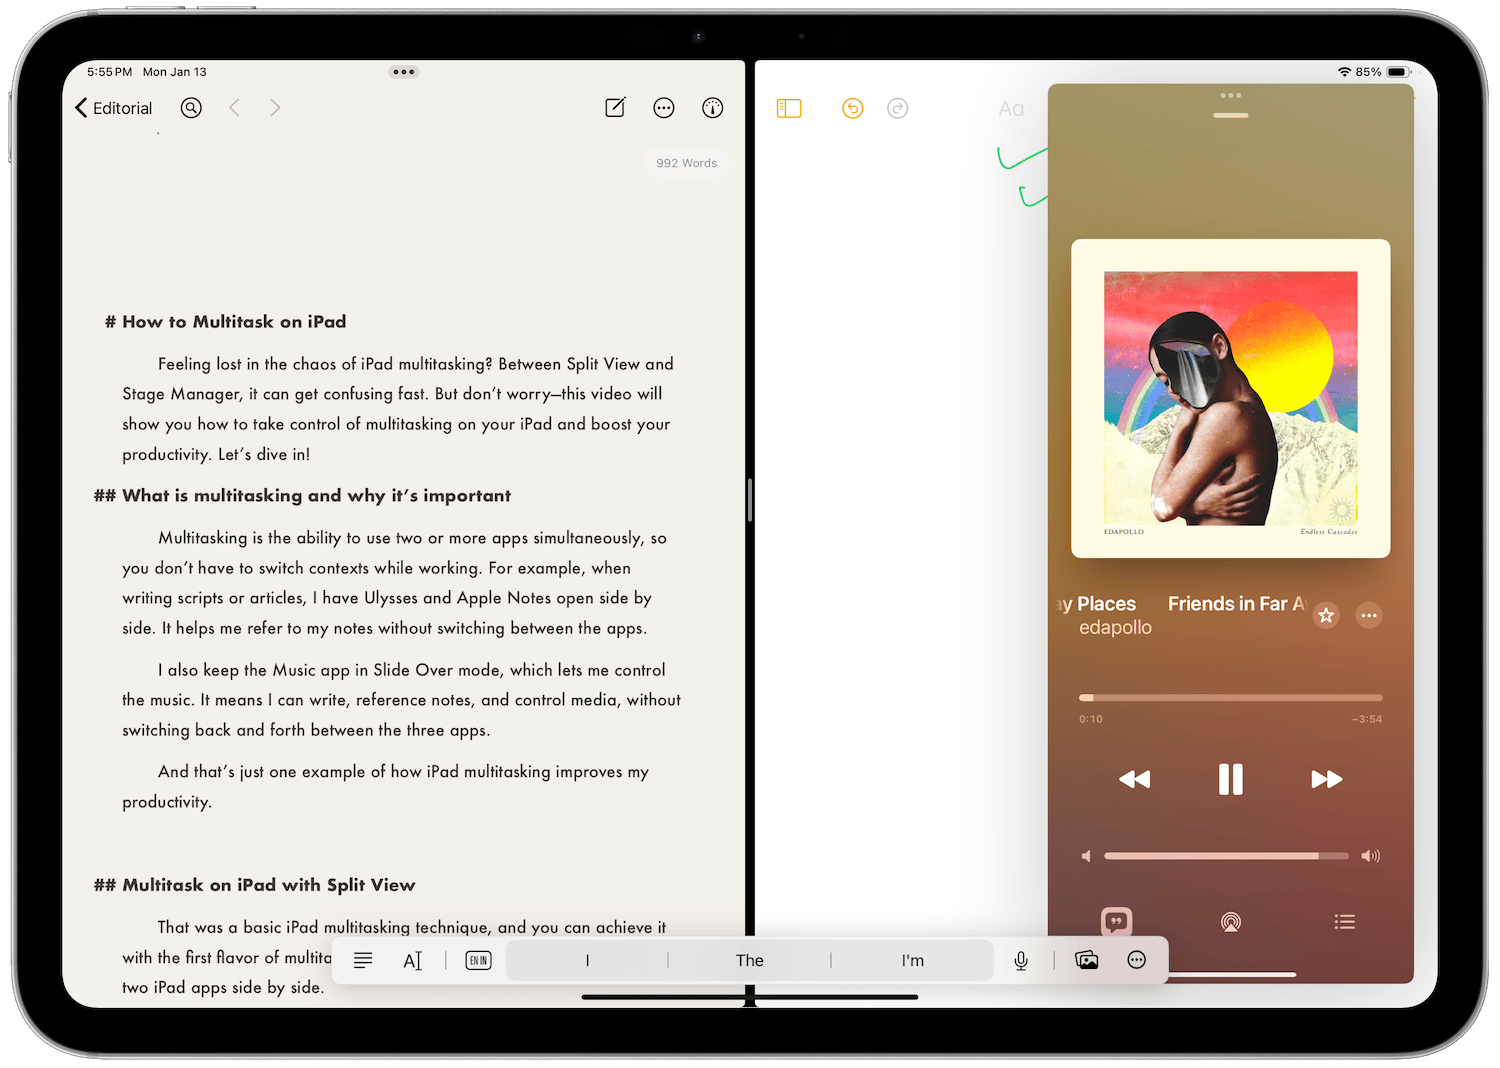
I also keep the Music app in Slide Over mode, which lets me control the music. It means I can write, reference notes, and control media, without switching back and forth between the three apps.
And that’s just one example of how iPad multitasking improves my productivity.
Multitask on iPad with Split View
That was a basic iPad multitasking technique, and you can achieve it with the first flavor of multitasking - Split View. Split View allows you to use two iPad apps side by side.
To enable Split View and open two apps side by side in split screen mode, launch the first app. Now, there are several methods you can use to add the second app.
Enable Split View from the three-dot menu
The easiest way to access Spit View is with the three-dot menu at the top. Tap on it to reveal the multitasking menu. Note that the three-dot menu fades away in a few seconds. If you don’t see it, tap the screen to bring it back. In the multitasking menu, tap the Split View option.
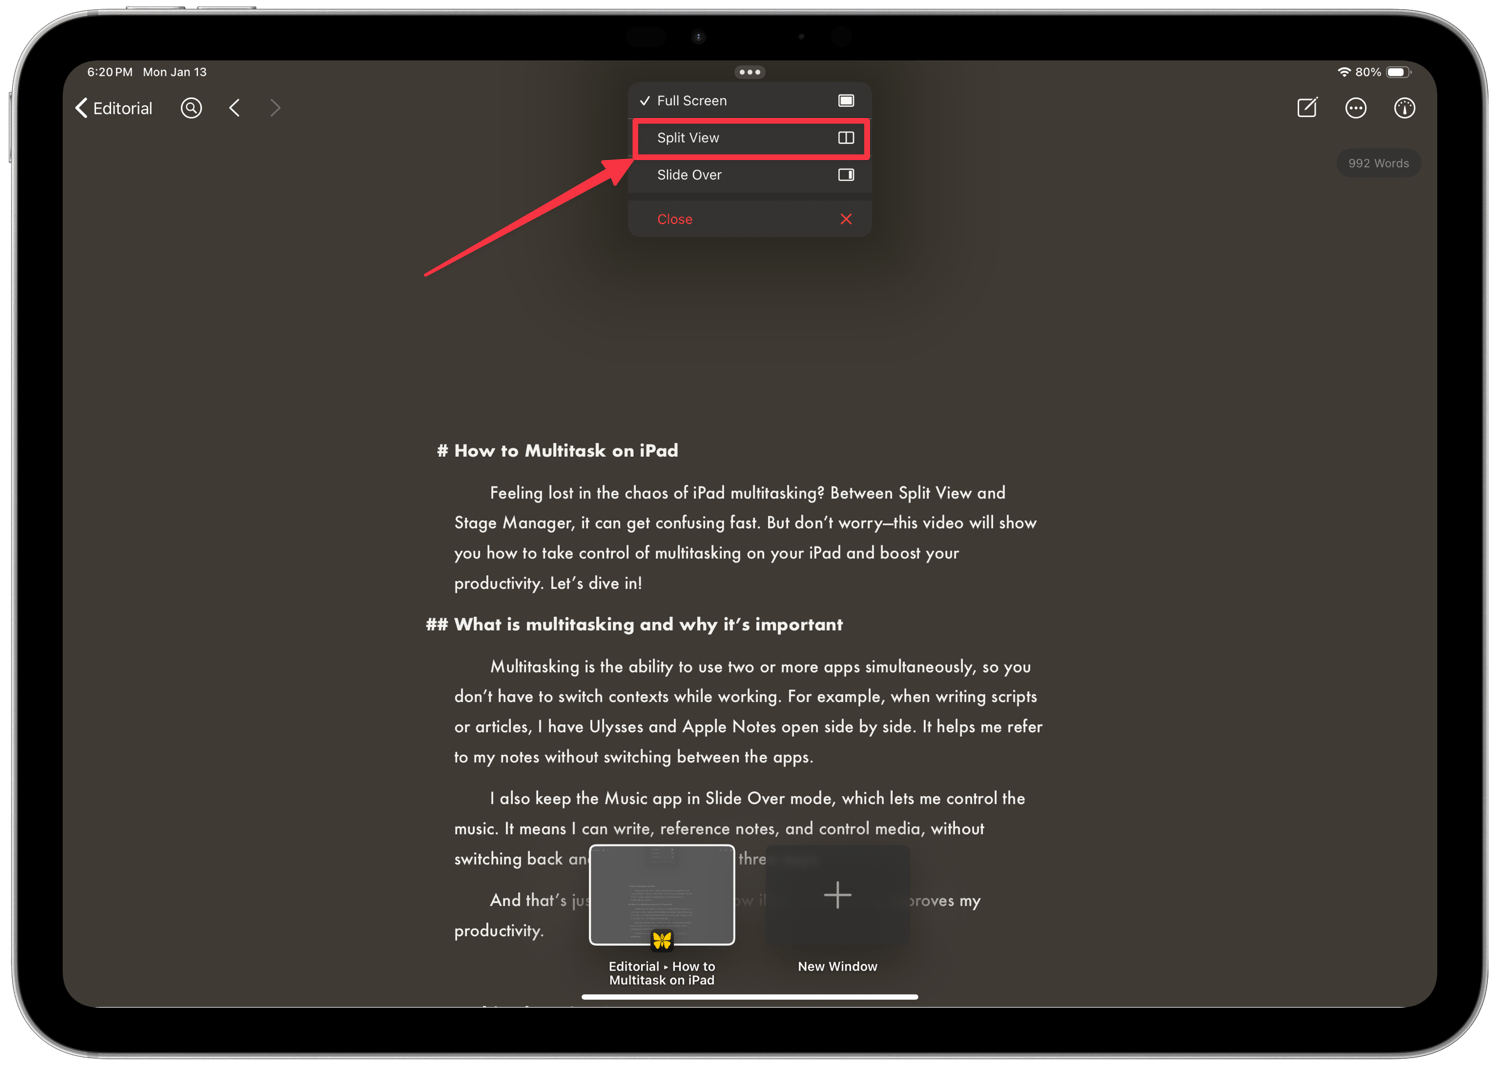
It will hide the app to one side and allow you to pick the other app you want to use in split screen mode. You can add the app from your dock, home screen, and the App Library. You can also use Spotlight search to find and add an app to Split View.
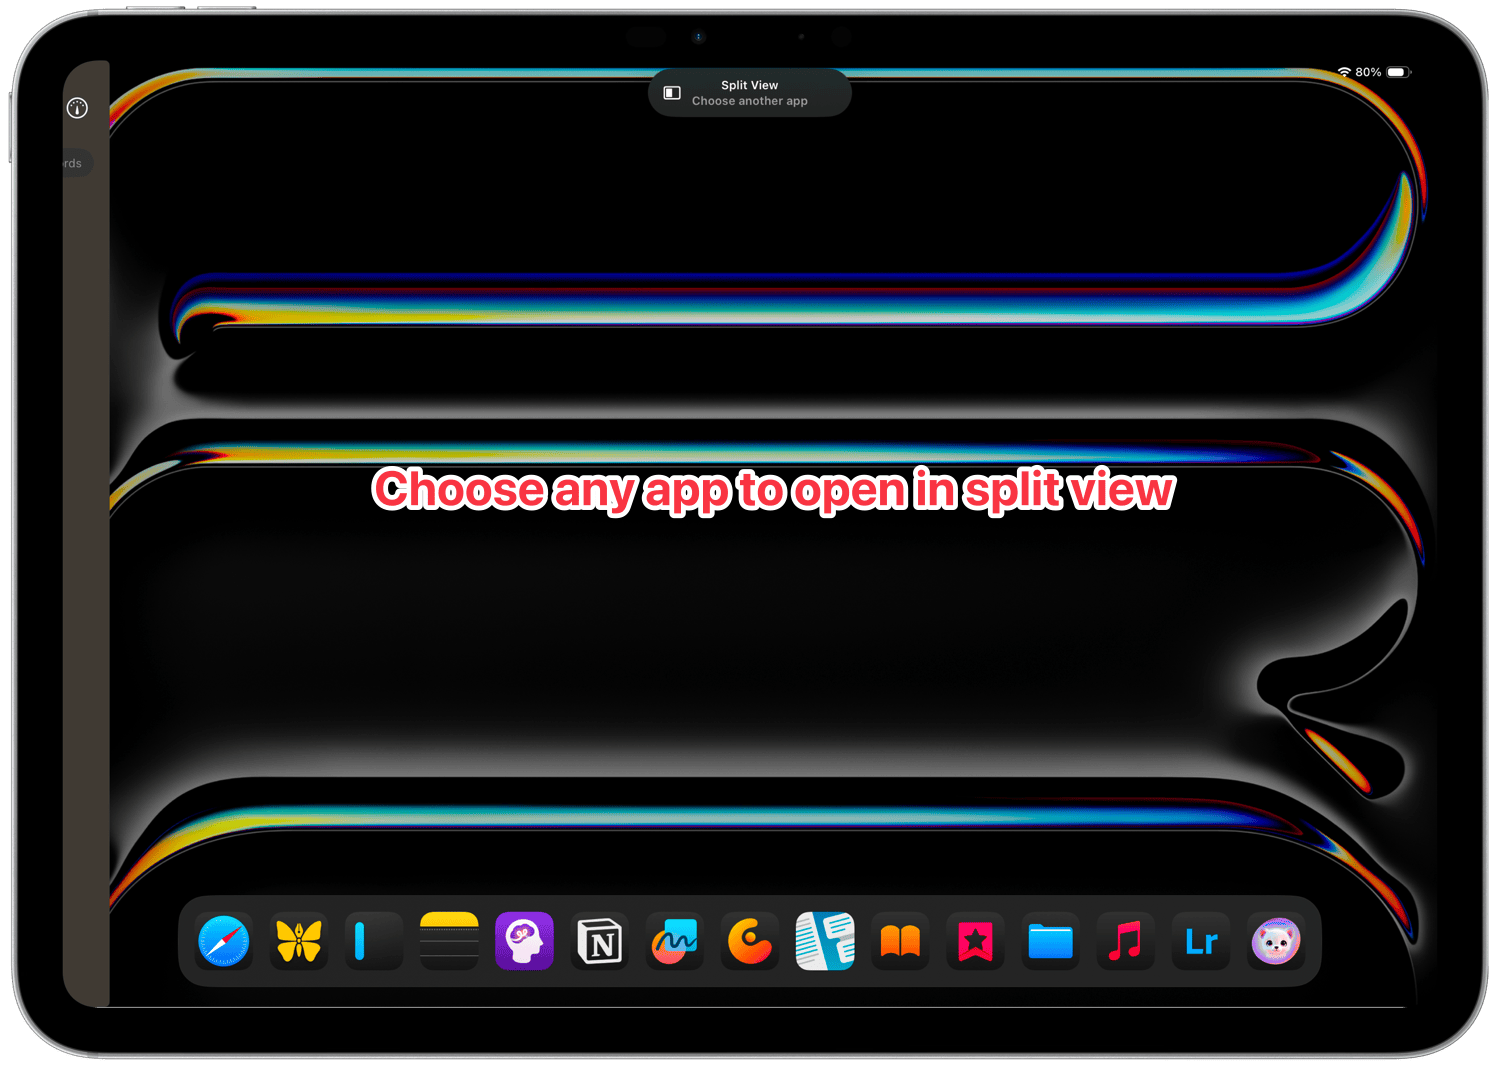
In Split Screen mode, the two apps share equal screen space by default, each occupying 50%. However, this arrangement is not fixed.
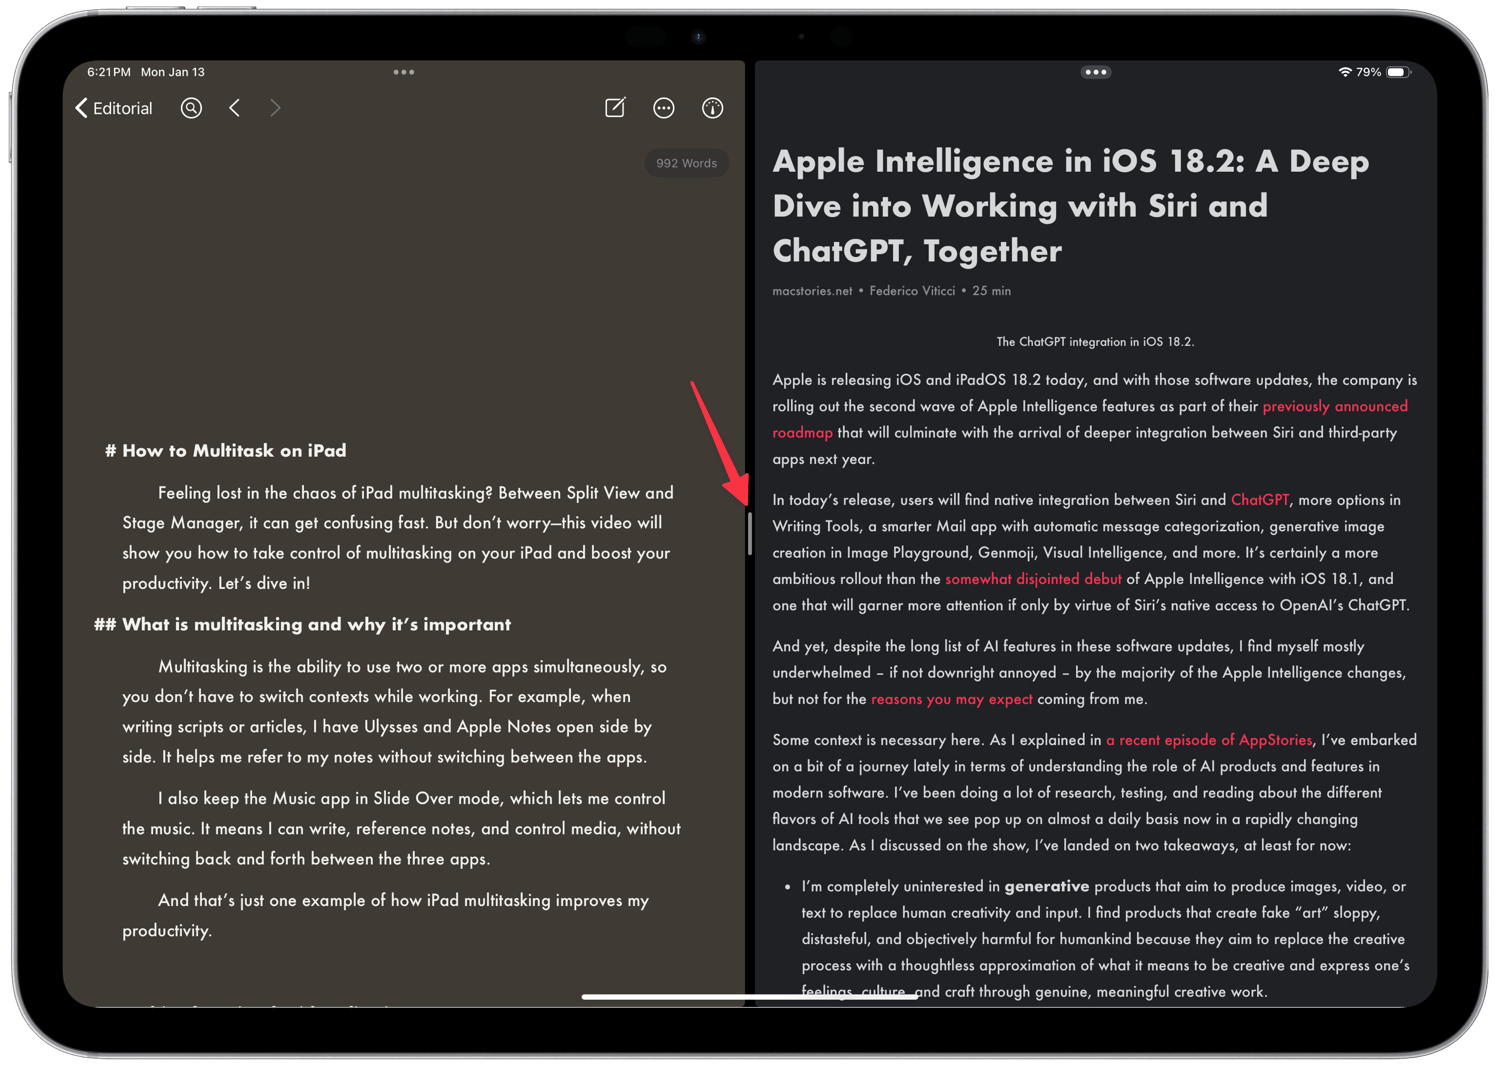
Notice the small grey bar between the two apps—you can hold and drag it left or right to adjust the screen space. This allows one app to take up to three-quarters of the display, while the other resizes accordingly.
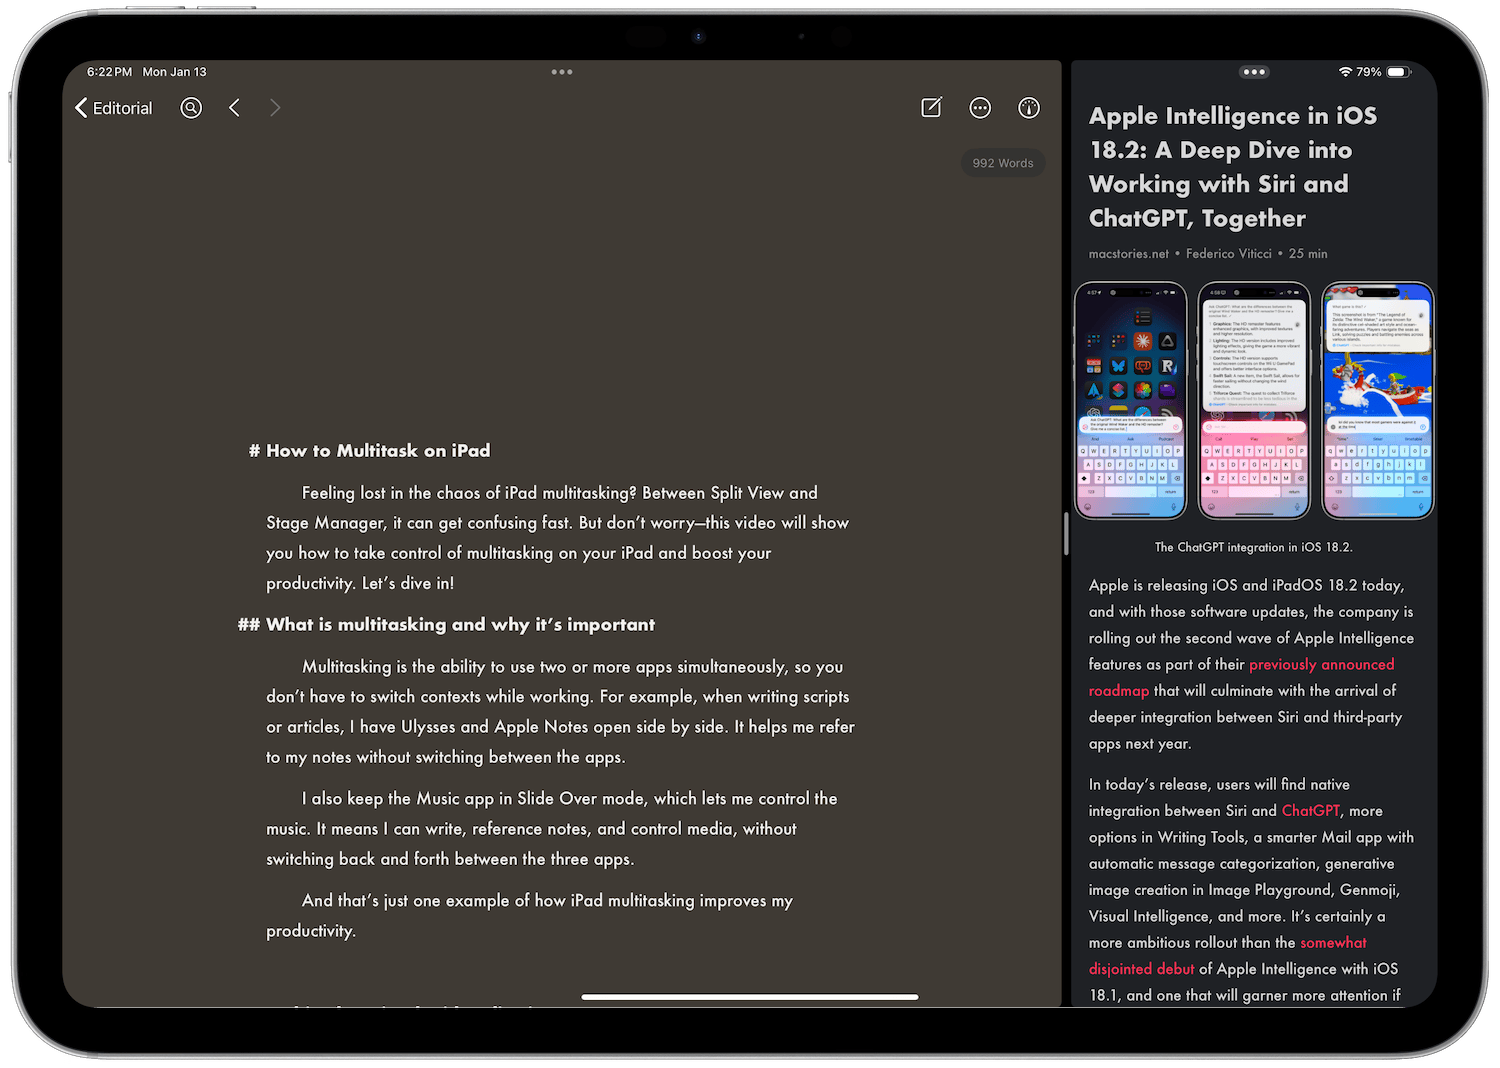
This is very handy. You can use the smaller app size for reference materials while you use the larger workspace to do the work.
Add apps to split screen view with drag and drop
The second way to open two apps in split-screen mode on iPad is by using the drag-and-drop method. With one app open on the iPad, slide up from the bottom to bring the Dock.
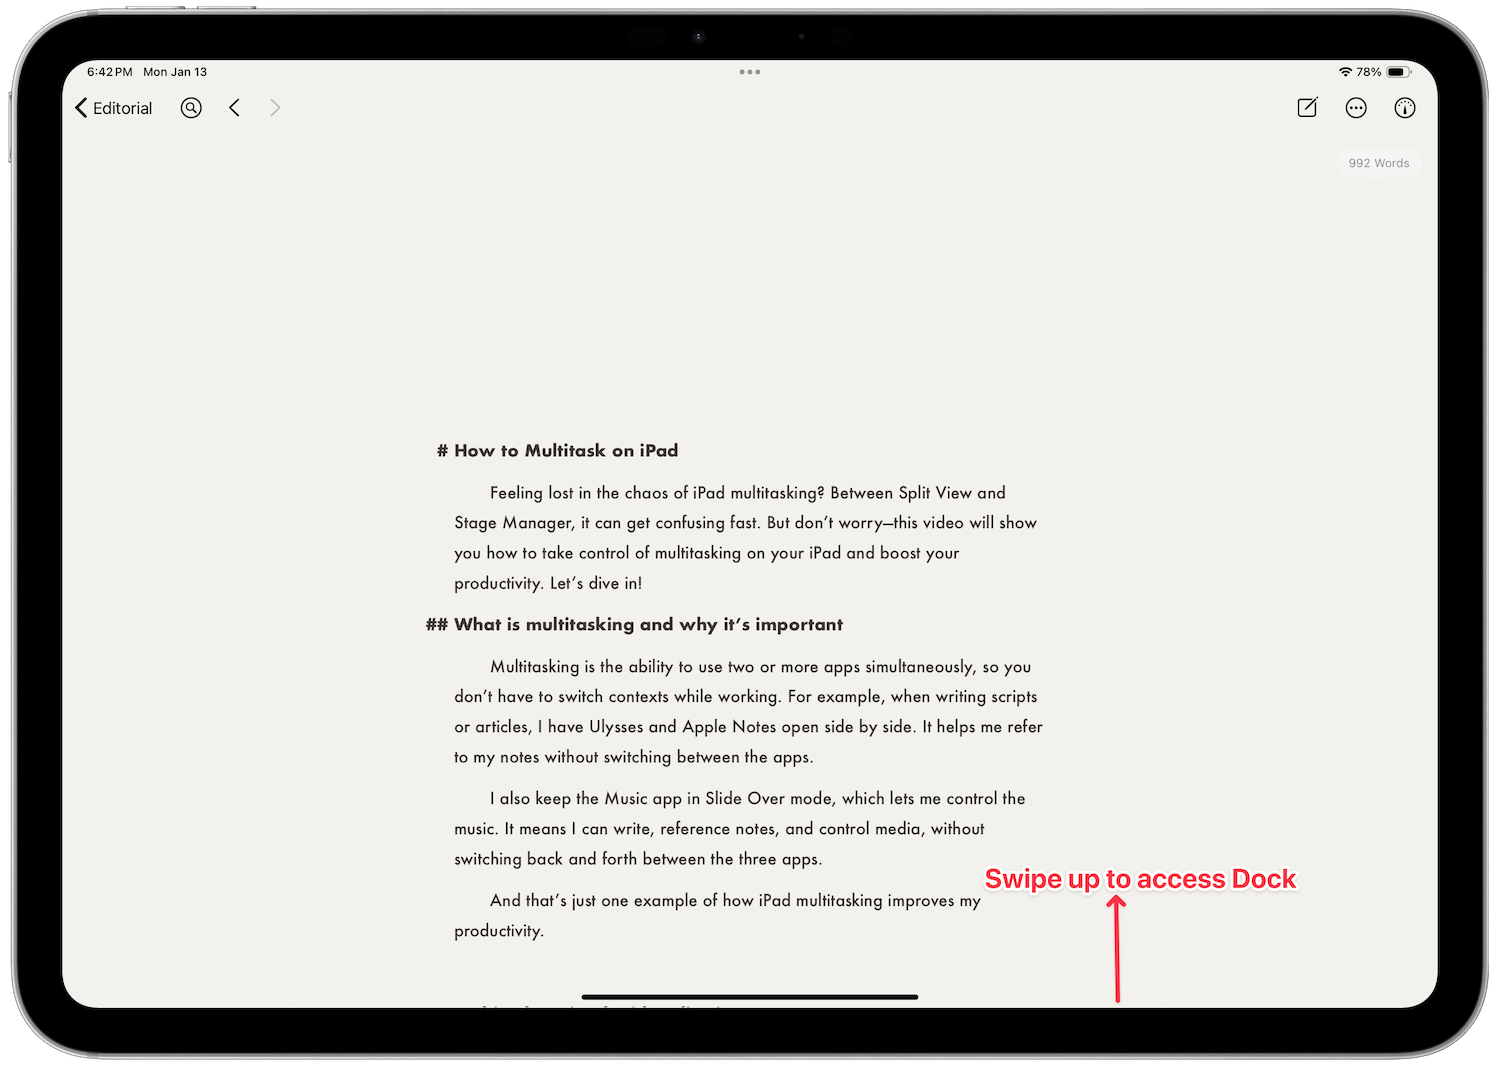
Drag and drop any app from the Dock to the left or right edge of the iPad’s display to open it in split-screen mode.
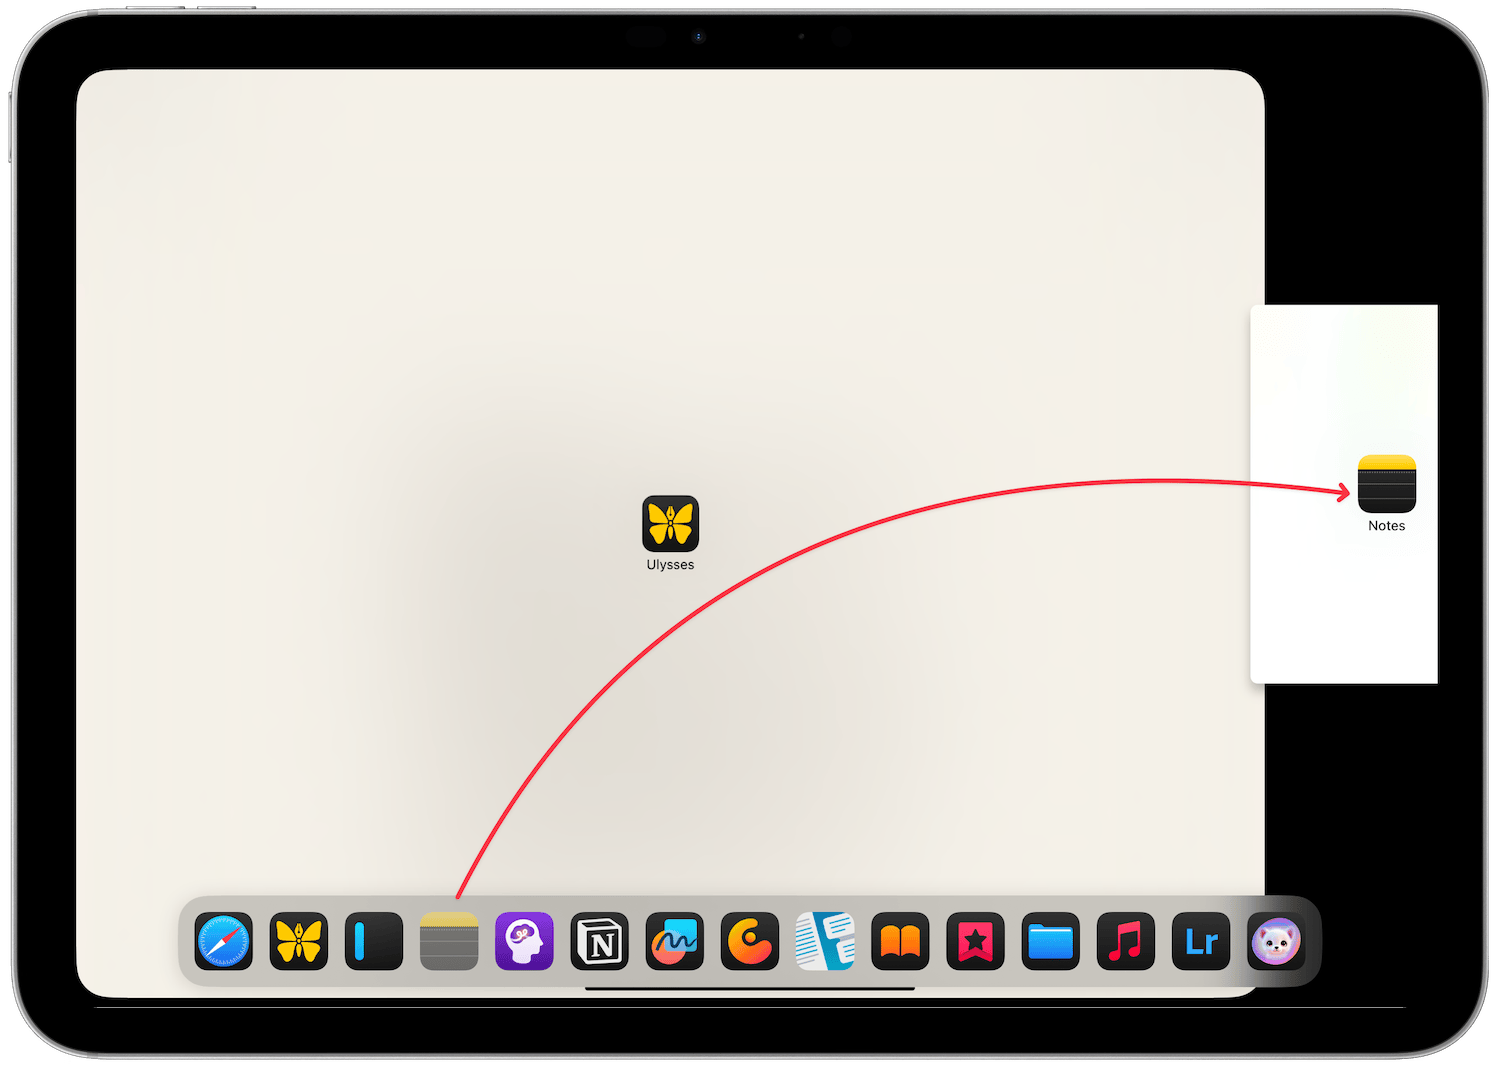
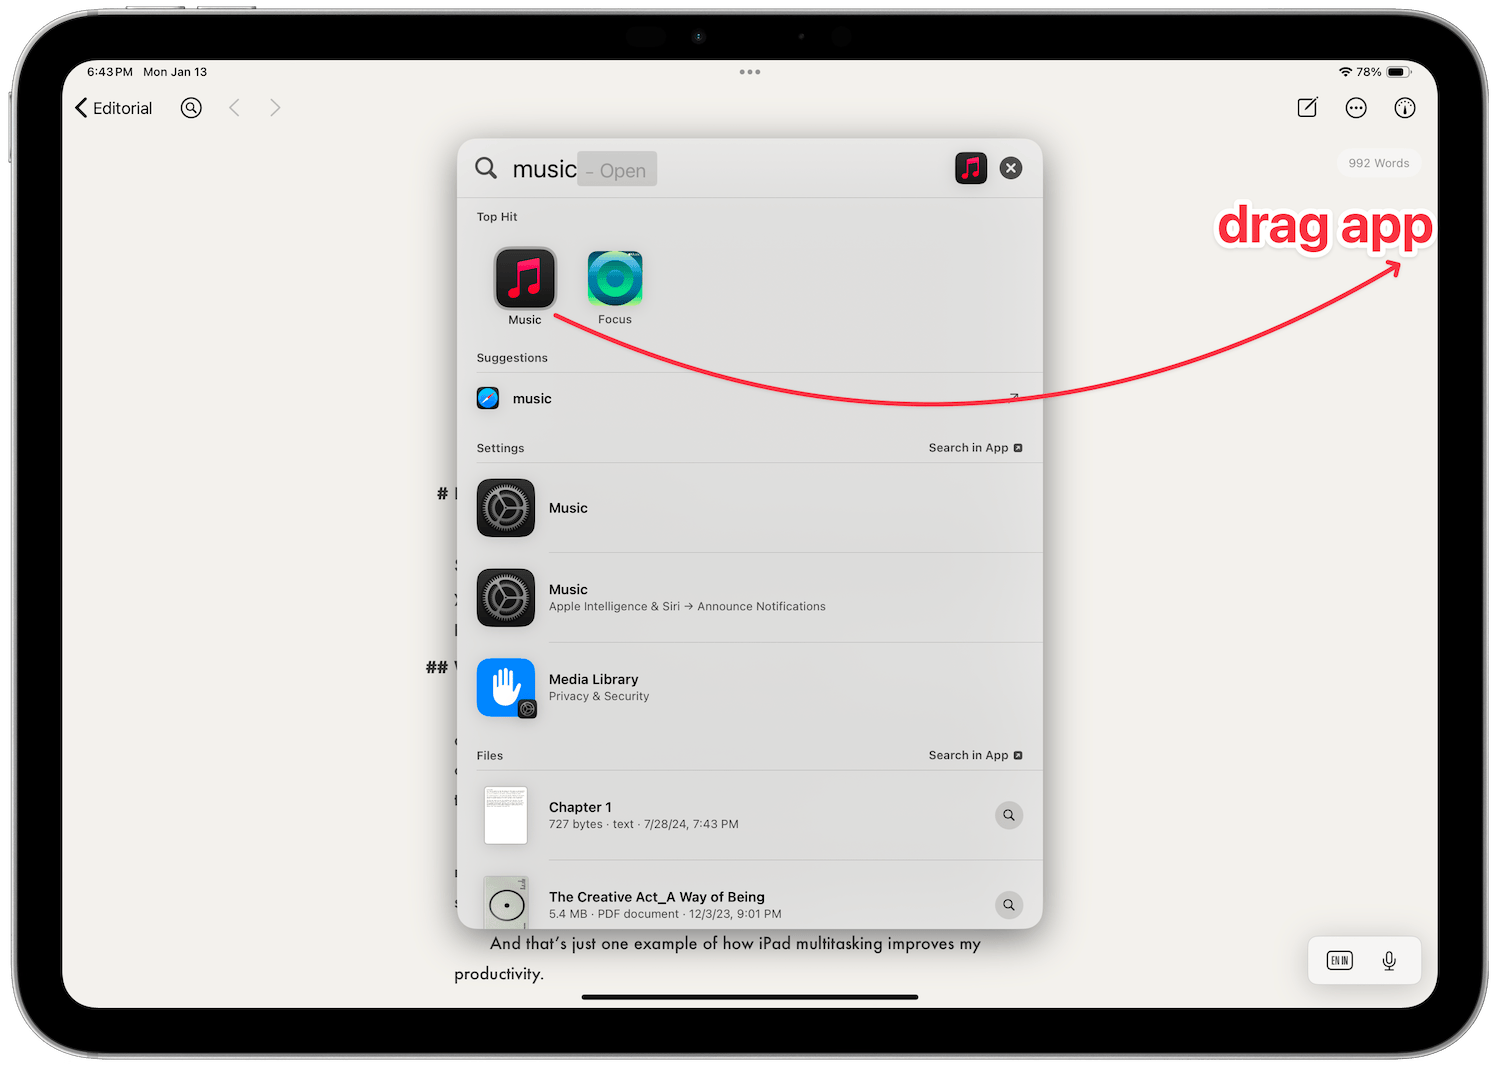
If you have a Magic Keyboard, you can hit the ⌘Space keyboard shortcut to bring up Spotlight. Search for the app you want to add and drag it to open it in Split View.
For the apps that support it, you can even drag and drop from things inside the app to open in Split View. For example, in Safari I can drag and drop a tab to open two tabs side by side.
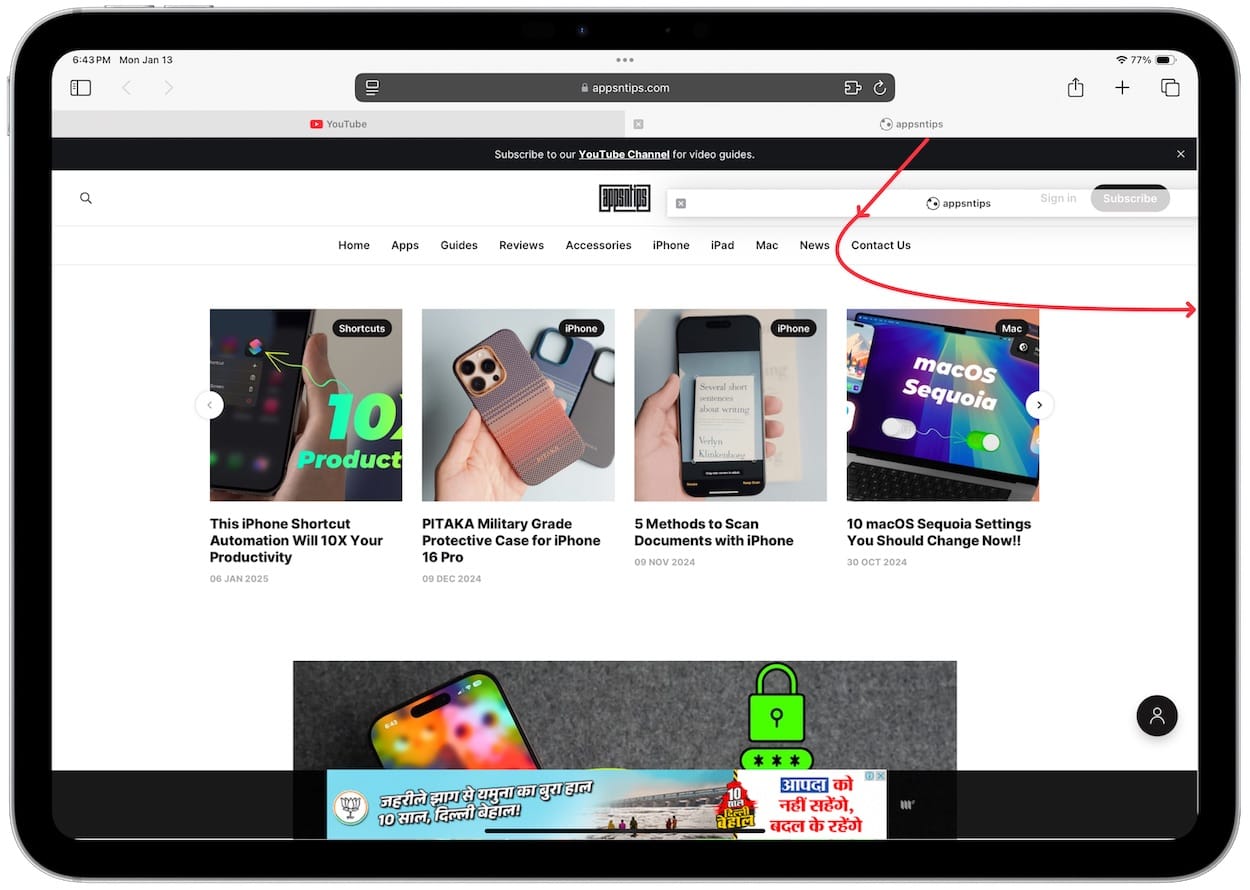
In the Mail app, I can drag an email to get two emails side by side or the compose window to view what I am writing and the email I am replying to simultaneously.
Managing apps in Split View
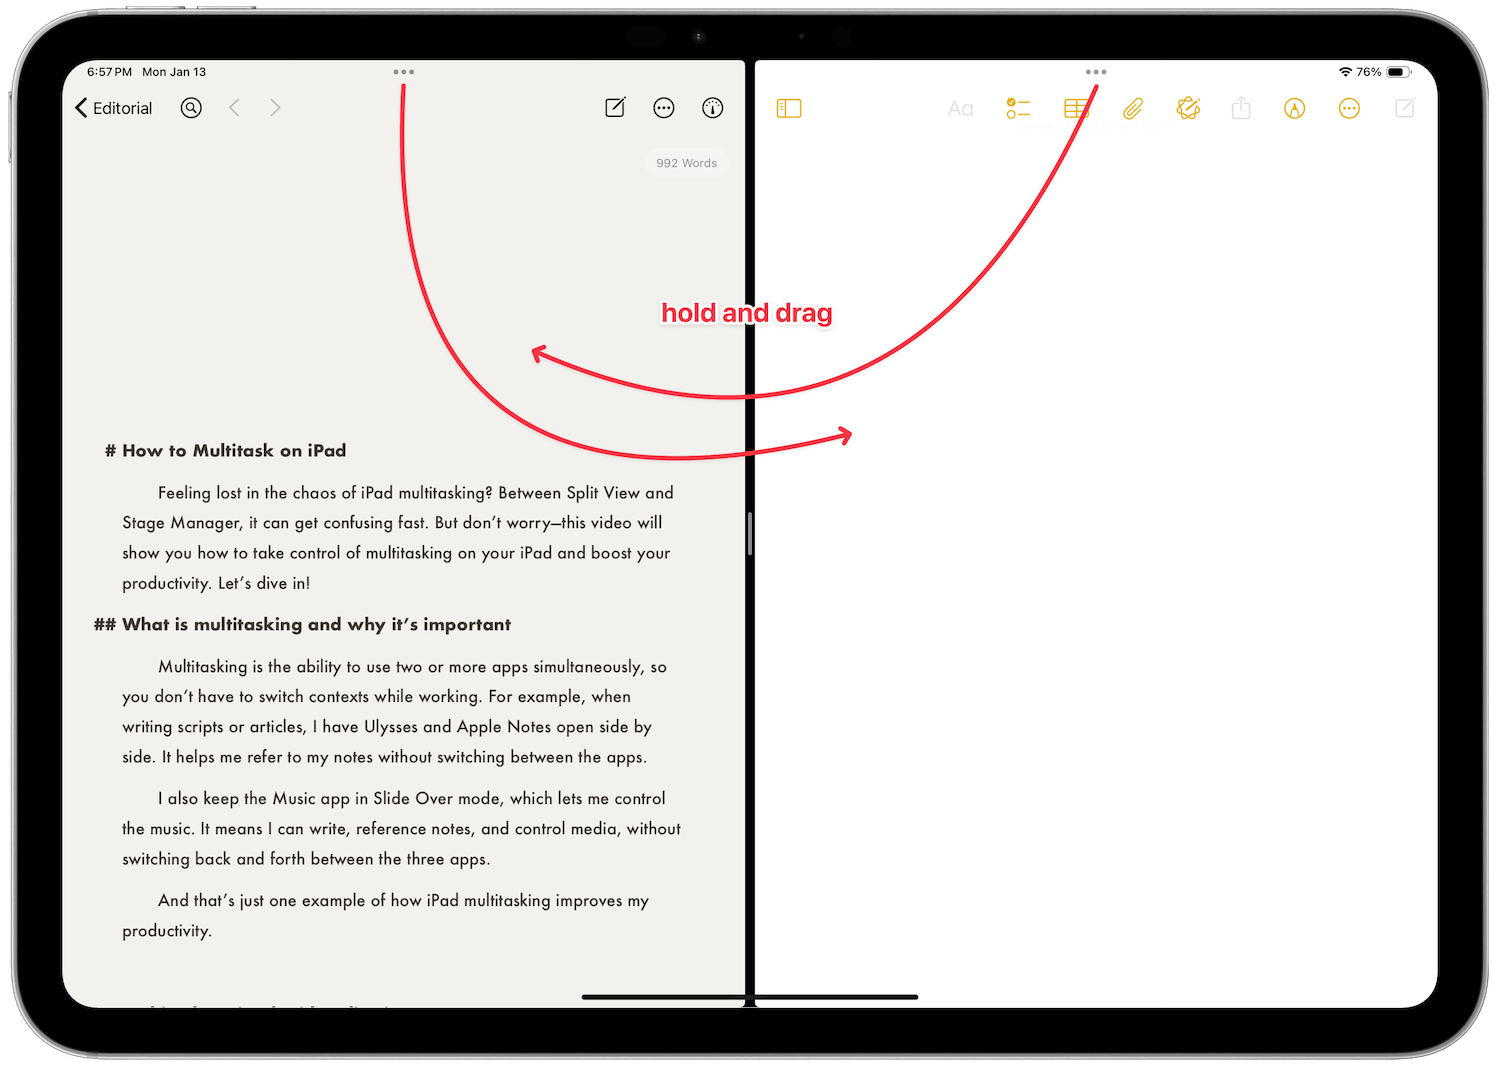
In the Split View mode, you can swap the app between left and right positions. The easiest way is to hold the three-dot menu and drag the app to the left or right side.
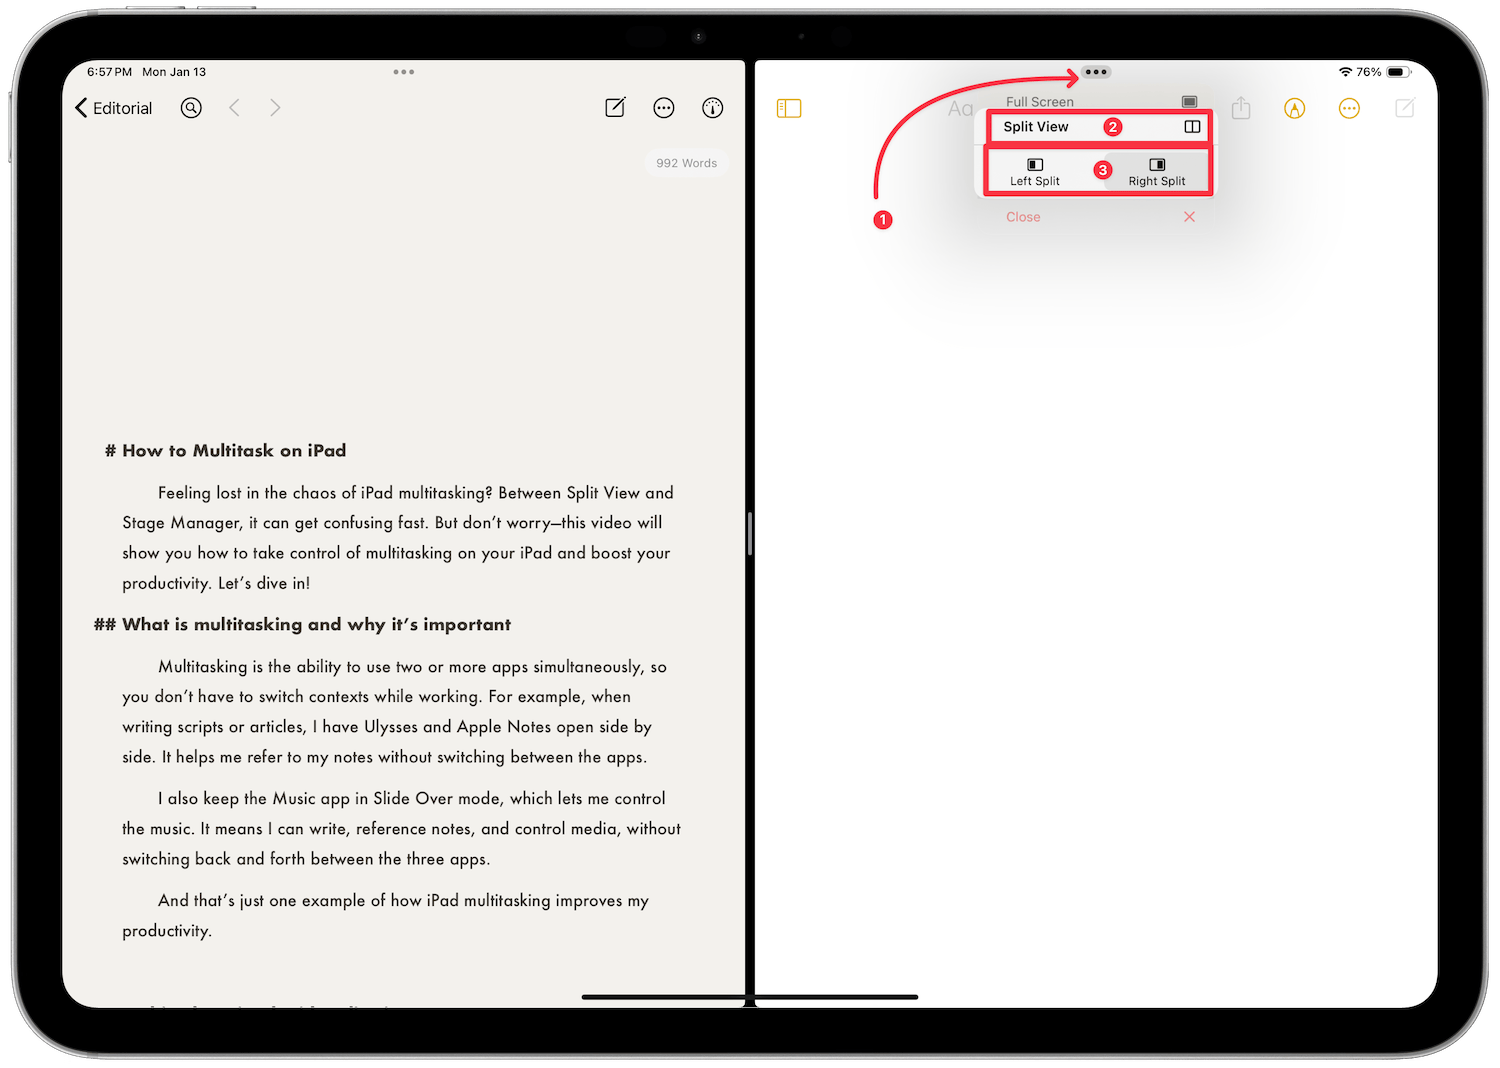
You can also tap the three-dot menu, choose the Split View option, and select the Left or Right Split option.
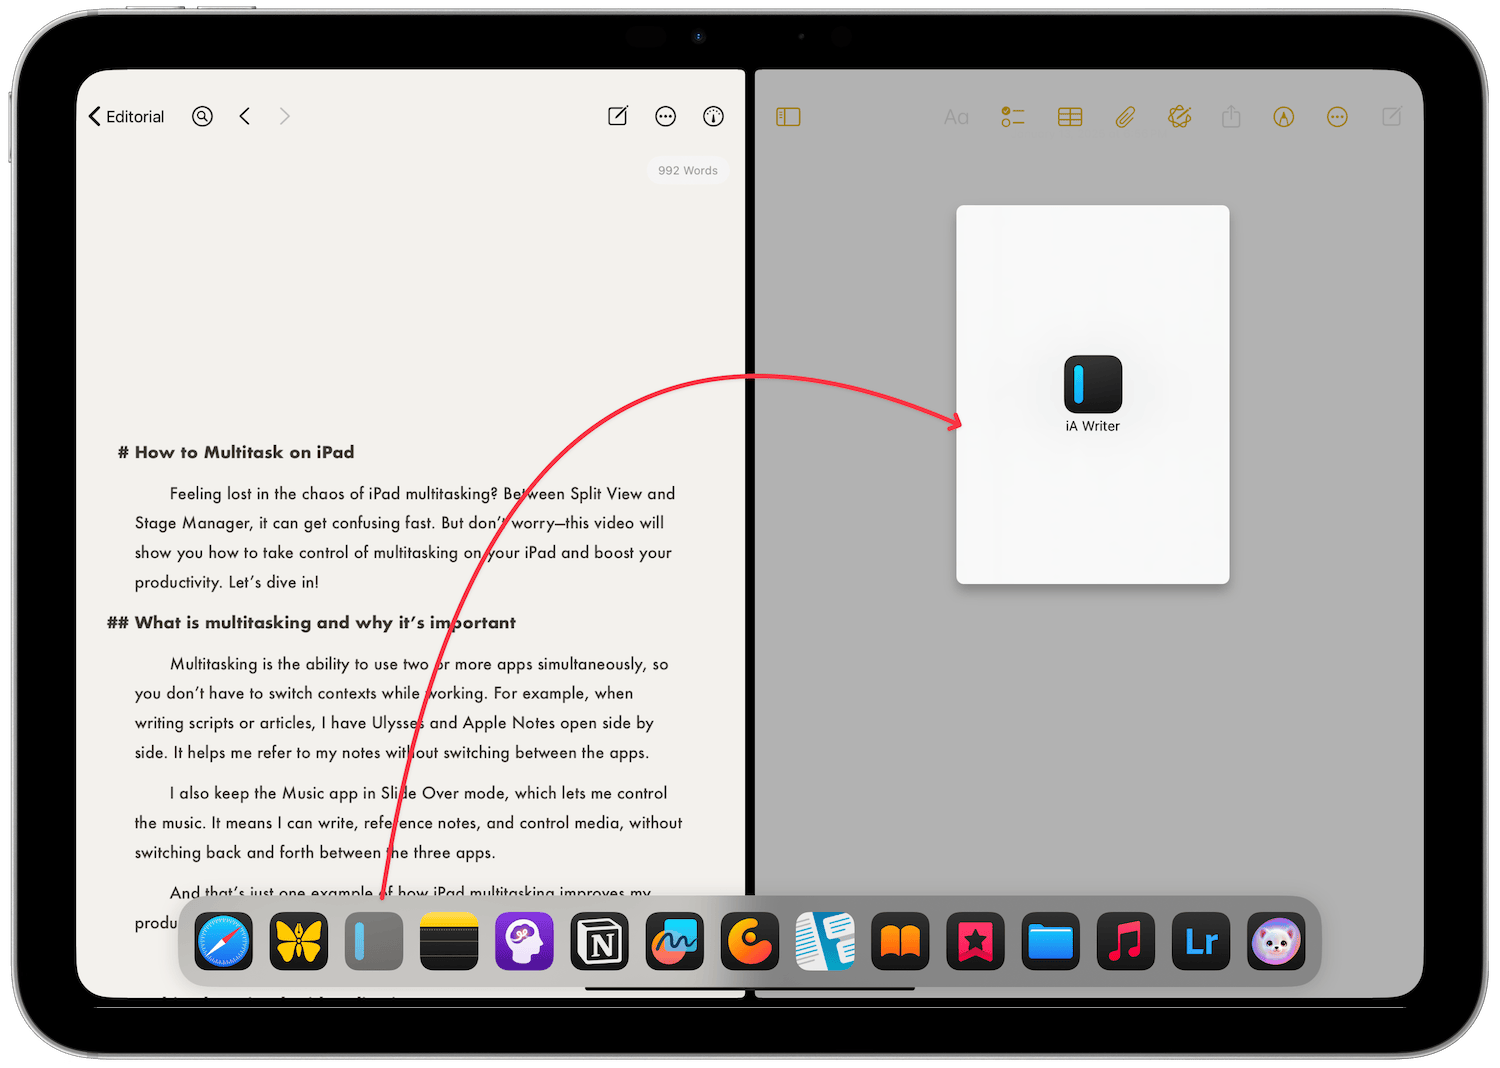
If you have two apps open side by side in split screen mode and you want to change one of the apps, you can do that with drag and drop gesture. Bring up the Dock or use Spotlight to search for the app and drag and drop it on the app you want to replace.
You can also open two windows of the same app side by side if the app supports multiple windows in iPadOS, which by now, most of the apps do. It works the same way as it does with different apps. This is helpful if you keep the reference notes in the same app.
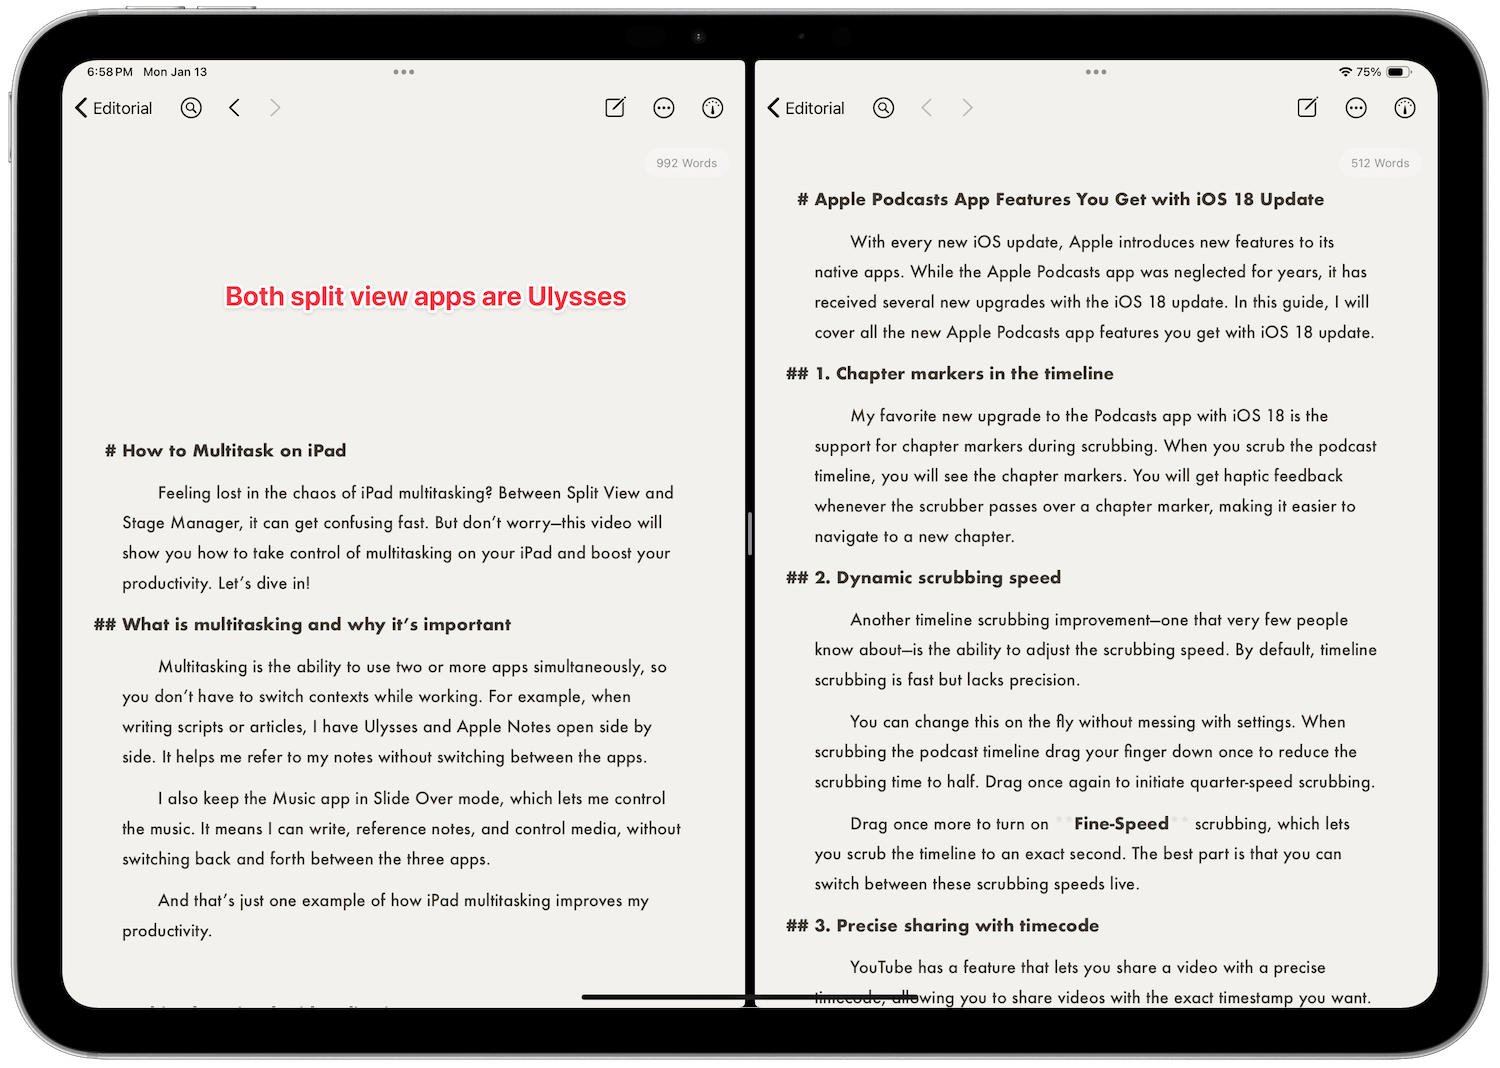
If you swipe up to go home while working in Split View, iPadOS intelligently retains your app pairs. You can access it from the recent app menu. Swipe up and hold from the bottom to open the app switcher or recent app view and you will see all your split-screen pair apps here. You can tap on one to open it.
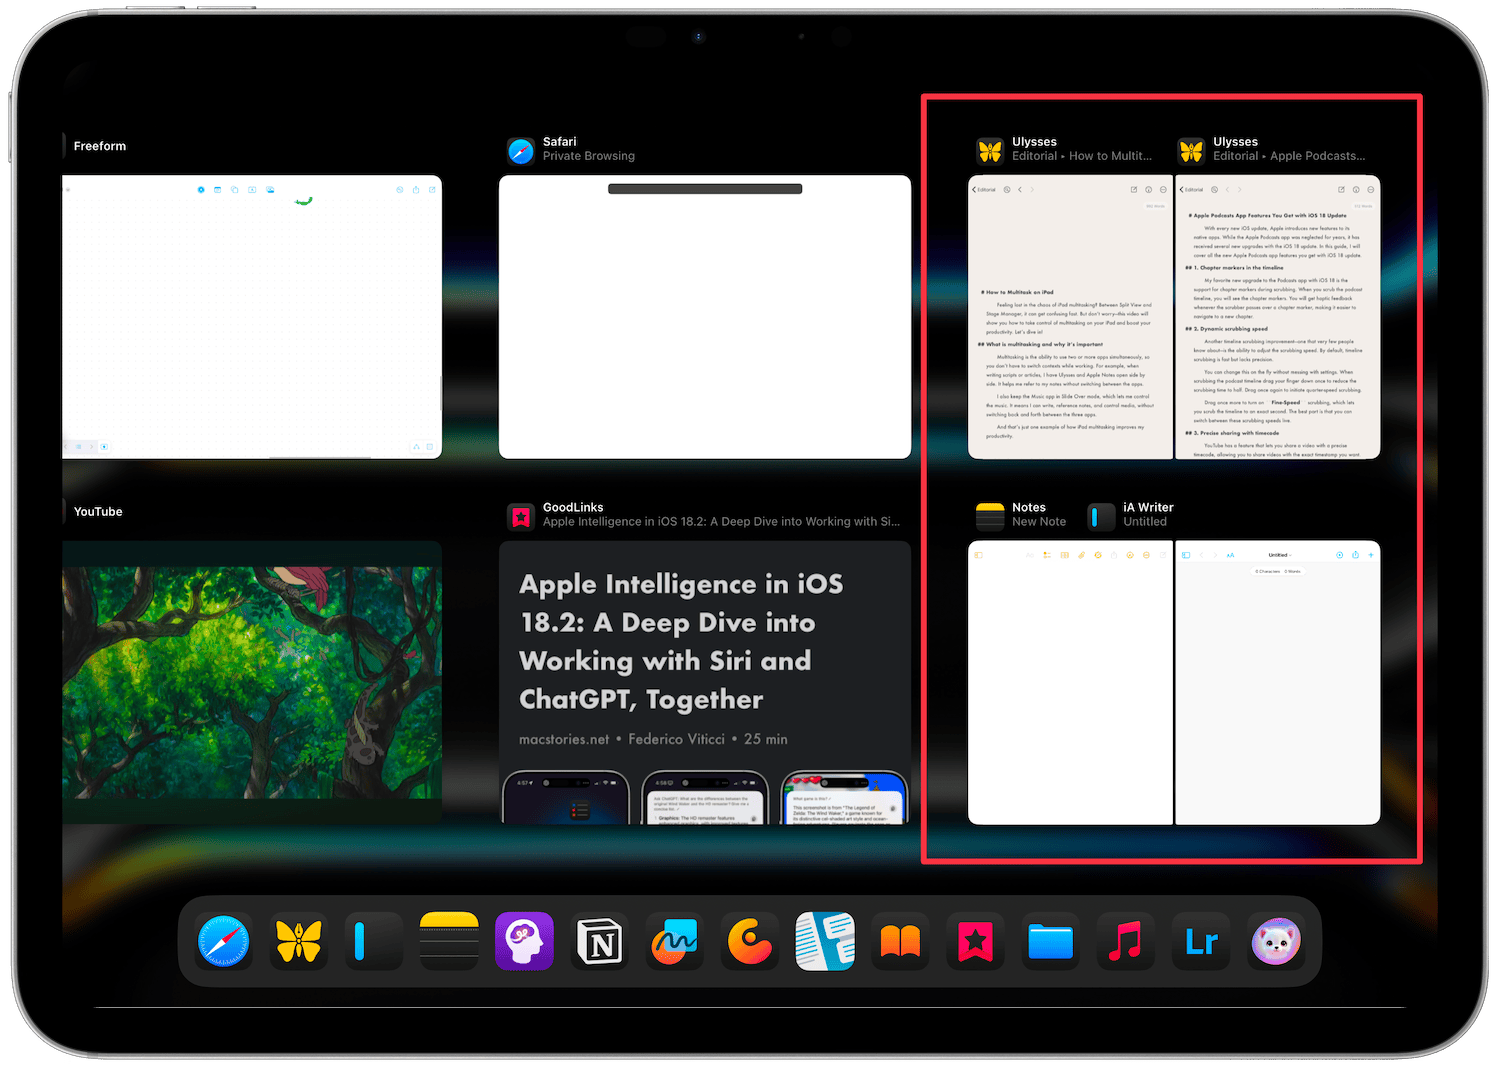
One final point to remember is that if an app is already in Spilt View and you create a new split-screen combination with another app, it will remove it from the first Split View. Very few apps like Apple Notes allow you to open multiple instances of the same app.
That’s why, I recommend creating only one Split View instance of an app, as most apps don’t support multiple Split View pairings. Even for those that do, the functionality can be hit-or-miss.
Enhance iPad multitasking with Slide Over
Slide Over is an iPad multitasking feature that allows you to open apps in Slide Over view that you can access by dragging from the edge of your iPad’s screen. Note that Slide Over apps are only available when an app is open on the iPad. You cannot access them from the Home Screen. Let me show you how this works.
Convert an app into Slide Over mode
There are two methods to open apps in Slide Over mode on the iPad. You can use the first method to turn the currently opened app into Slide Over view.
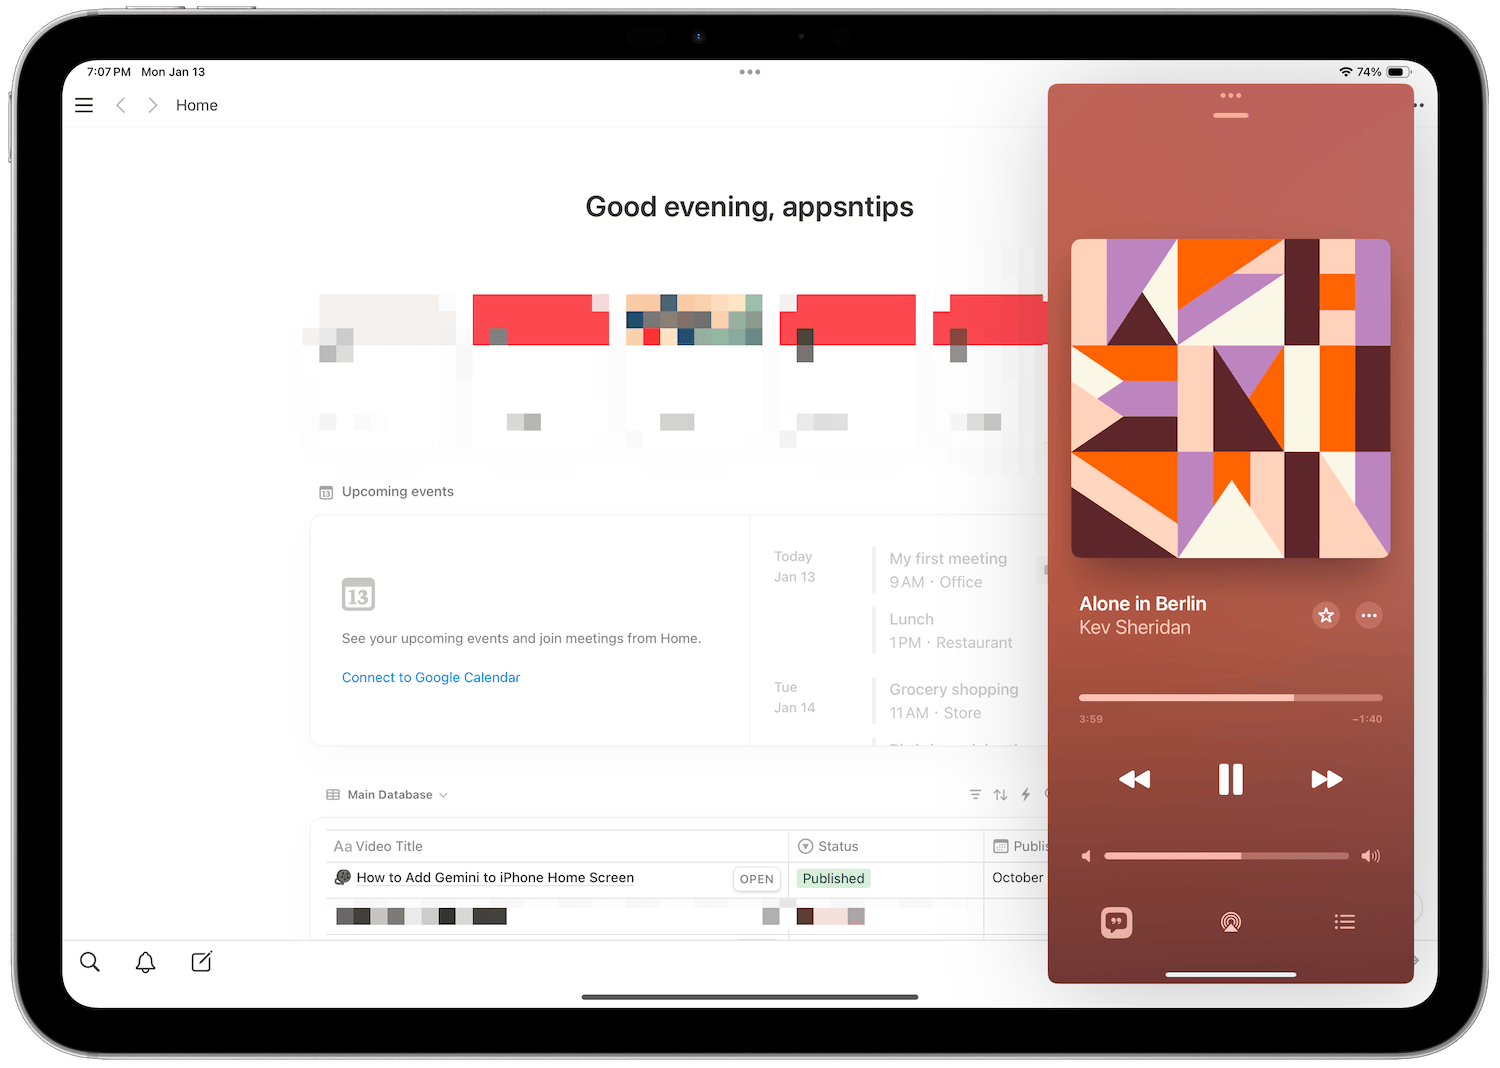
Let’s say I have Music open on the iPad. I have played the playlist I want and now want to keep it in the Slide Over Mode while I work inside Notion.
I will hit the three-dot menu and choose the Slide Over option.
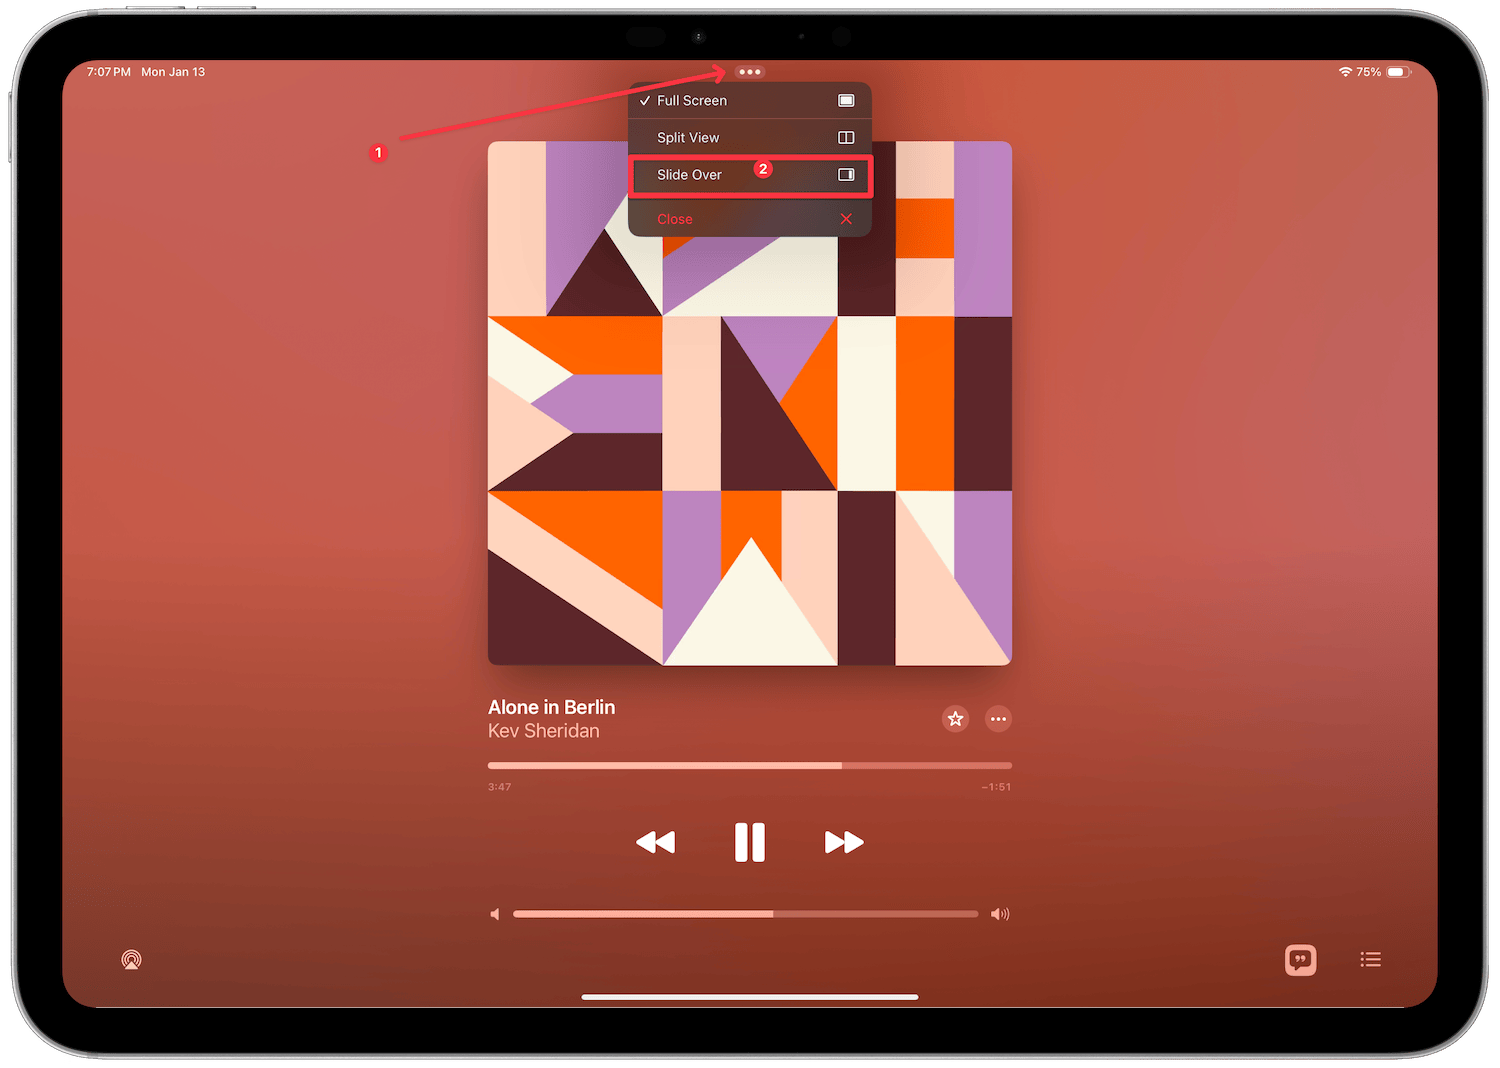
Now I will tap on Notion to open it in full view.
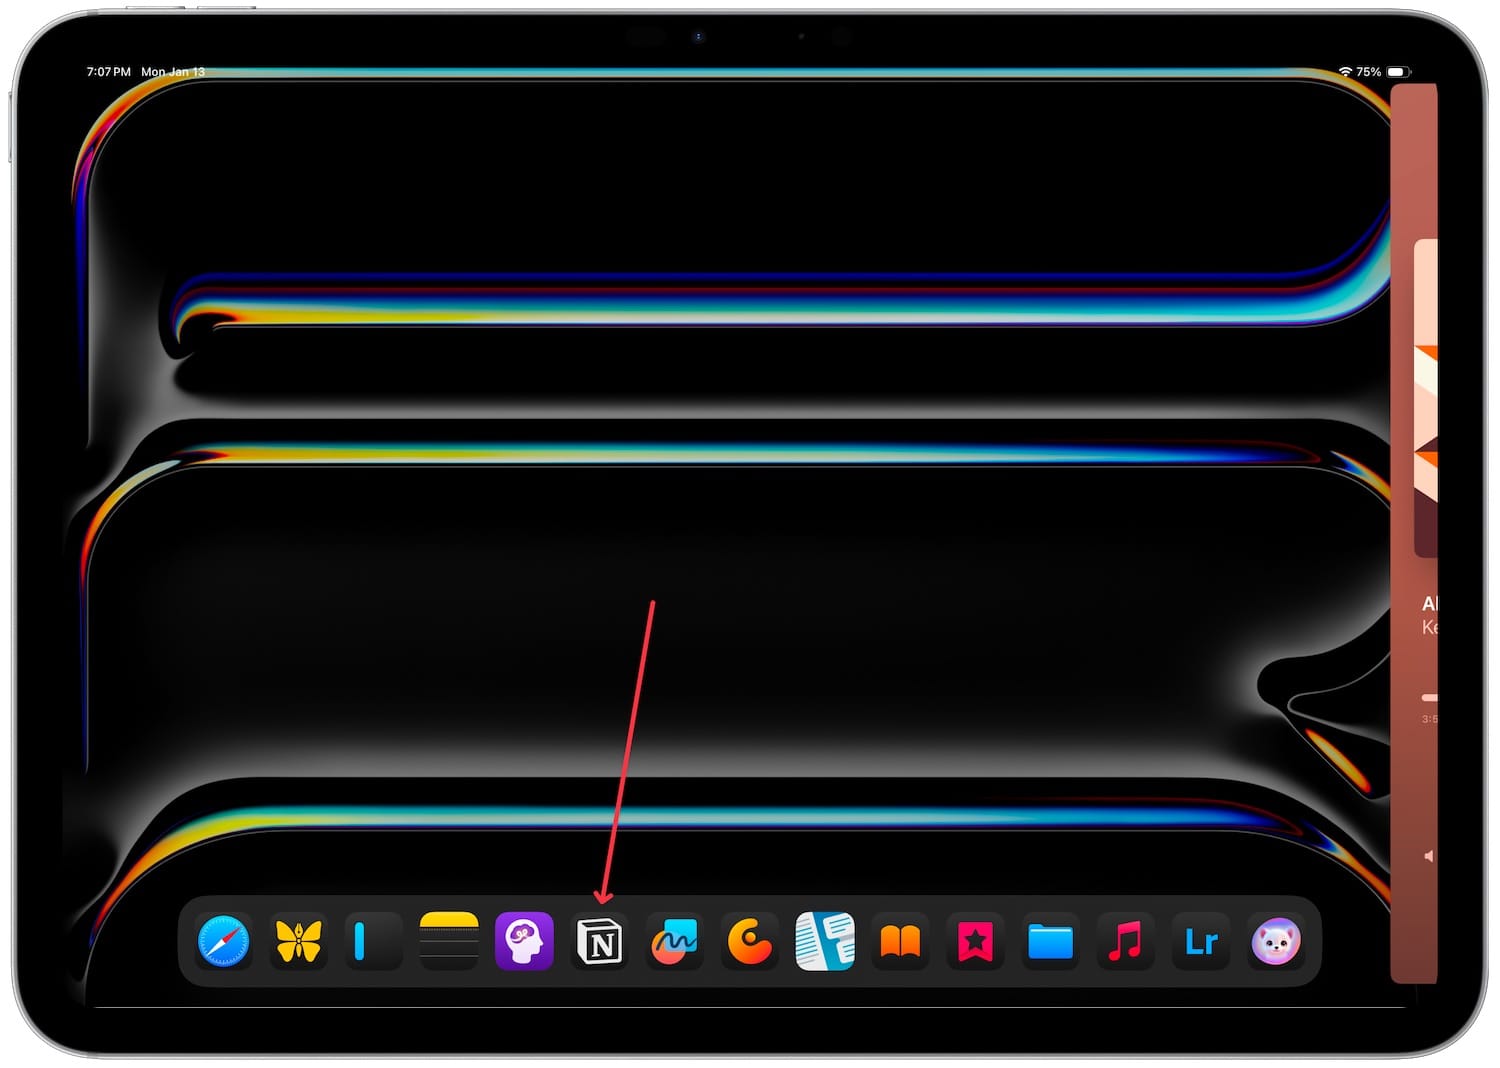
You can use this method to convert any open app into Slide Over mode if it supports it. Some apps still don’t support this iPhone-style view so they won’t work.
Add an app as Slide Over
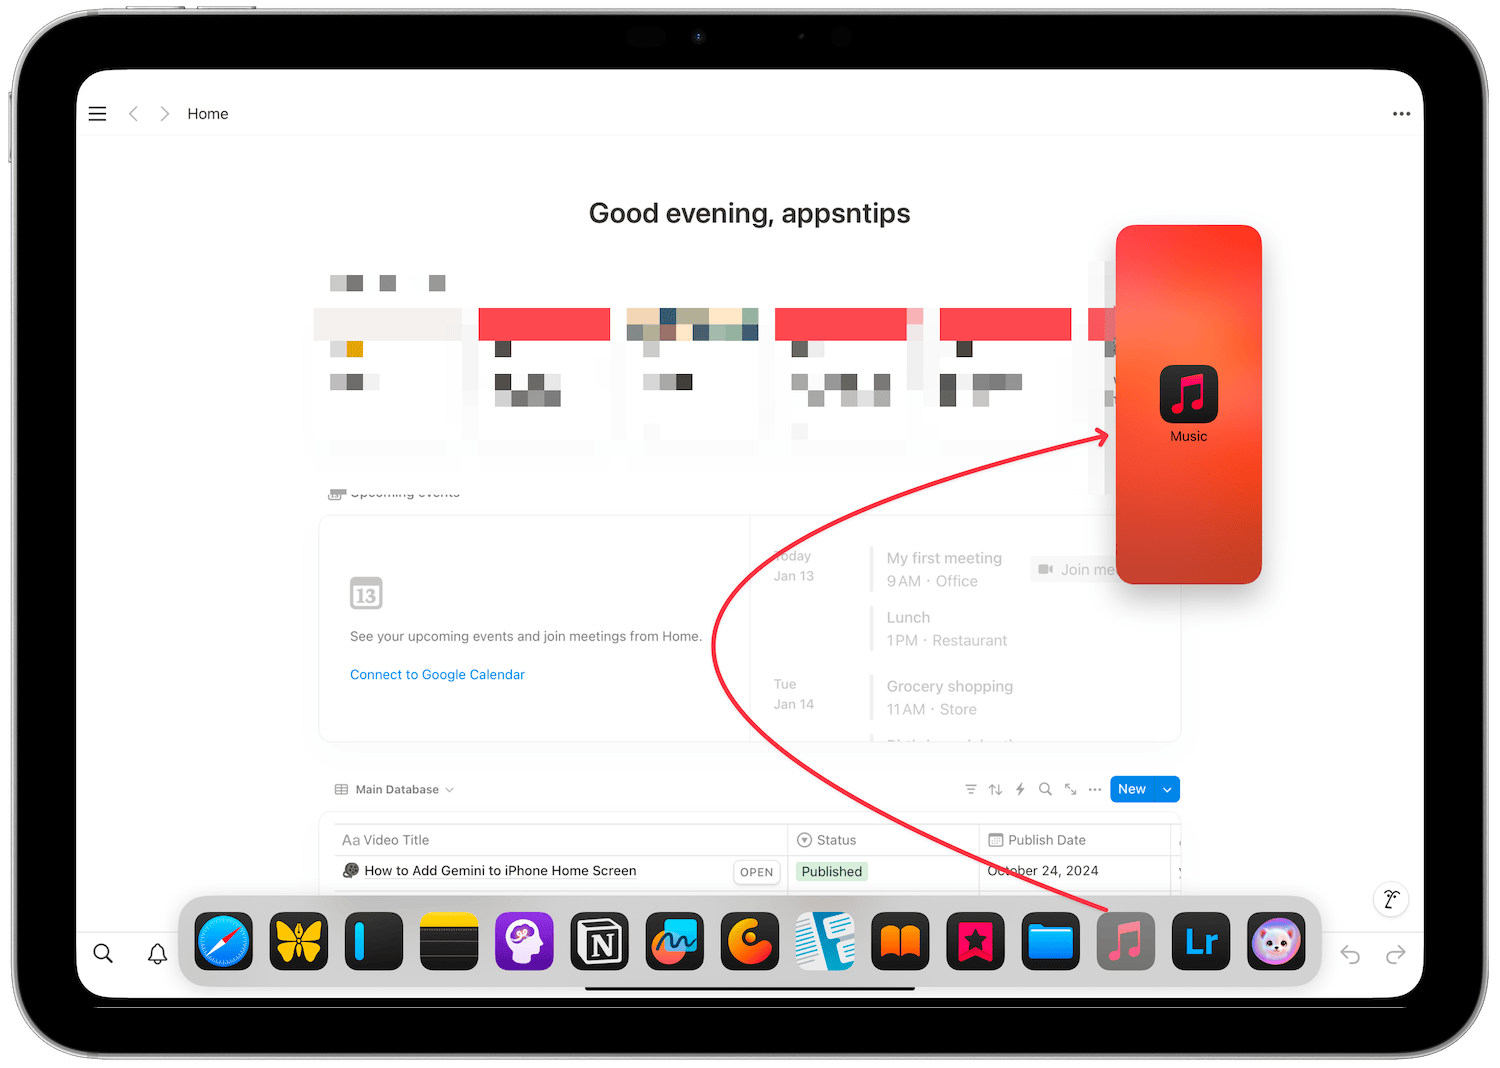
That’s the first way to open an app in Slide Over mode. The second method, which I suspect you will use most of the time, allows you to open an app in Slide Over view on top of an existing app.
I have Notion opened here and now want to add Music as a Slide Over app. I will slide my finger from the bottom to bring up the Dock and drag and drop the Music app to open it in Slide Over. Its’ that simple. Notice that I am not dragging the app to the edge of the display as that will give me the option to initiate Split View mode.
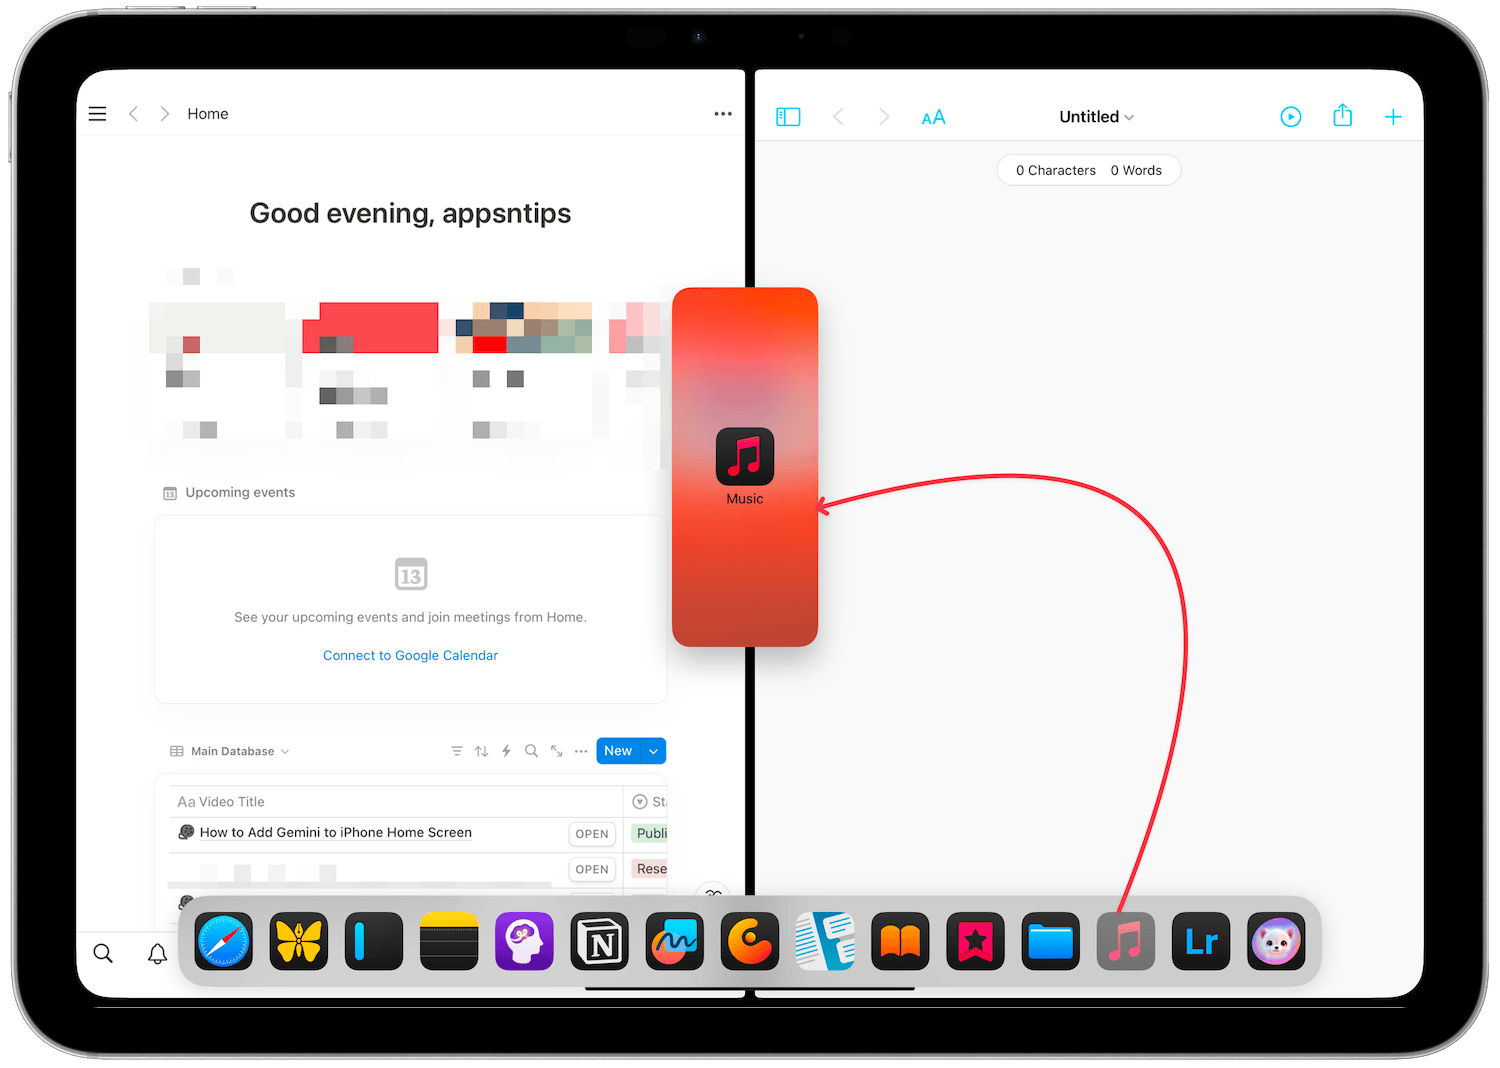
But what if I have two apps in Split View and want to add an app in Slide Over mode? Well, it works pretty much the same way. You drag and drop the app you want in the Slide Over. But instead of dropping it in the left or right which will replace the Split View apps, you will drop it right at the line separating the two apps.
Change between Slide Over and Split View
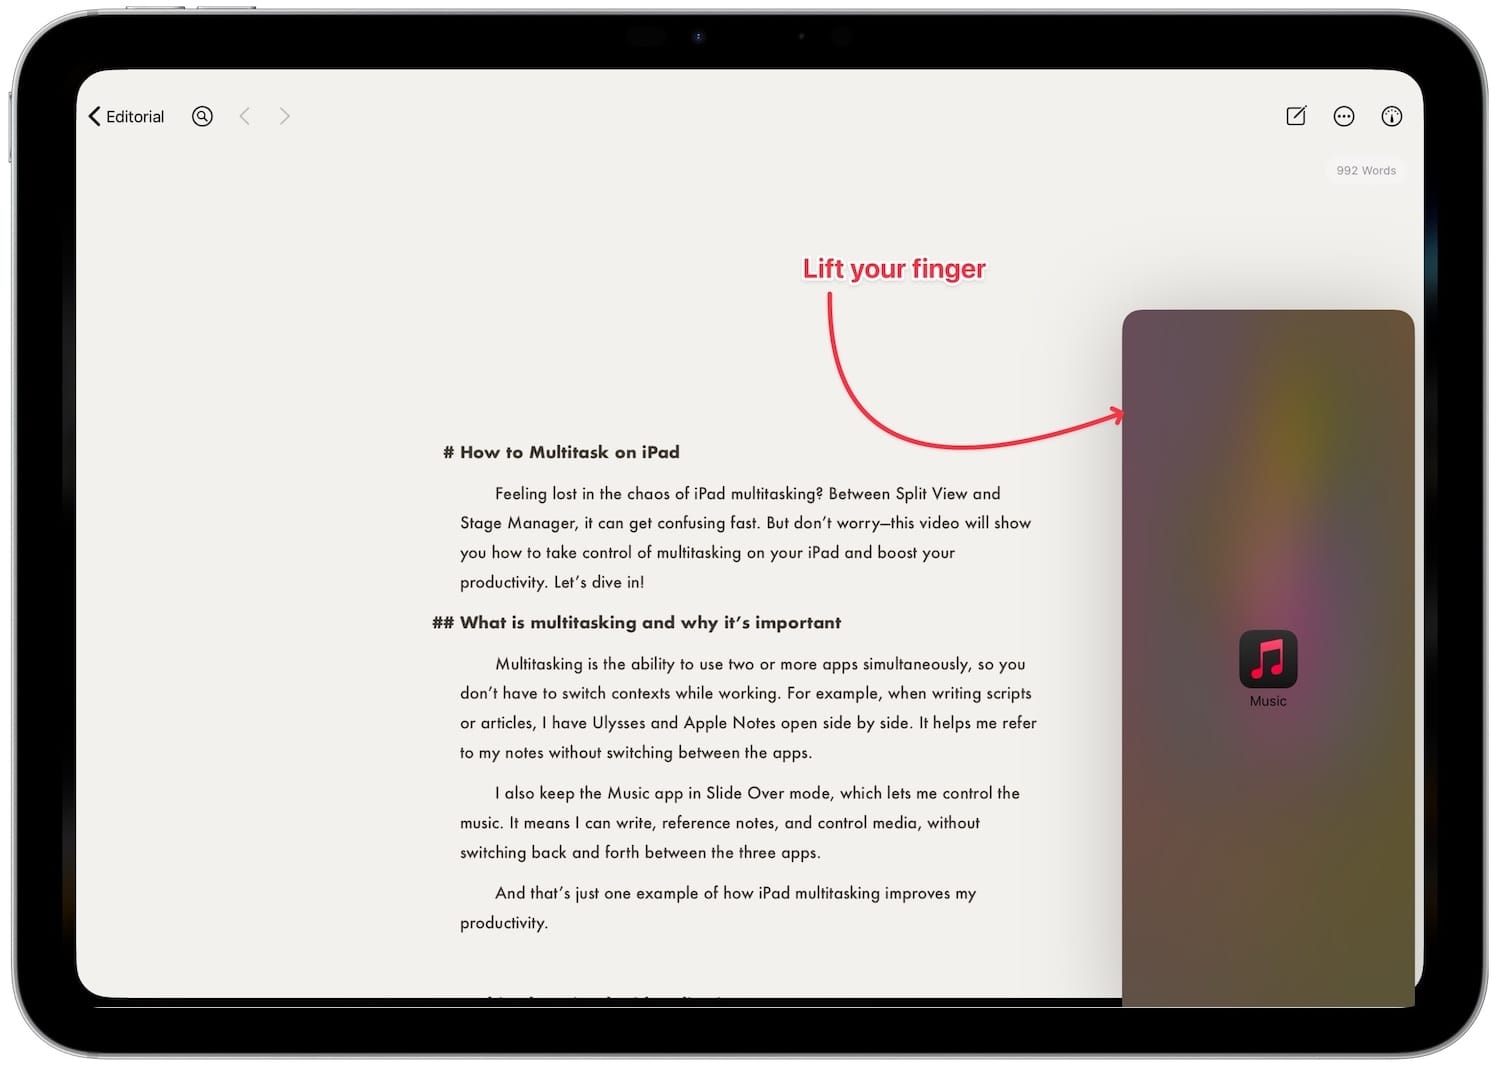
You can also switch between Slide Over and Split View modes using drag and drop gestures. If an app is in Slide Over you can hold and drag it from the three-dot menu until you see the Split View activation window.
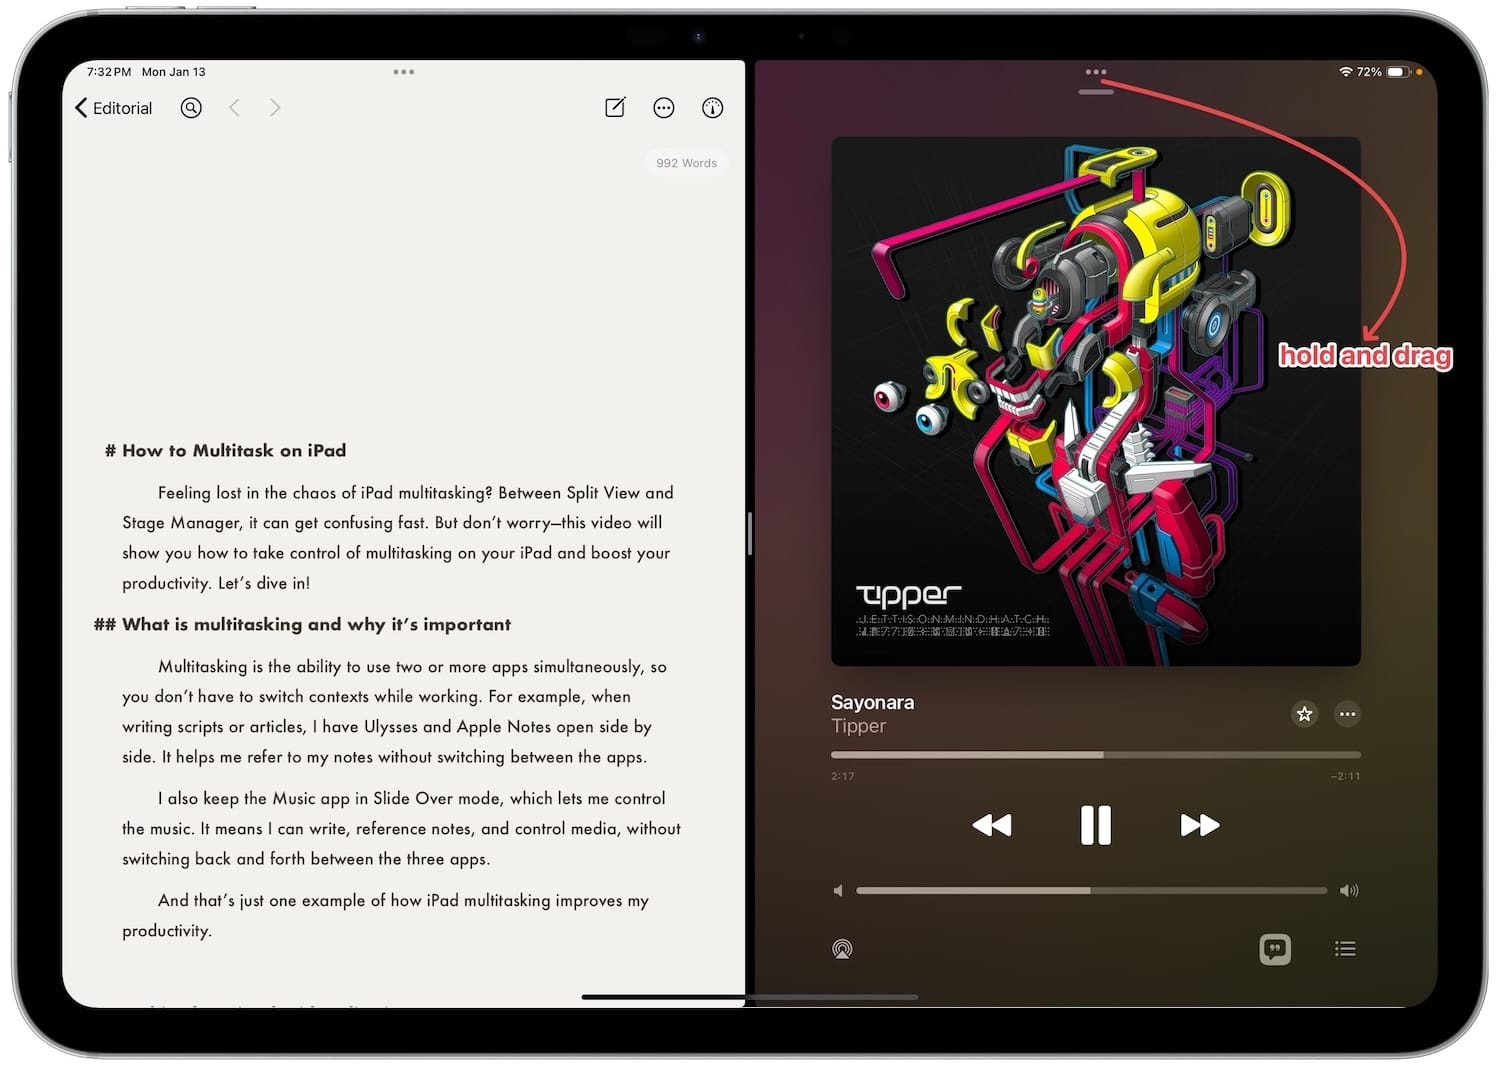
Now lift your finger to convert it into Split View mode.Similarly, you can drag a split-screen app and convert it to a Slide Over window by dragging and dropping it on top of the other app.
Add multiple apps to Slide Over
You can use the same steps to add multiple apps to Slide Over. With an app open in Slide Over mode, you can drag and drop another app on top of it or on the split screen parting line to add it to Slide Over.
Managing Slide Over apps
By default, the Slide Over apps move to the right side of the iPad. You can use the three-dot menu to flick them to the left side. I will bring them back to the right side as that feels more natural.
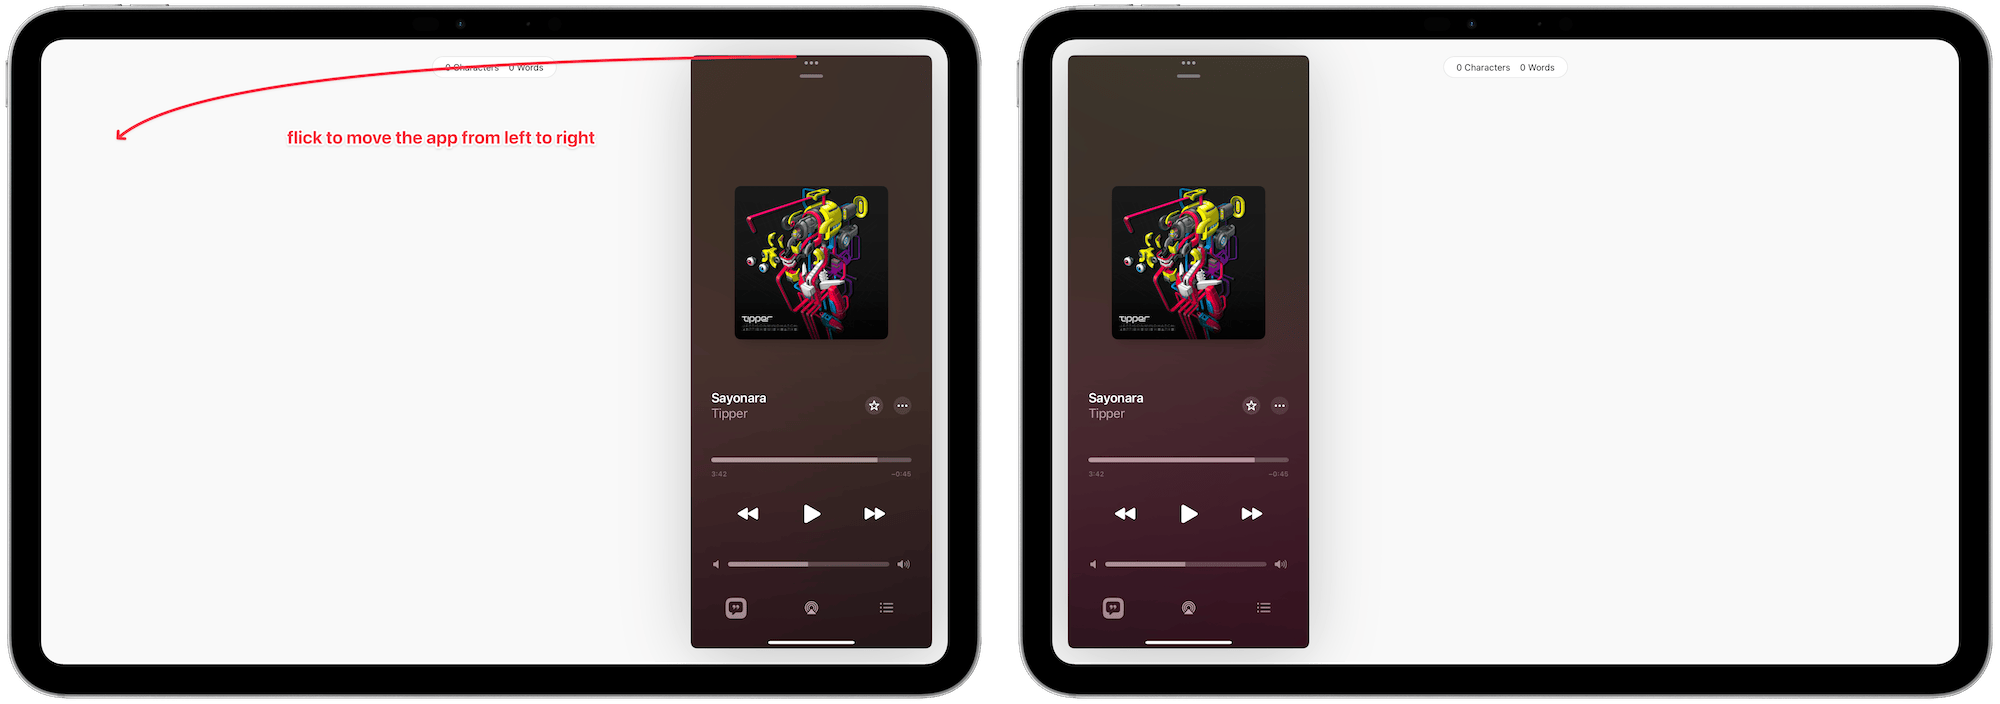
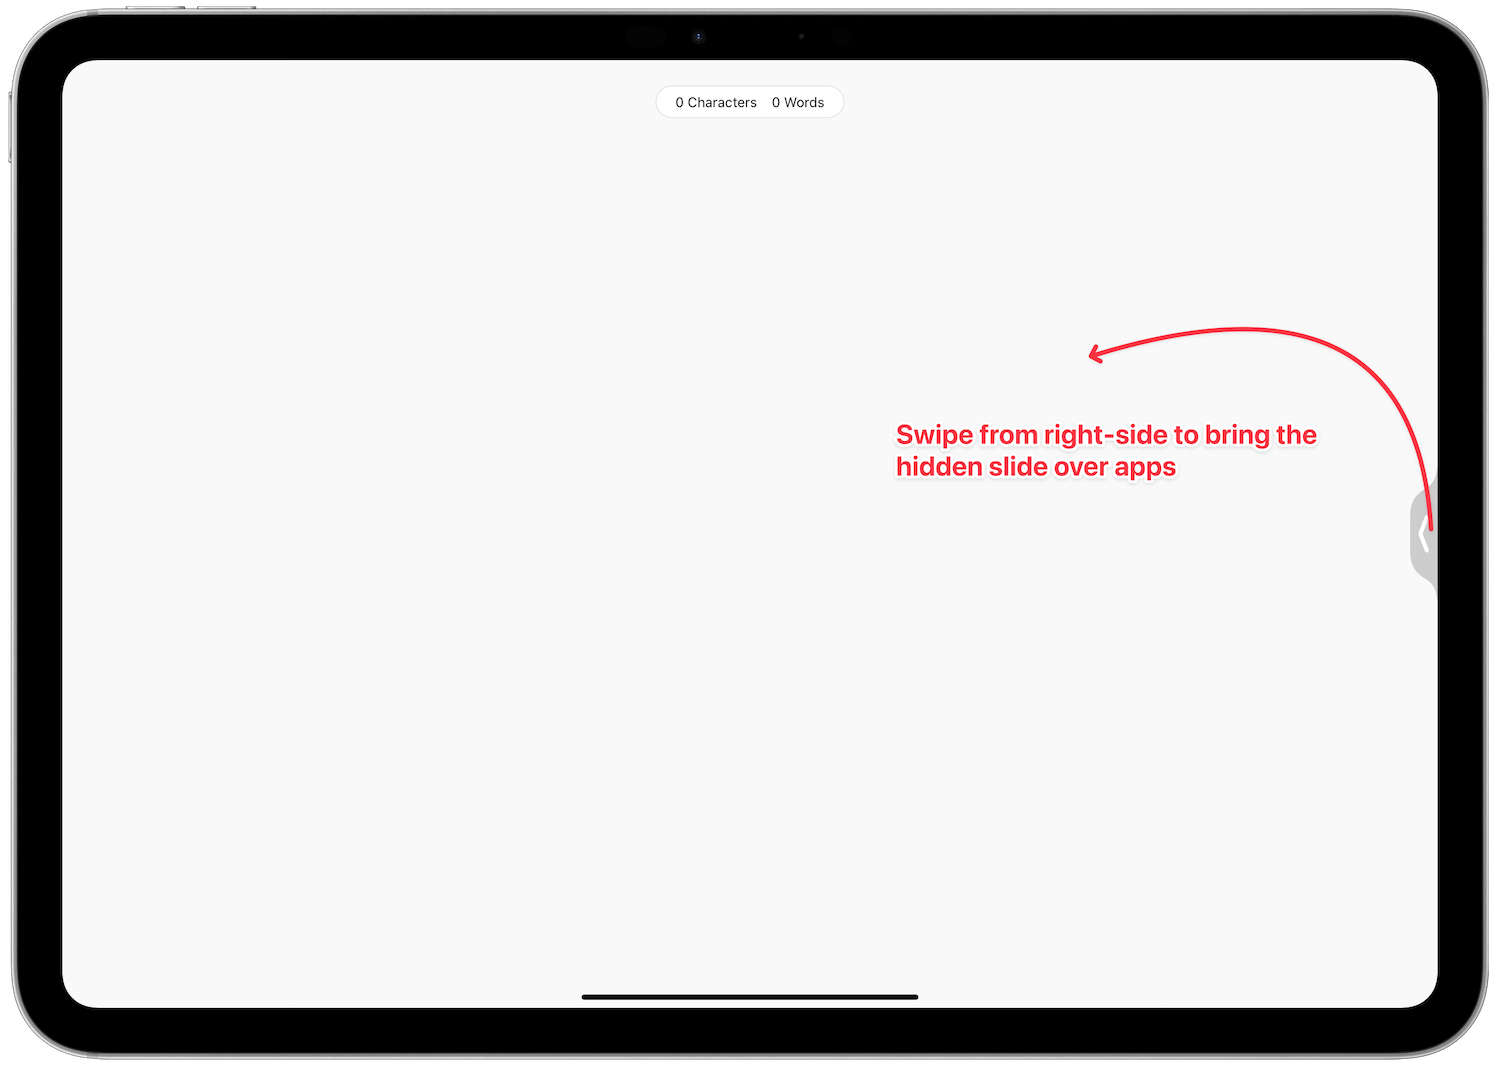
The benefit of Slide Over apps is that they get out of your way when not needed. You can dismiss Slide Over apps by swiping them from the top, or the edge, to whatever side they are on. You can bring them back by swiping back from the edge of the screen.
Another good thing about Slide Over apps is that they remain available even if you switch the main app. Slide Over apps behave like iPhone apps. So you can use the home bar at the bottom to swipe between these apps or swipe and hold to open a recents app menu. You can use this menu to switch between apps or swipe up to clear the app you no longer need.
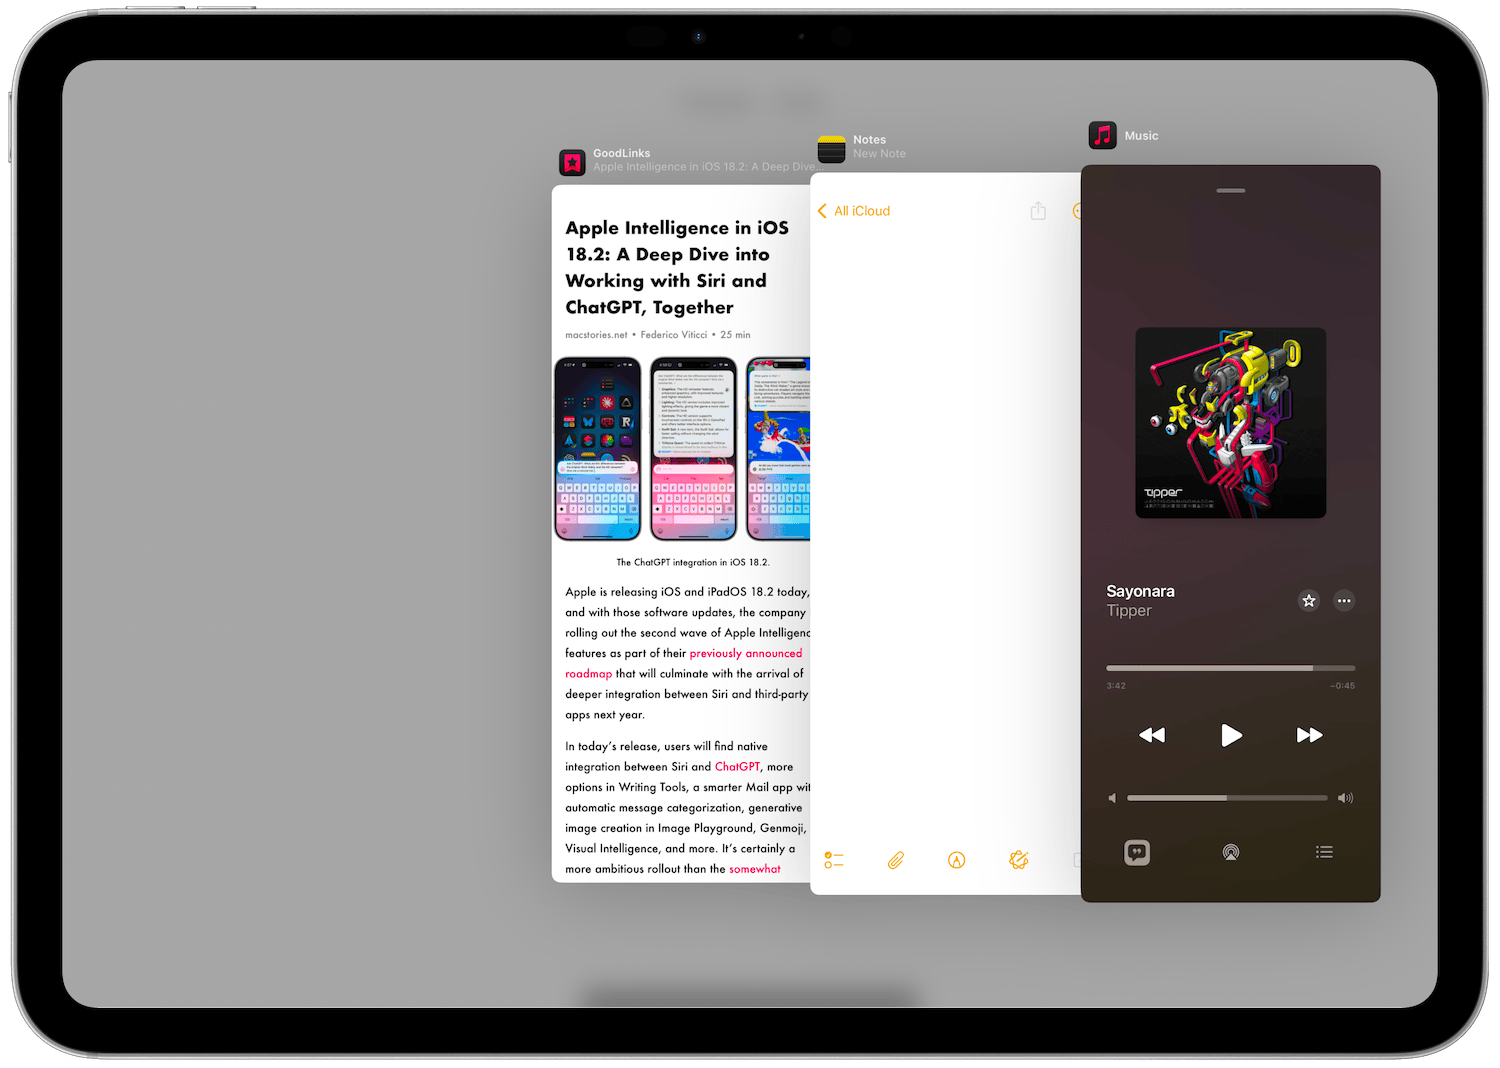
You can also access this Slide Over app switcher menu from the main recents app menu in iPadOS. It’s tucked to the side. Here you can swipe up on the Slide Over apps to clear them. If you tap on any of them, it will open the last app you used with all the Slide Over apps.
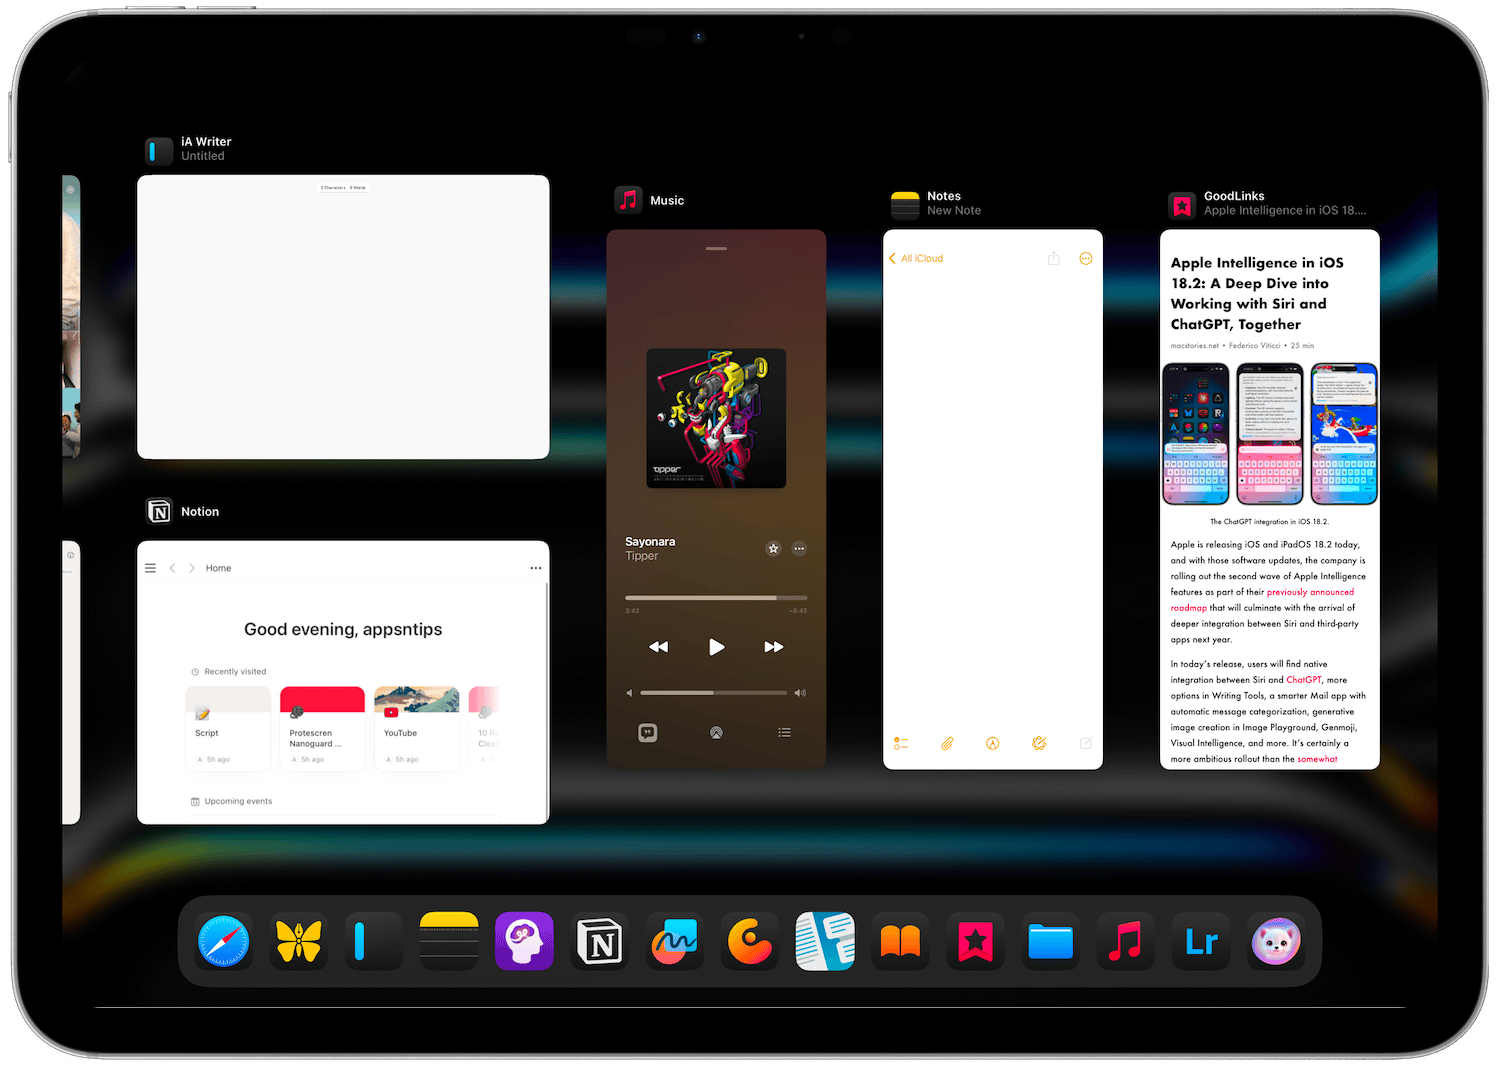
Remember, Slide Over apps cannot operate in a vacuum. At least one app should be open to access them.
Multitask on iPad with Stage Manager
If you have a 2018 iPad Pro or newer model or any of the iPad Air with Apple Silicon chipset, you gain another multitasking ability called Stage Manager. Stage Manager is a complex multitasking system on iPadOS and you should only use it when you use your iPad with a keyboard and mouse.
With that said, let’s see how the Stage Manager multi-tasking feature works on iPad.
How to enable Stage Manager on iPad
You can enable Stage Manage from the Control Center. The Stage Manager icon is the one with three dots followed by a square. If you don’t see its icon, you can add it by editing the Control Center.
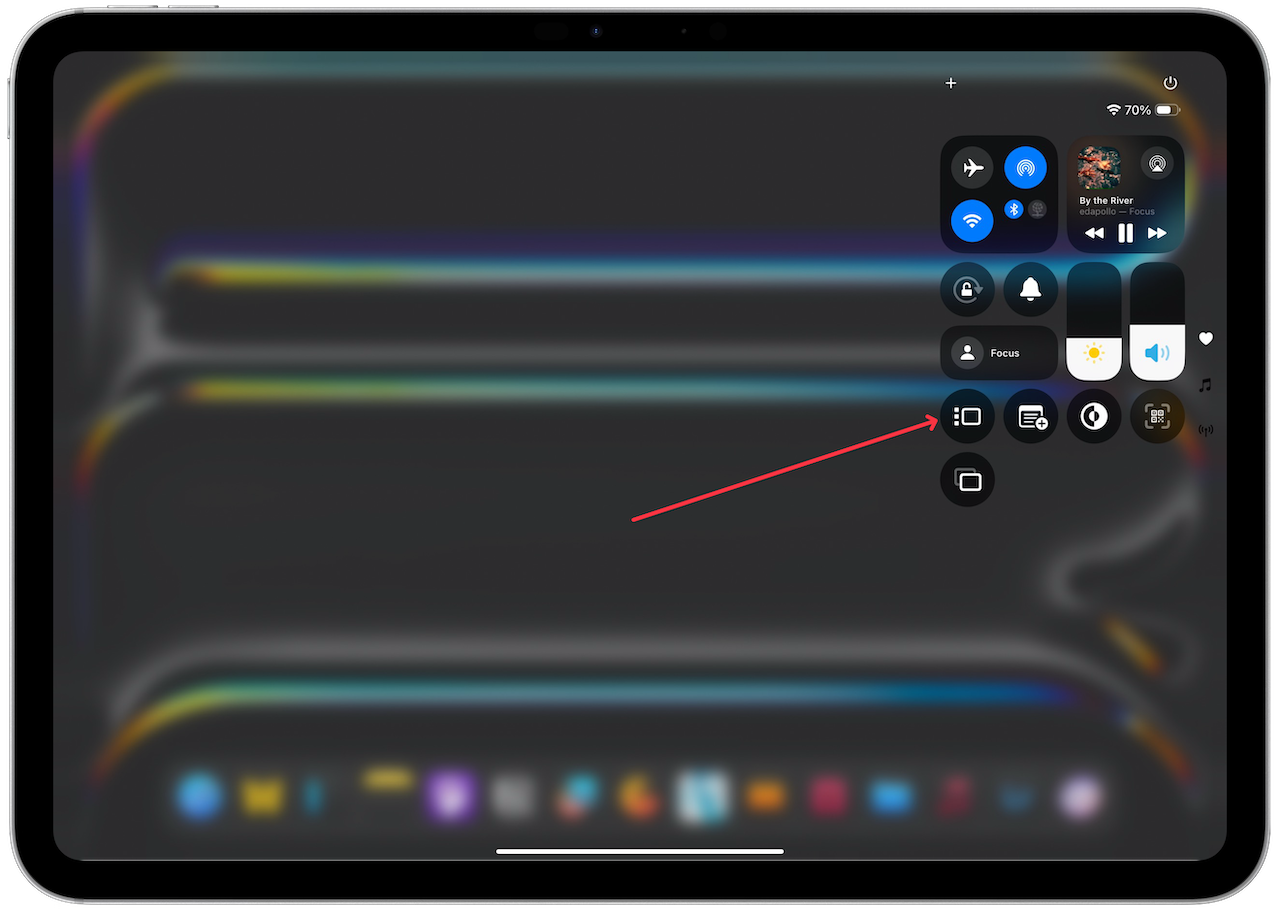
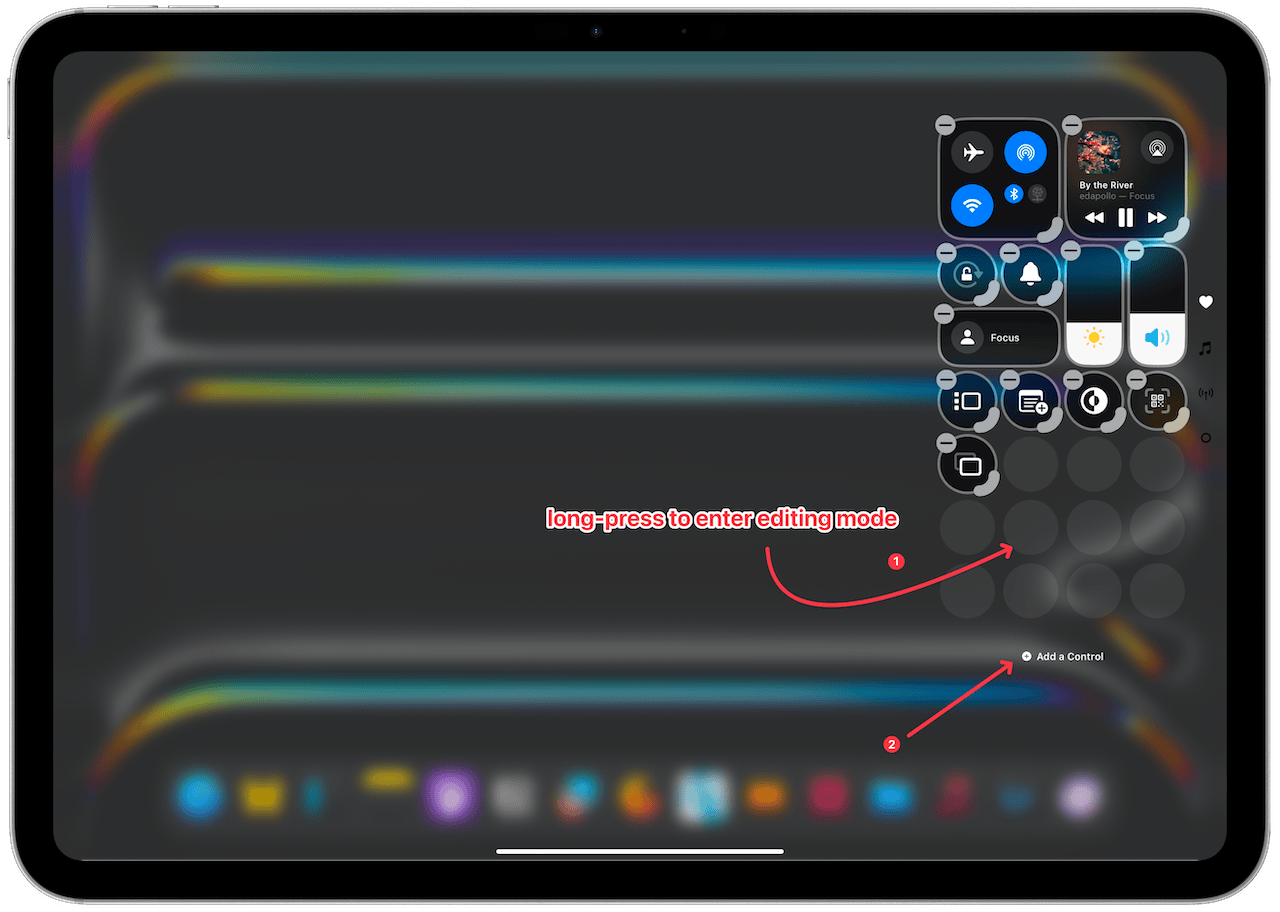
In iPadOS 18, Long-press anywhere in the Control Center and tap the Add a Control button.
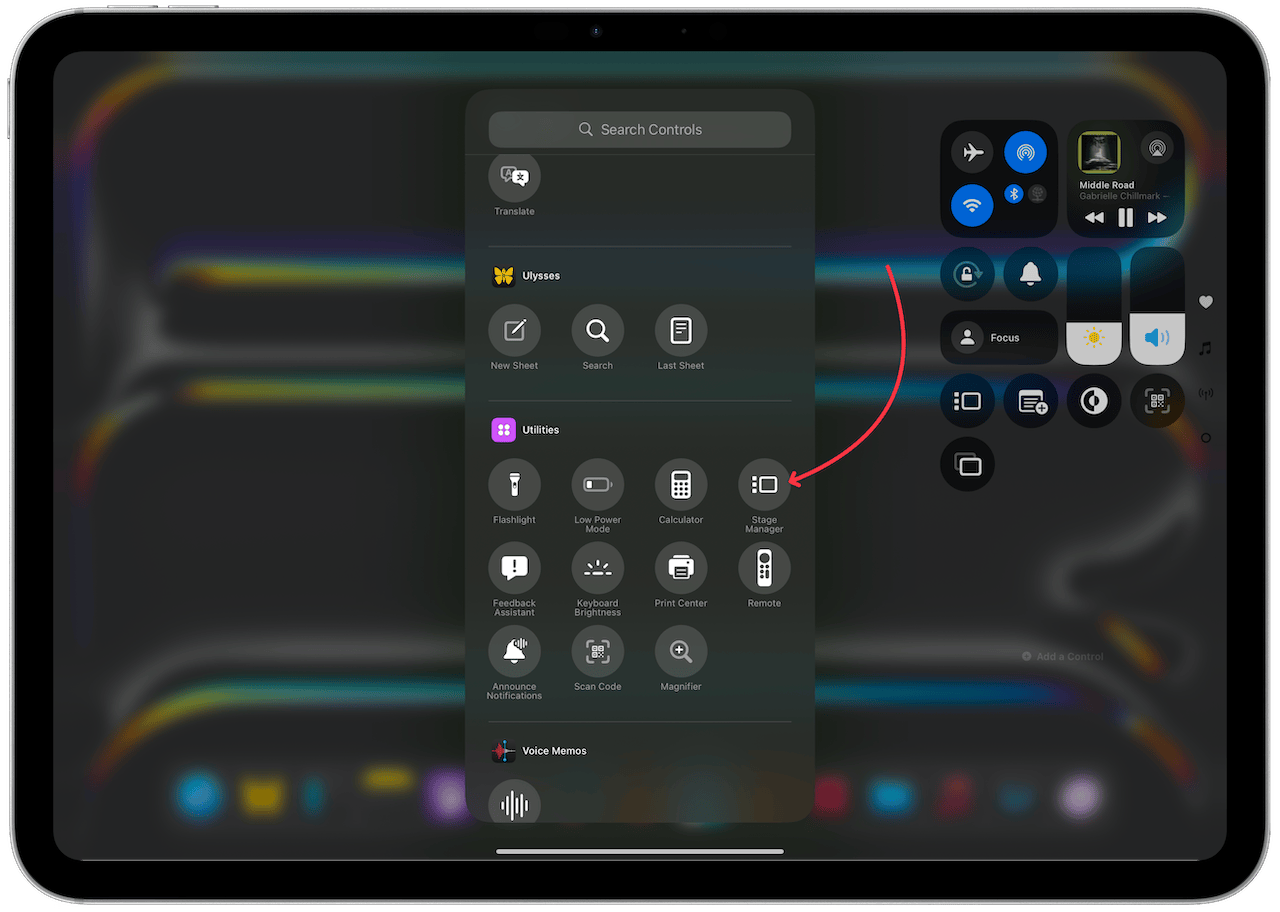
Search for Stage Manager and tap to add it to the Control Center.
If you have not updated to iPadOS 18, launch the Settings app and open the Control Center settings. Tap the green plus (+) button next to Stage Manager and it will add it to the Control Center.
While we are in the Control Center, let us configure some settings. Open the Multitasking & Gestures setting and tap on Stage Manager.
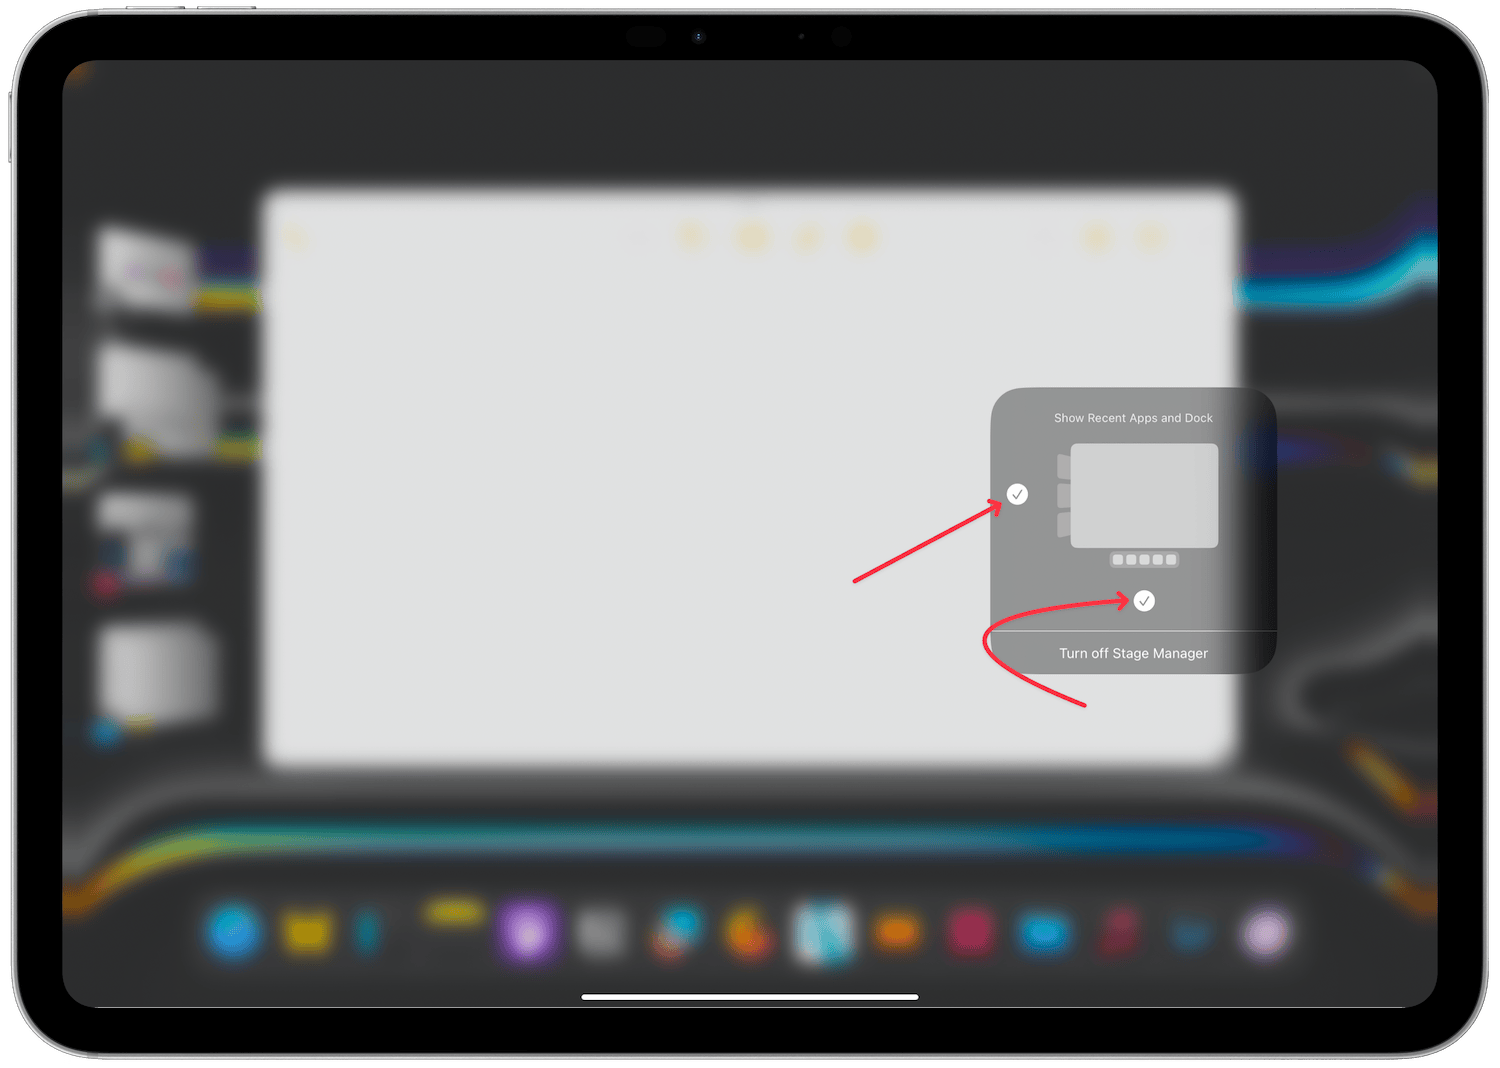
You will notice that when Stage Manager is in action, you can see your Dock and Recent Apps menu. I recommend turning off the toggles for these options to get a cleaner workspace. You can always bring them back with a swipe.
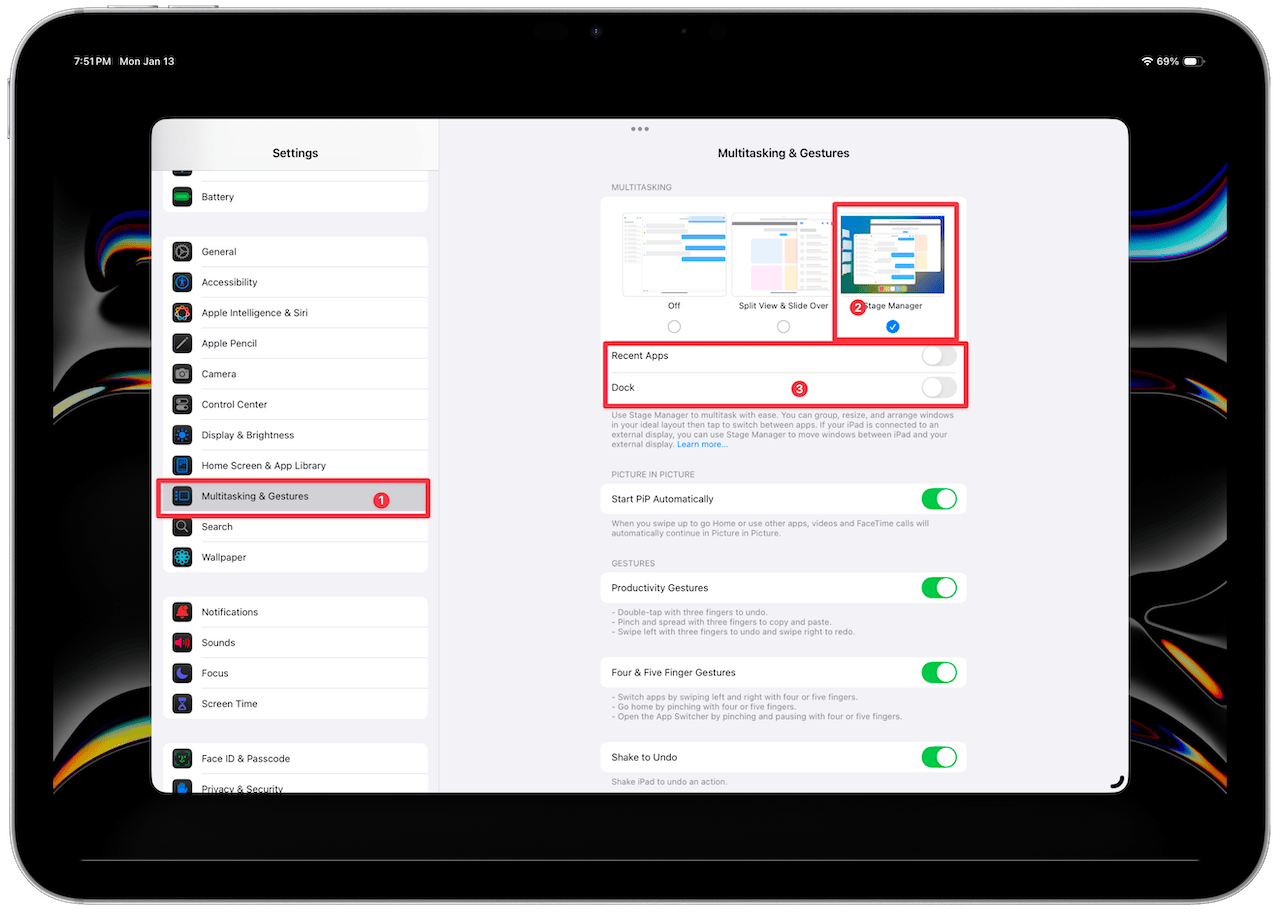
For now, I will keep them on to show the different features of Stage Manager.
How to Use Stage Manger on iPad
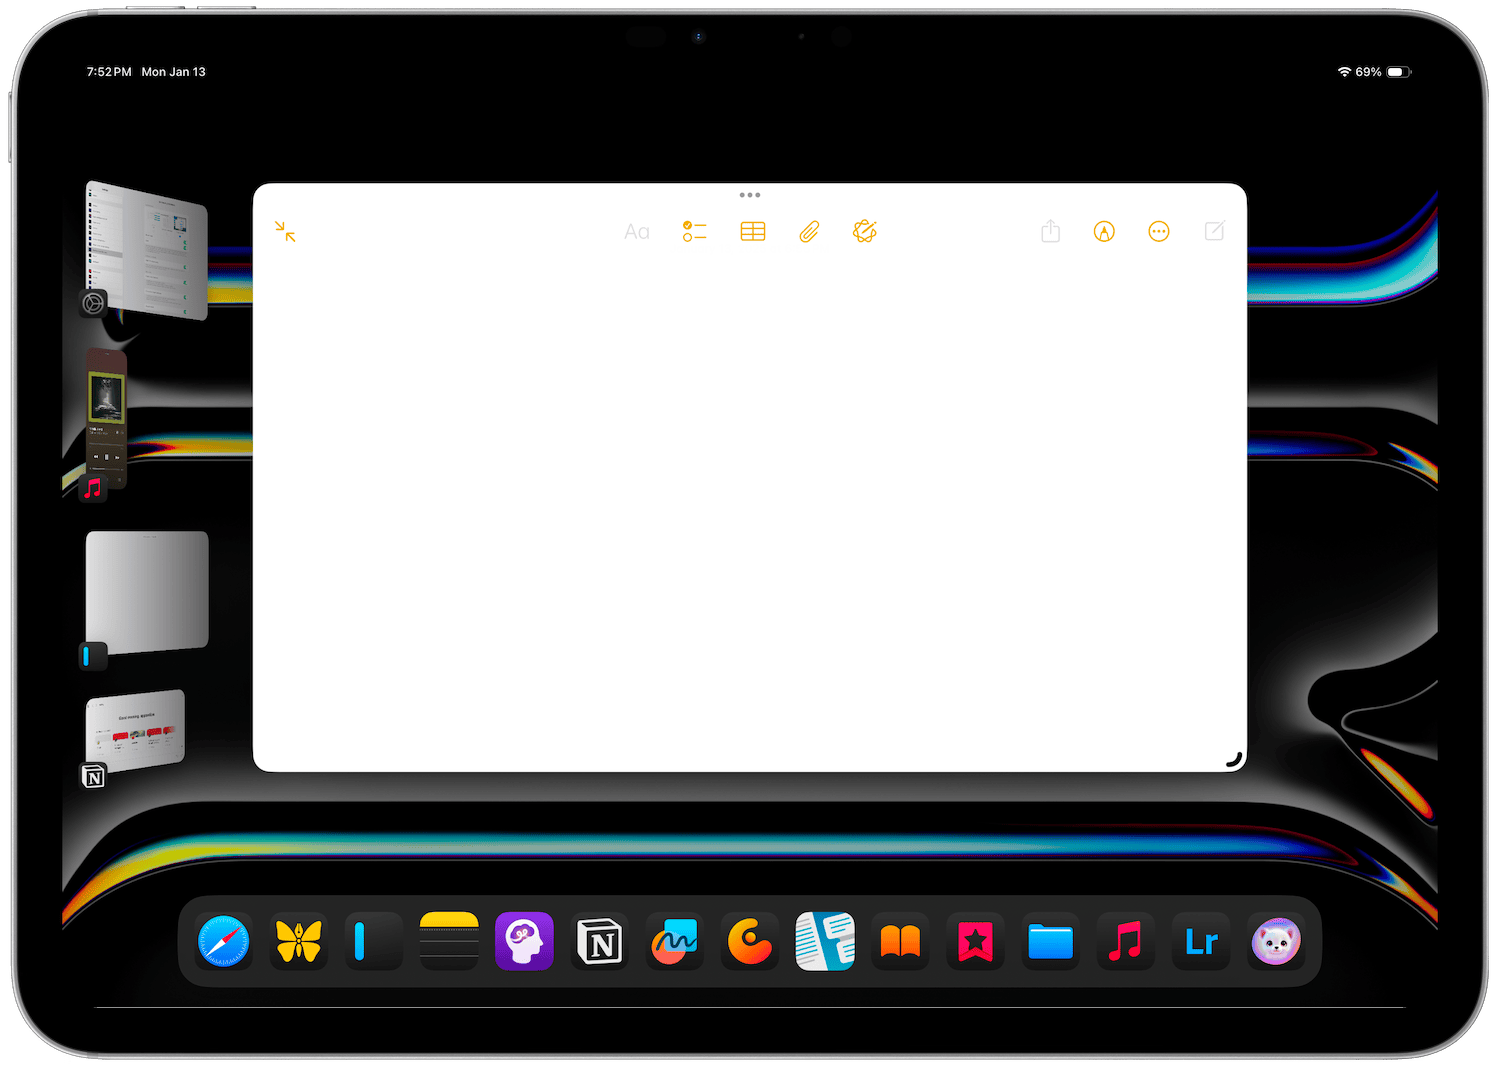
Let’s start with the basics. When you activate Stage Manager and launch an app, it will open in a window version, like on a Mac.
Notice that there’s a drag handle at the bottom-right corner of the app you have launched. You can tap & hold and drag it to rearrange the size of the app. You can resize most apps to any size, but some apps will resist this and allow you to only resize them to certain aspect ratios.
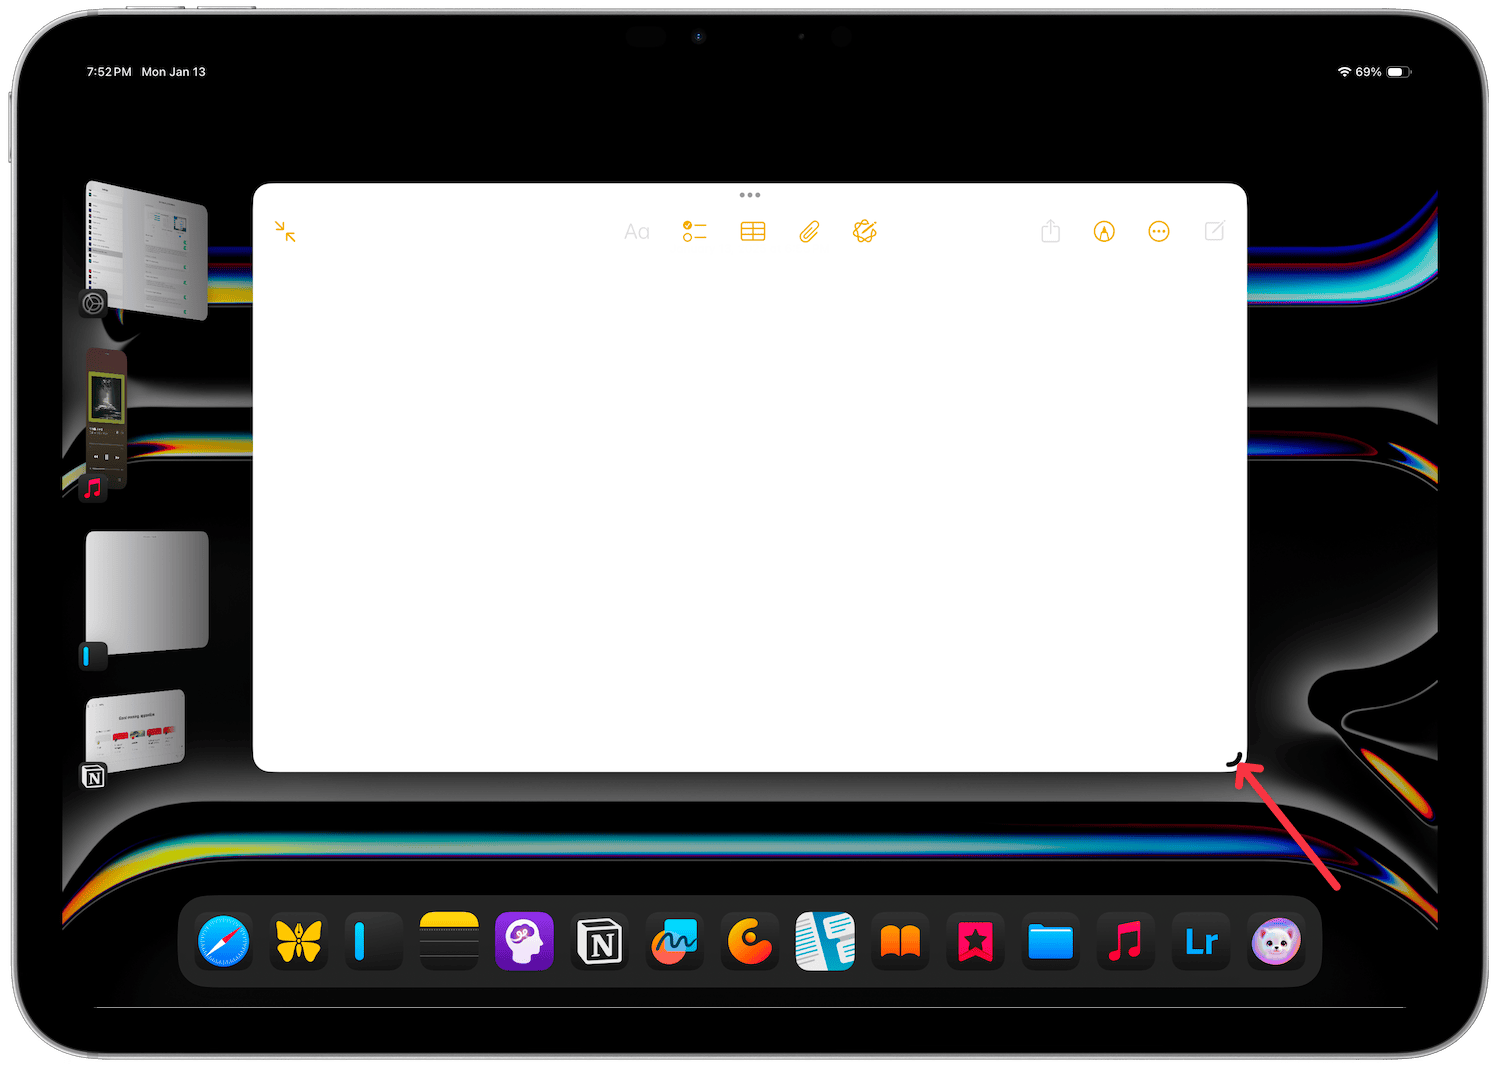
If you are using the Magic Keyboard or any Bluetooth mouse, you get more flexibility. You can grab the left or right side and drag to make the app window wider or grab the top or bottom edge to make the window taller. You can also click and drag any edge to resize the app window in any direction.
You can move an app window around and place it anywhere by dragging the top bar. You can do it with your fingers or trackpad.
Multiple Stages of Stage Manager
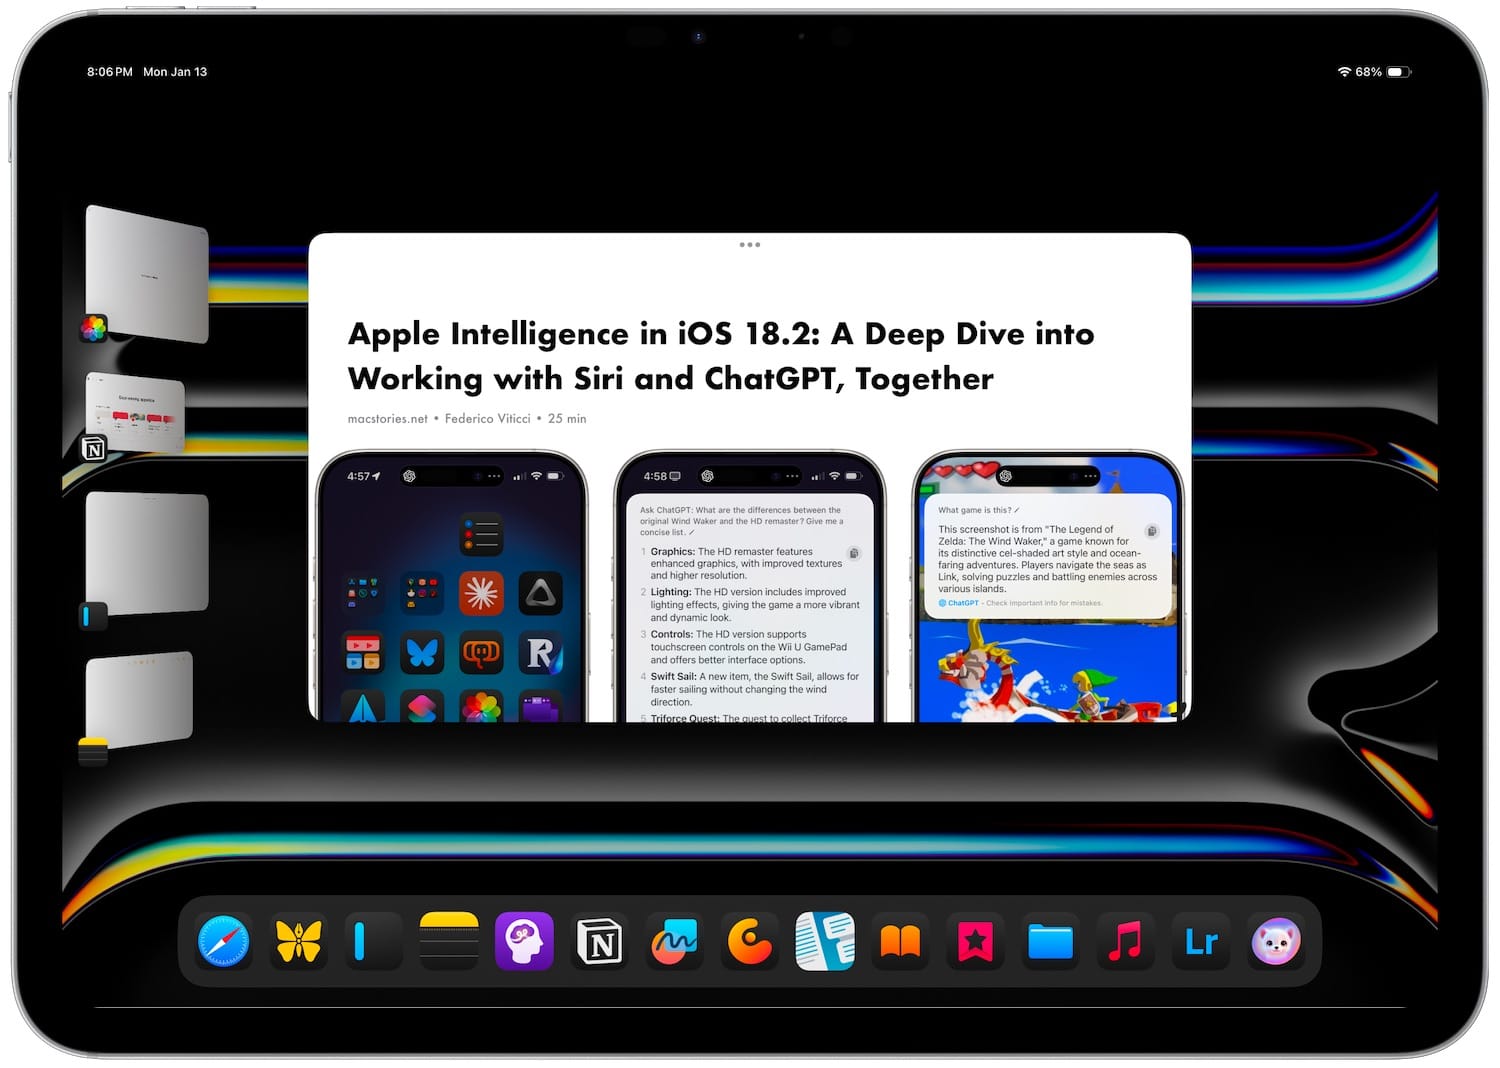
When you tap or click on an app to launch it, you will notice it replaces the current app and a new Recents App menu populates the left side of the screen with your last app.
That happens because you can create multiple Stages in Stage Manager. Think of a Stage as a collection of apps. Each stage can have four app windows open and iPadOS shows four Stages at once in the Recents app bar.
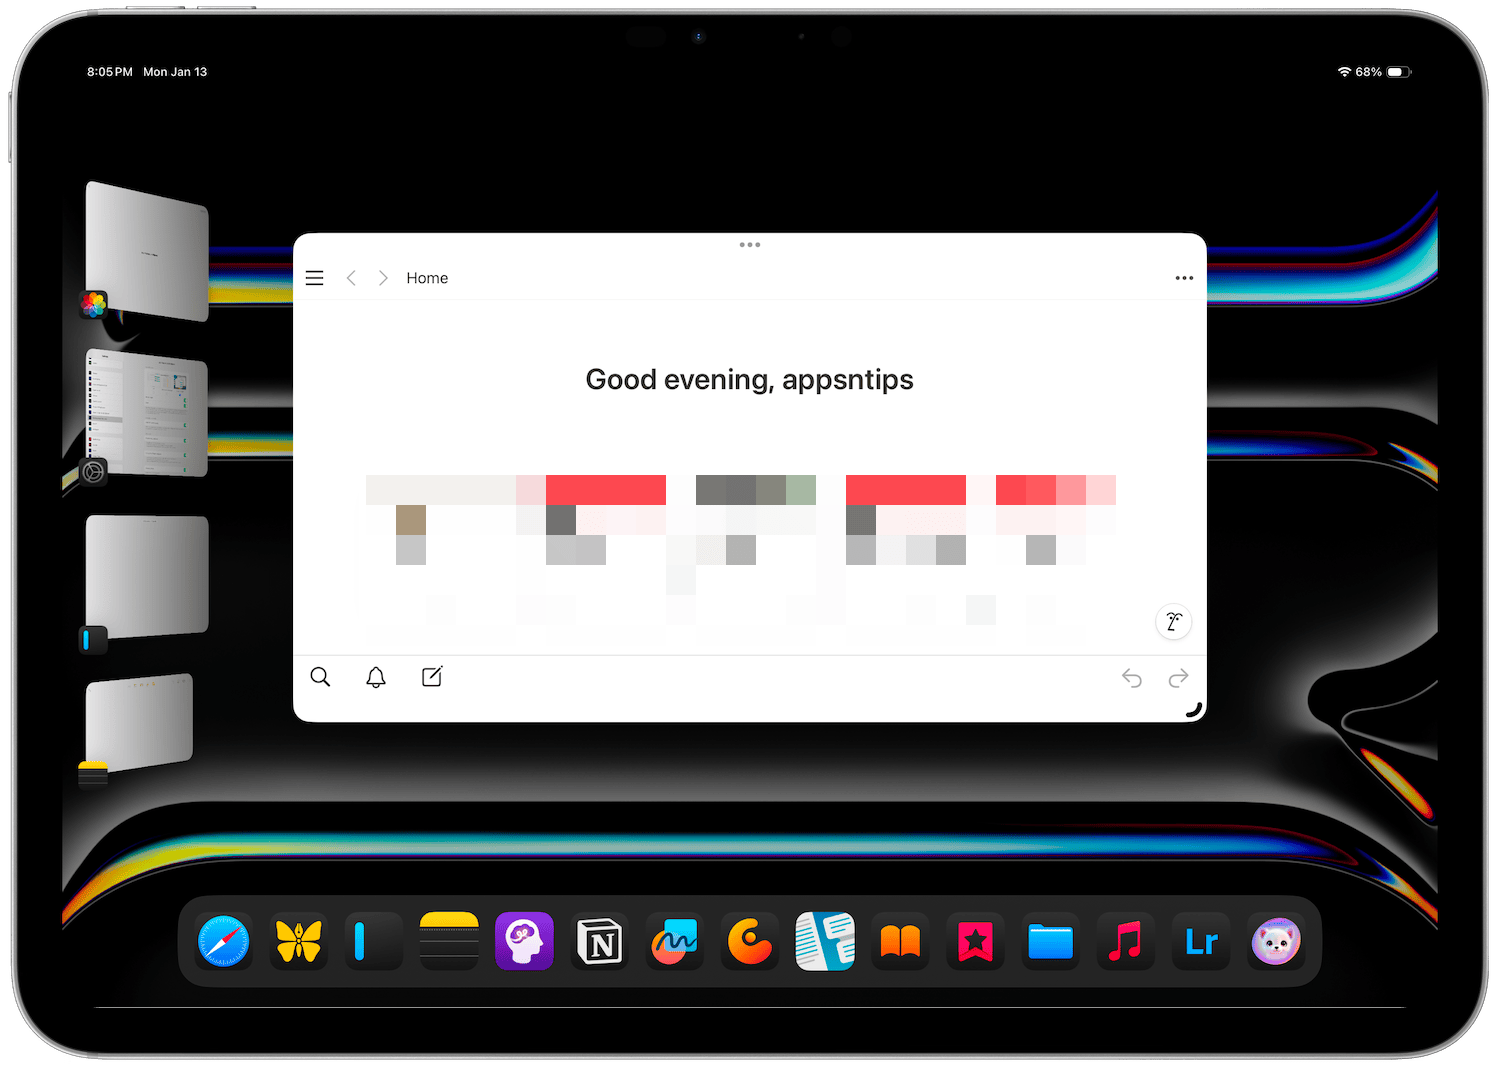
I launched five apps. The current app is in the center while the four other apps are in the recent app sidebar. If I launched a 6th app, you will notice that only four recent stages are visible.
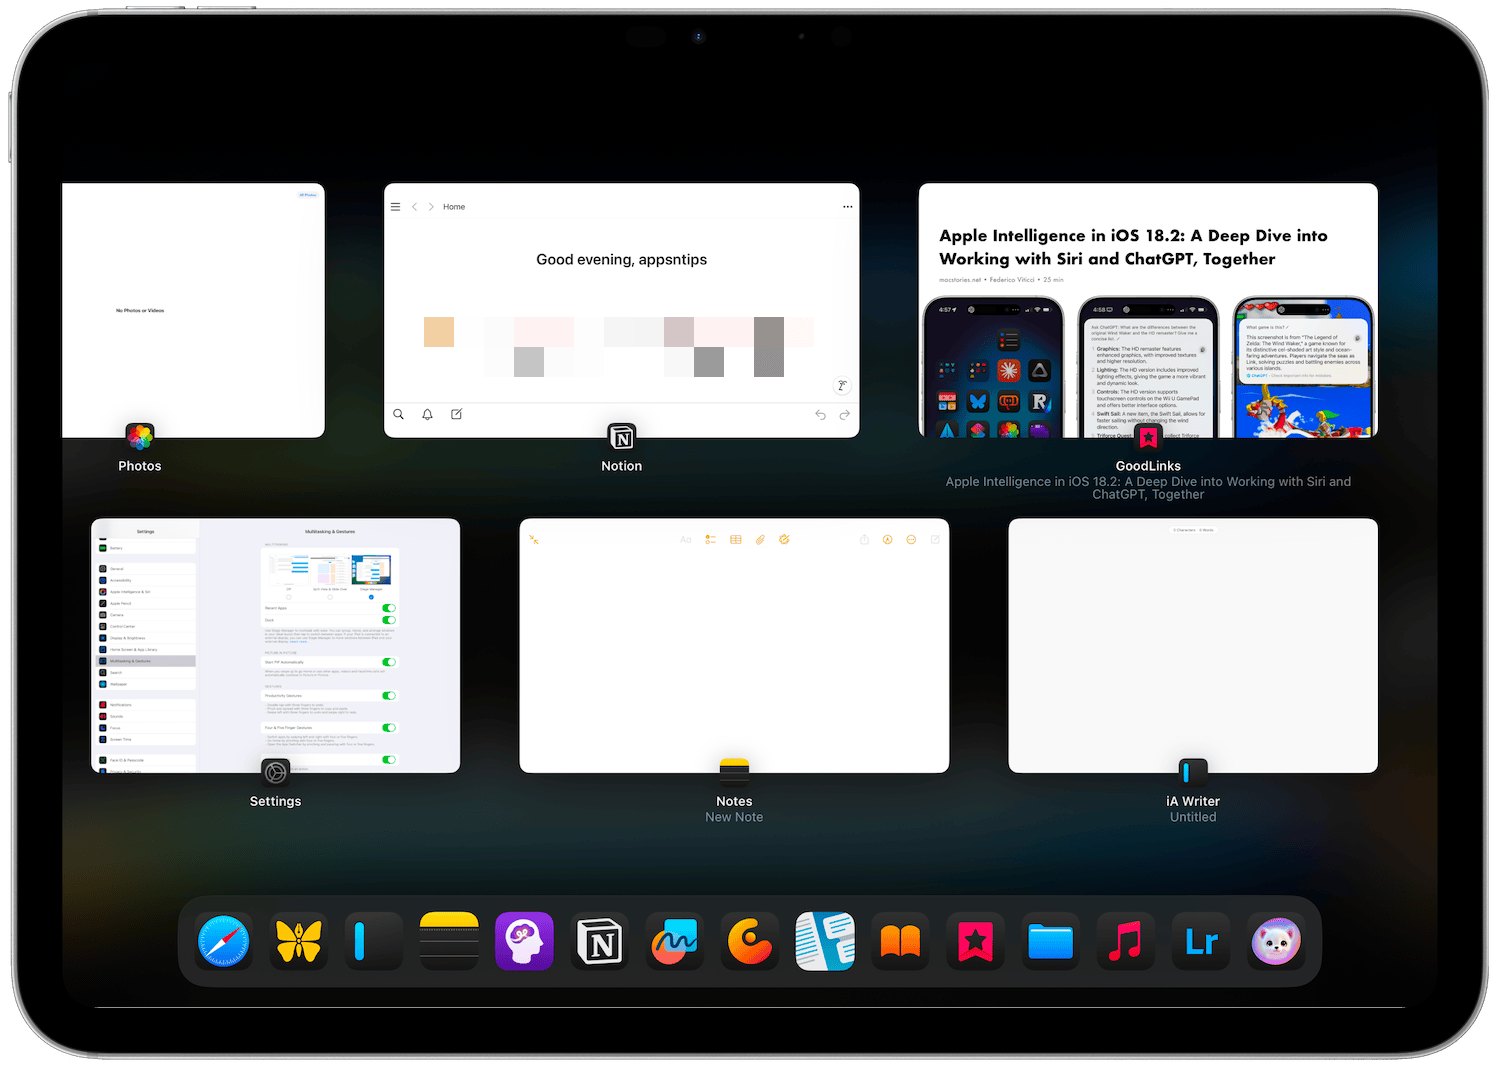
To see all the stages, open the Recent Apps or multitasking menu of iPadOS. From here, you can switch to any of the stages.
Adding multiple apps to a Stage
You know that launching an app creates a new Stage. So how do you add multiple apps to the same stage? If you are not using a keyboard, you can drag and drop an app to a Stage to add it.
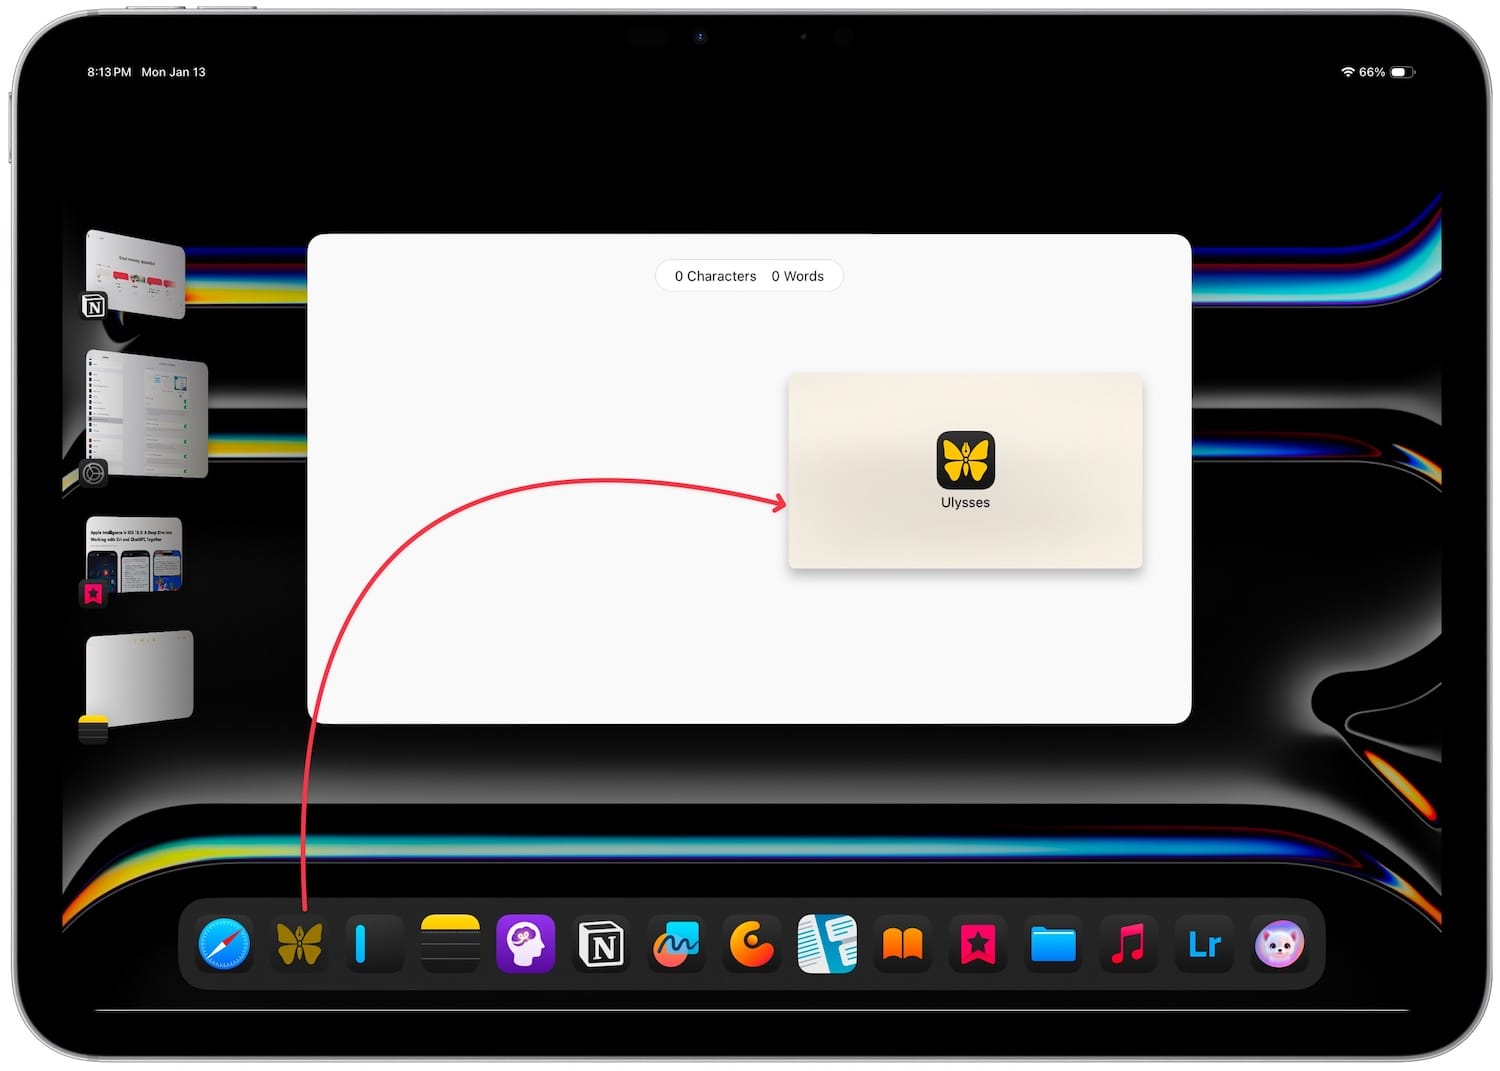
You can drag the app from the Dock, Spotlight, or the App Library. You can also drag and drop an app from another Stage to a current Stage.
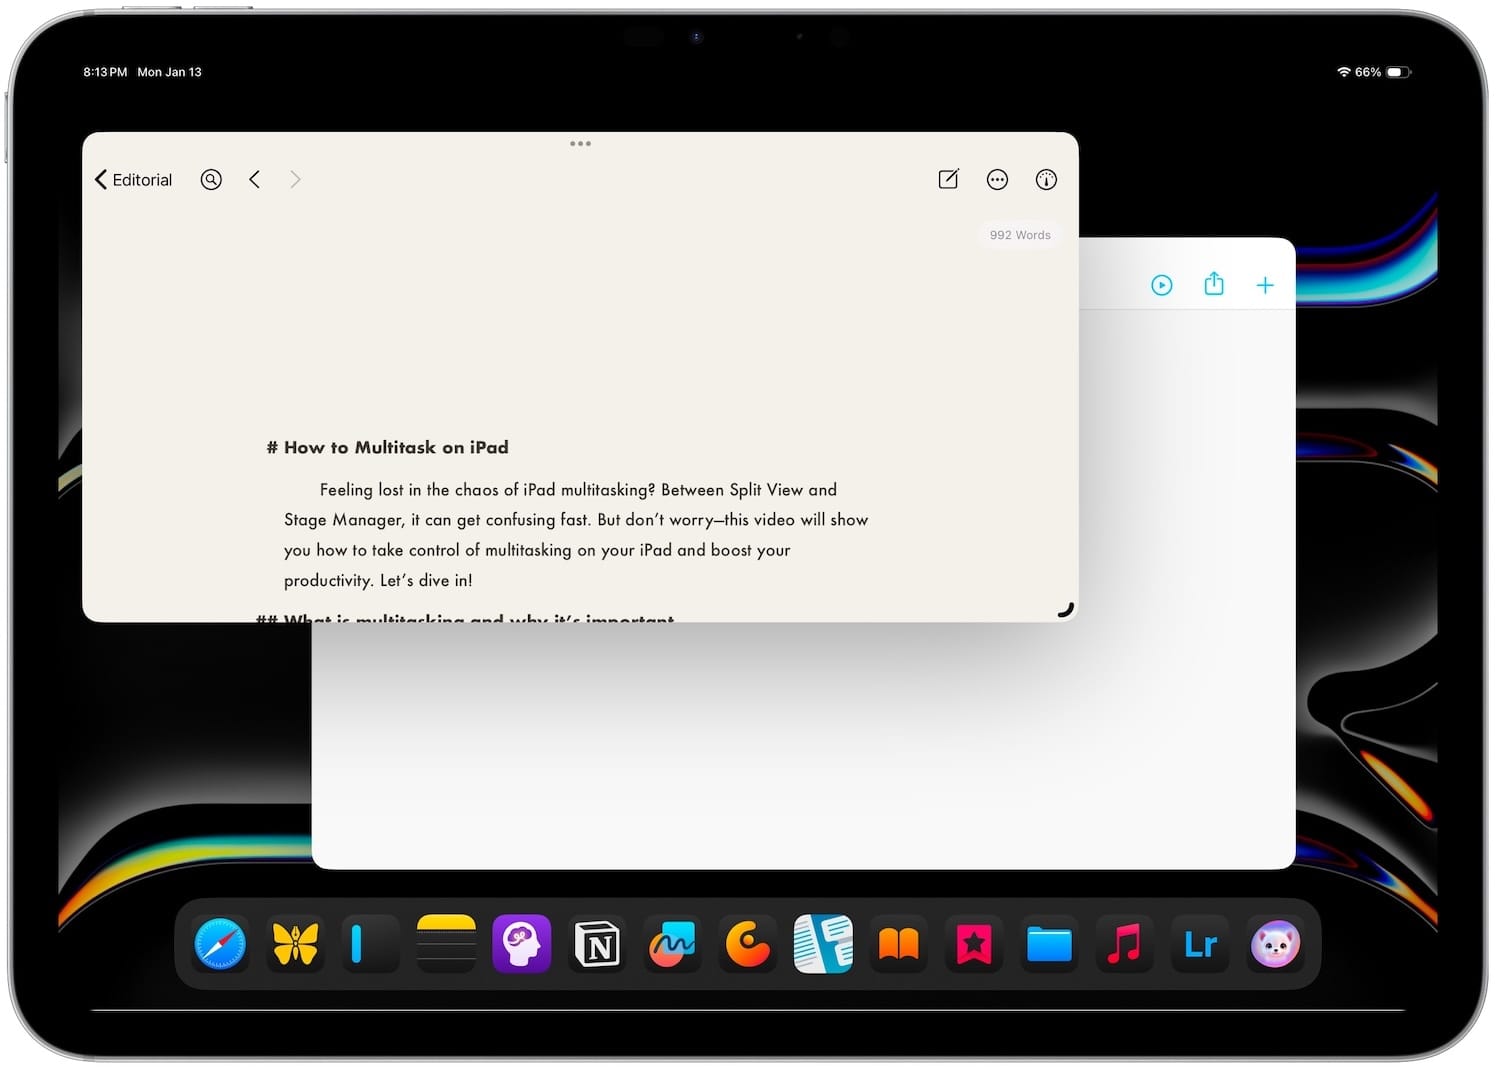
There’s one more way to add an app to a stage in tablet mode. Hold down on the top bar of any app and then tap on an app. Instead of opening the app in a new stage, it will add it to the current stage.
If you are using the Magic Keyboard or a Bluetooth keyboard and mouse, you can click and drag an app to add it to the current stage. You can also hold down the shift (⇧) key and click on an app to add it to the current stage.
Multitasking via the three-dot menu
Another way to add an app to the current Stage is via the three-dot multitasking menu. You can tap or click on it and then choose the Add Another Window option.
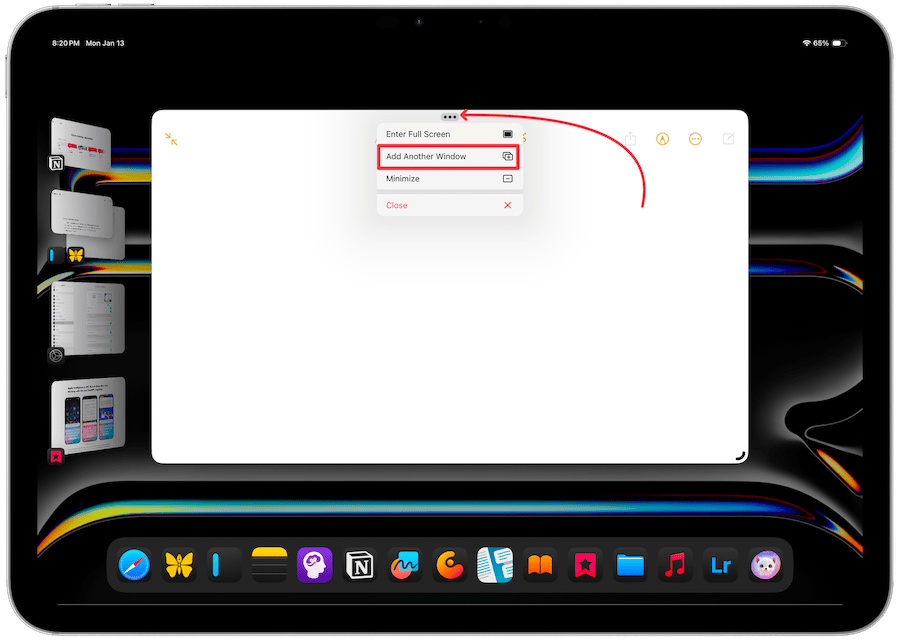
It will hide the apps in your current window and give you the option to select from all the currently open apps and the apps in your Dock.
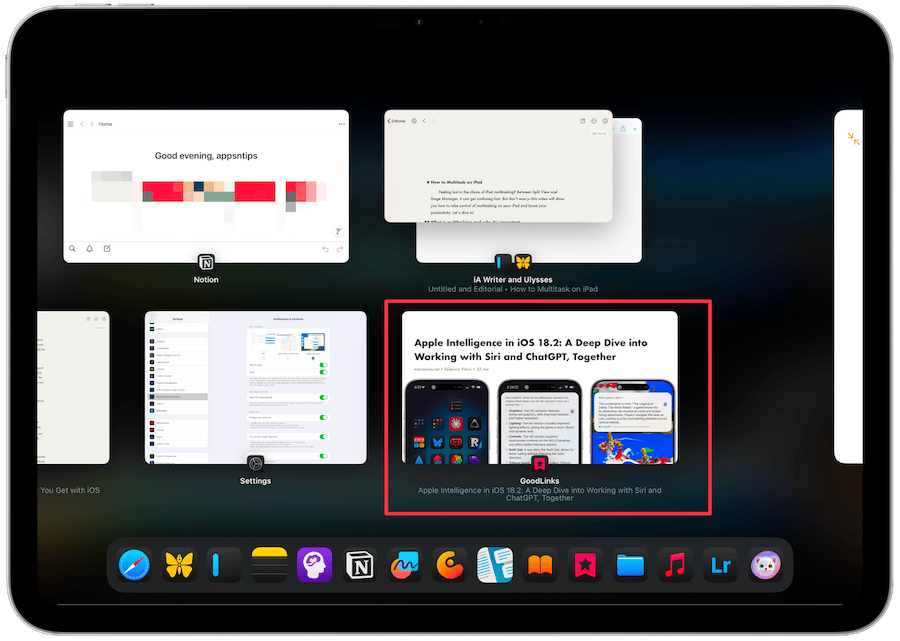
You can tap on any of these apps to add them to the current Stage. The keyboard shortcut to bring this option is Globe+Control and the Up arrow.
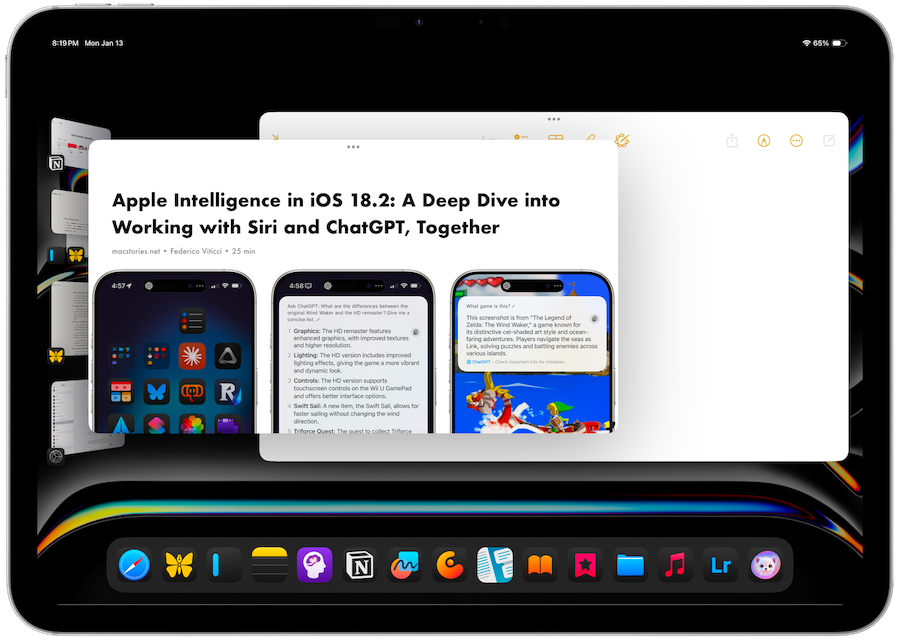
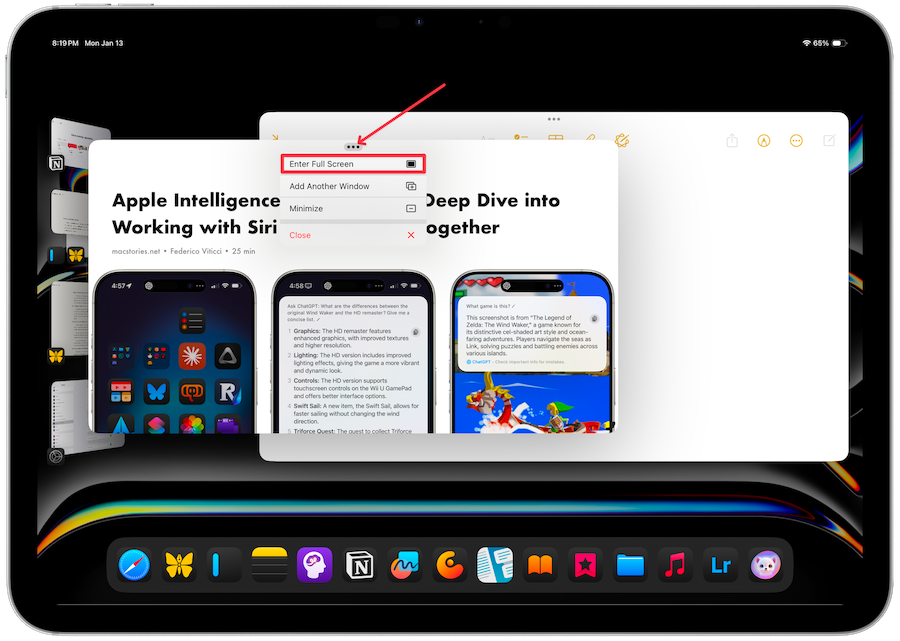
You can use the Enter Full Screen option to make the app go full-screen. You can also do this by grabbing and dragging the drag handle at the bottom-right corner until the app becomes full-size or hitting the Globe+F keyboard shortcut if you have the Magic Keyboard attached.
There’s also the option to minimize the app. The keyboard shortcut for this is ⌘M.
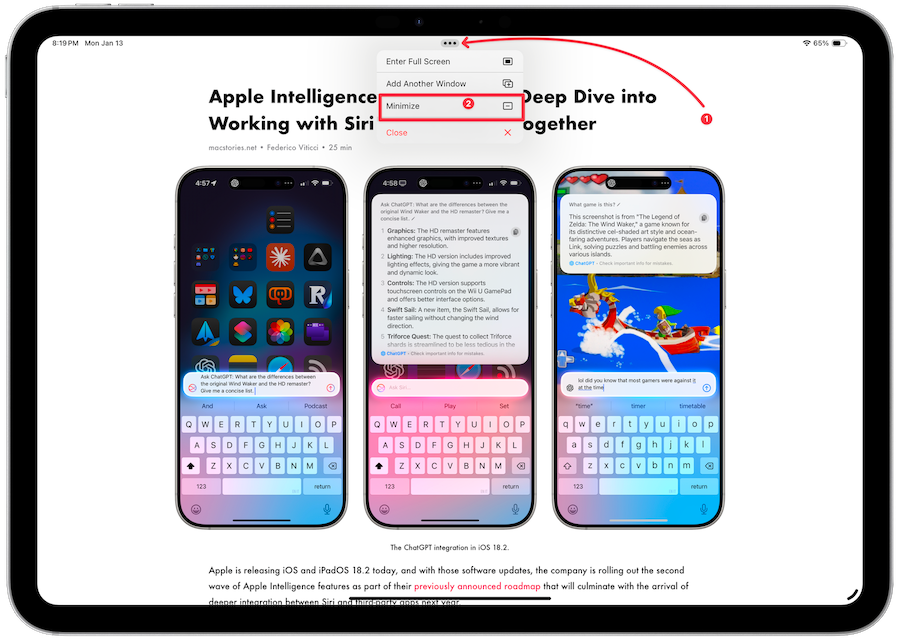
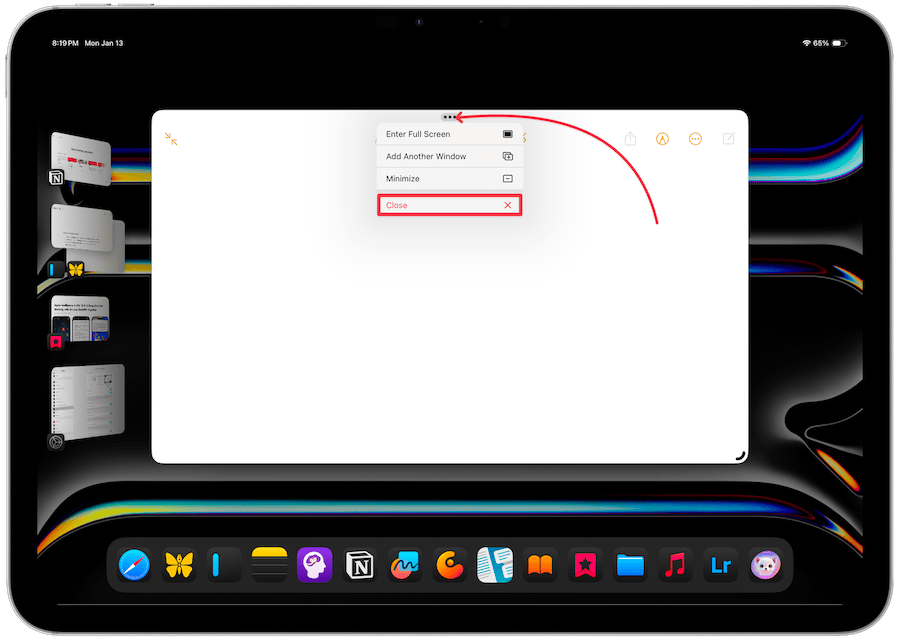
You can use the Close button to close an app's current window. You can also do this with the ⌘W keyboard shortcut.
Switching between apps and stages in Stage Manager
Since the iPad has a small screen, if you open multiple apps, they will overlap each other. You can move between the apps and bring an app to the front by tapping on it.
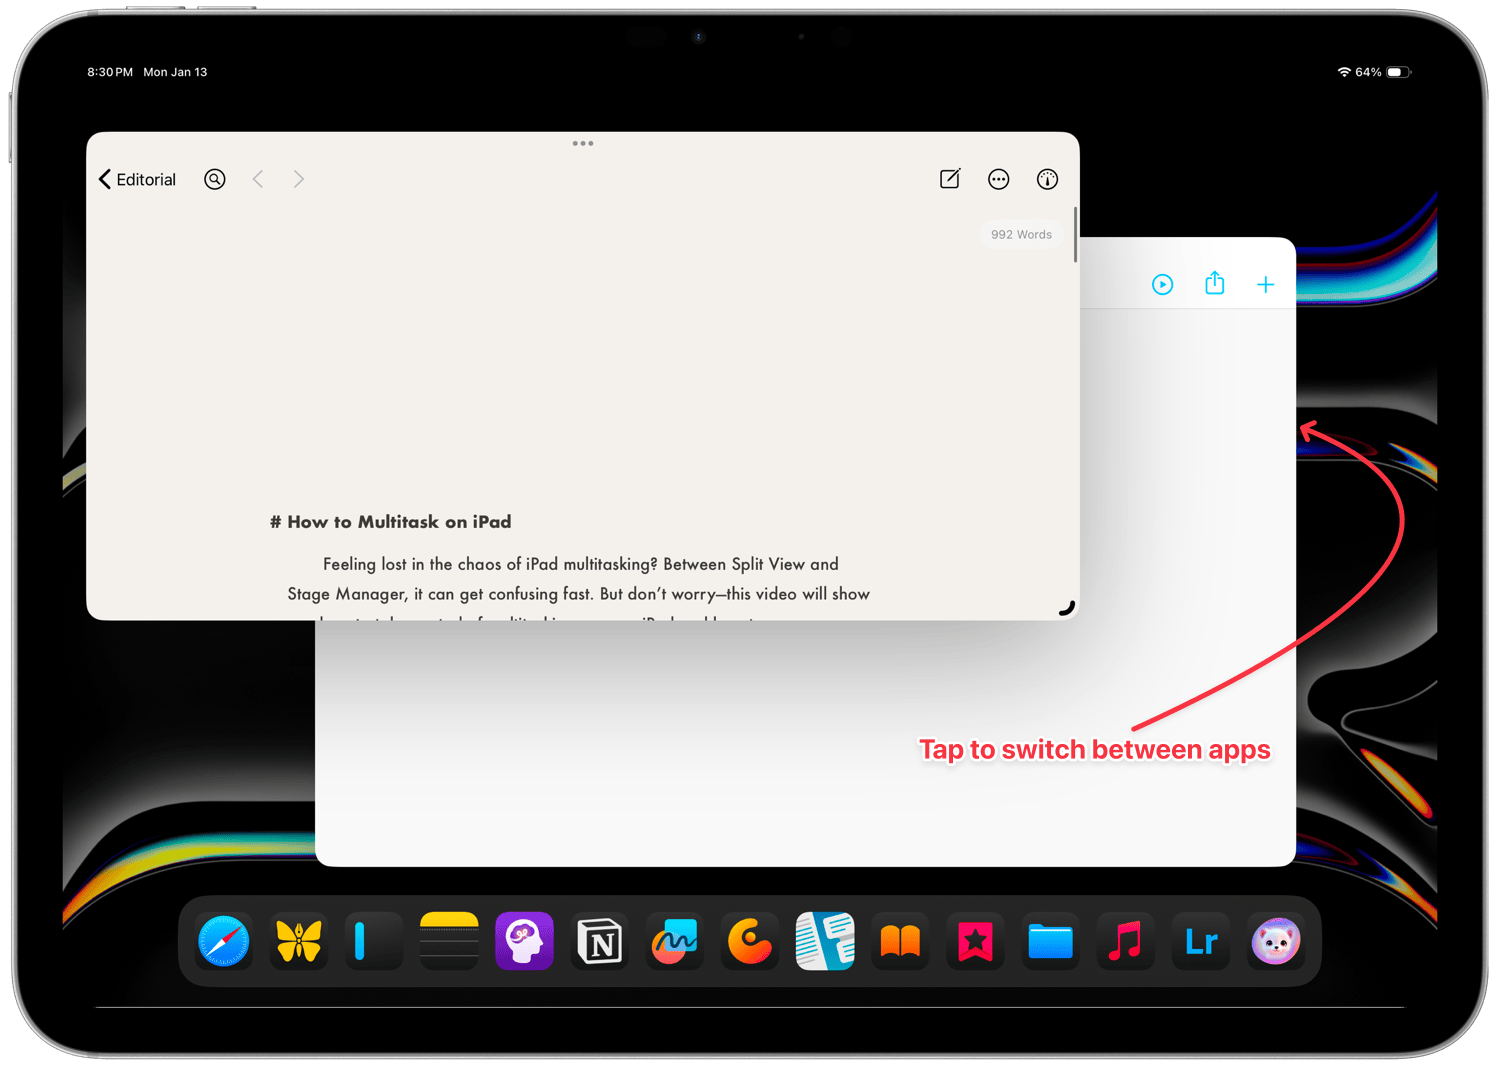
If you have a keyboard attached, you can use the shortcut Globe+backtick to cycle between the apps in the same stage.
The ⌘Tab keyboard shortcut will let you cycle between all the open apps. If you choose an app that’s not in the current stage, it will switch to the stage containing that app.
Another way to switch between different stages is by using the swipe gesture. On the iPad, swipe left to right at the bottom to switch between stages. You can also swipe with three fingers on the Magic Keyboard to switch between different stages.
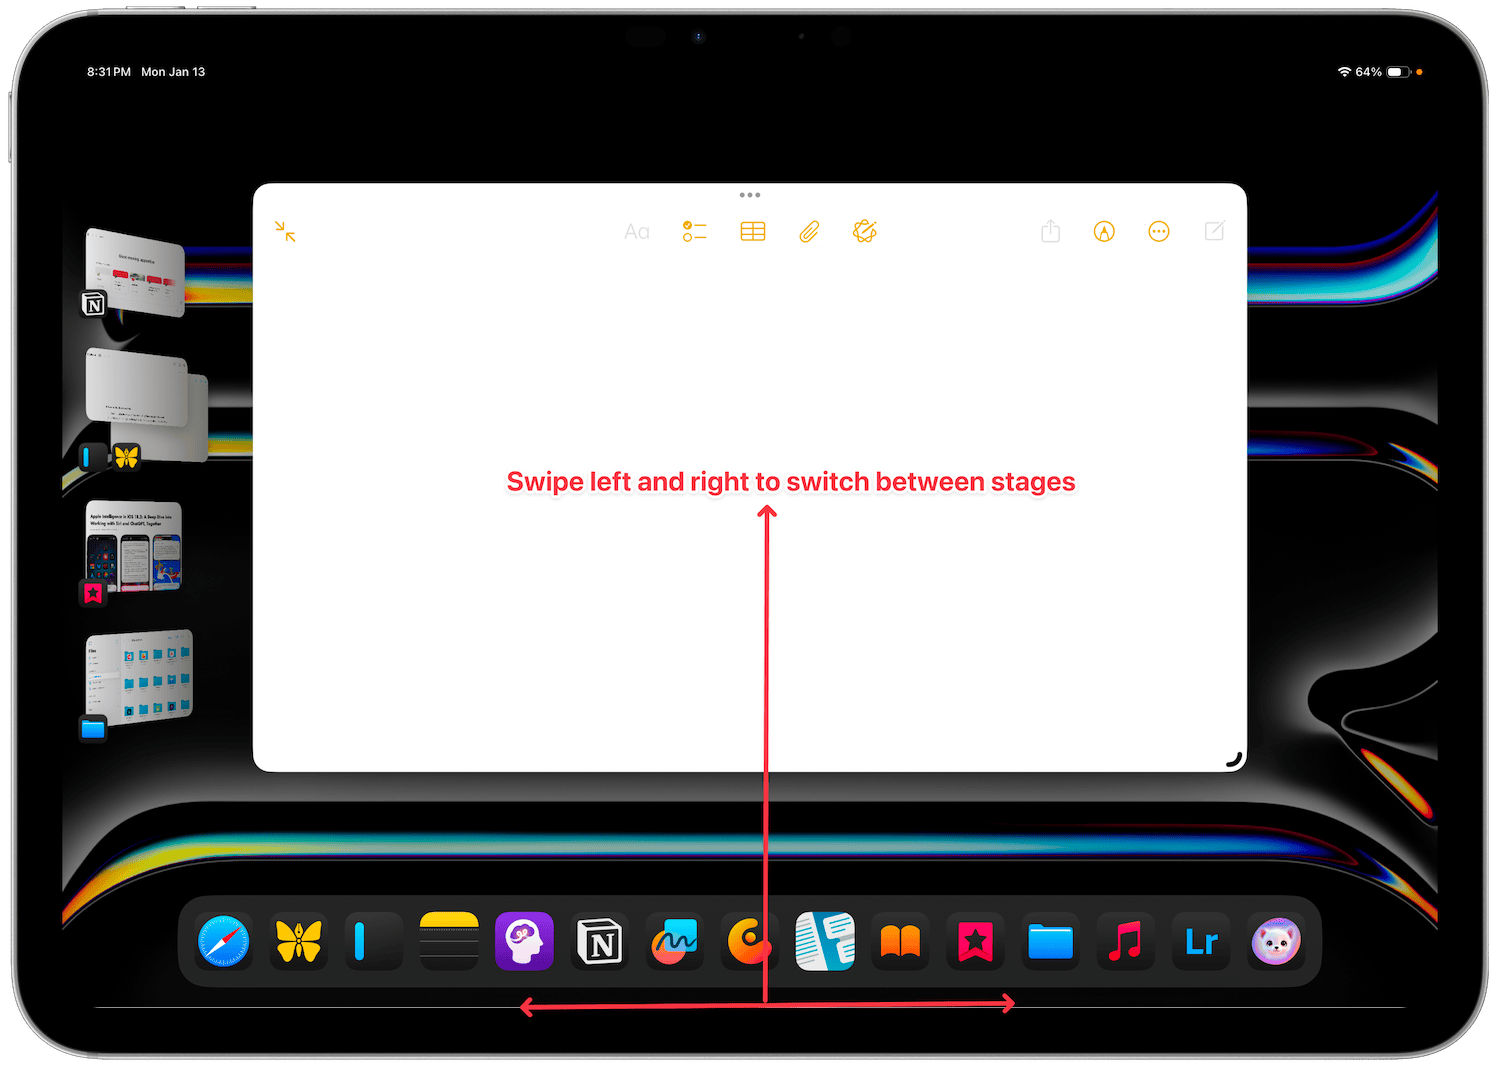
If you prefer keyboard shortcuts, you can switch between spaces by holding down the Globe key and using the left and right arrows.
Adding multiple windows of the same app
You can add multiple windows of the same app in a single stage. The easiest way to do this is to drag and drop the app icon in the stage and it will add a second window.
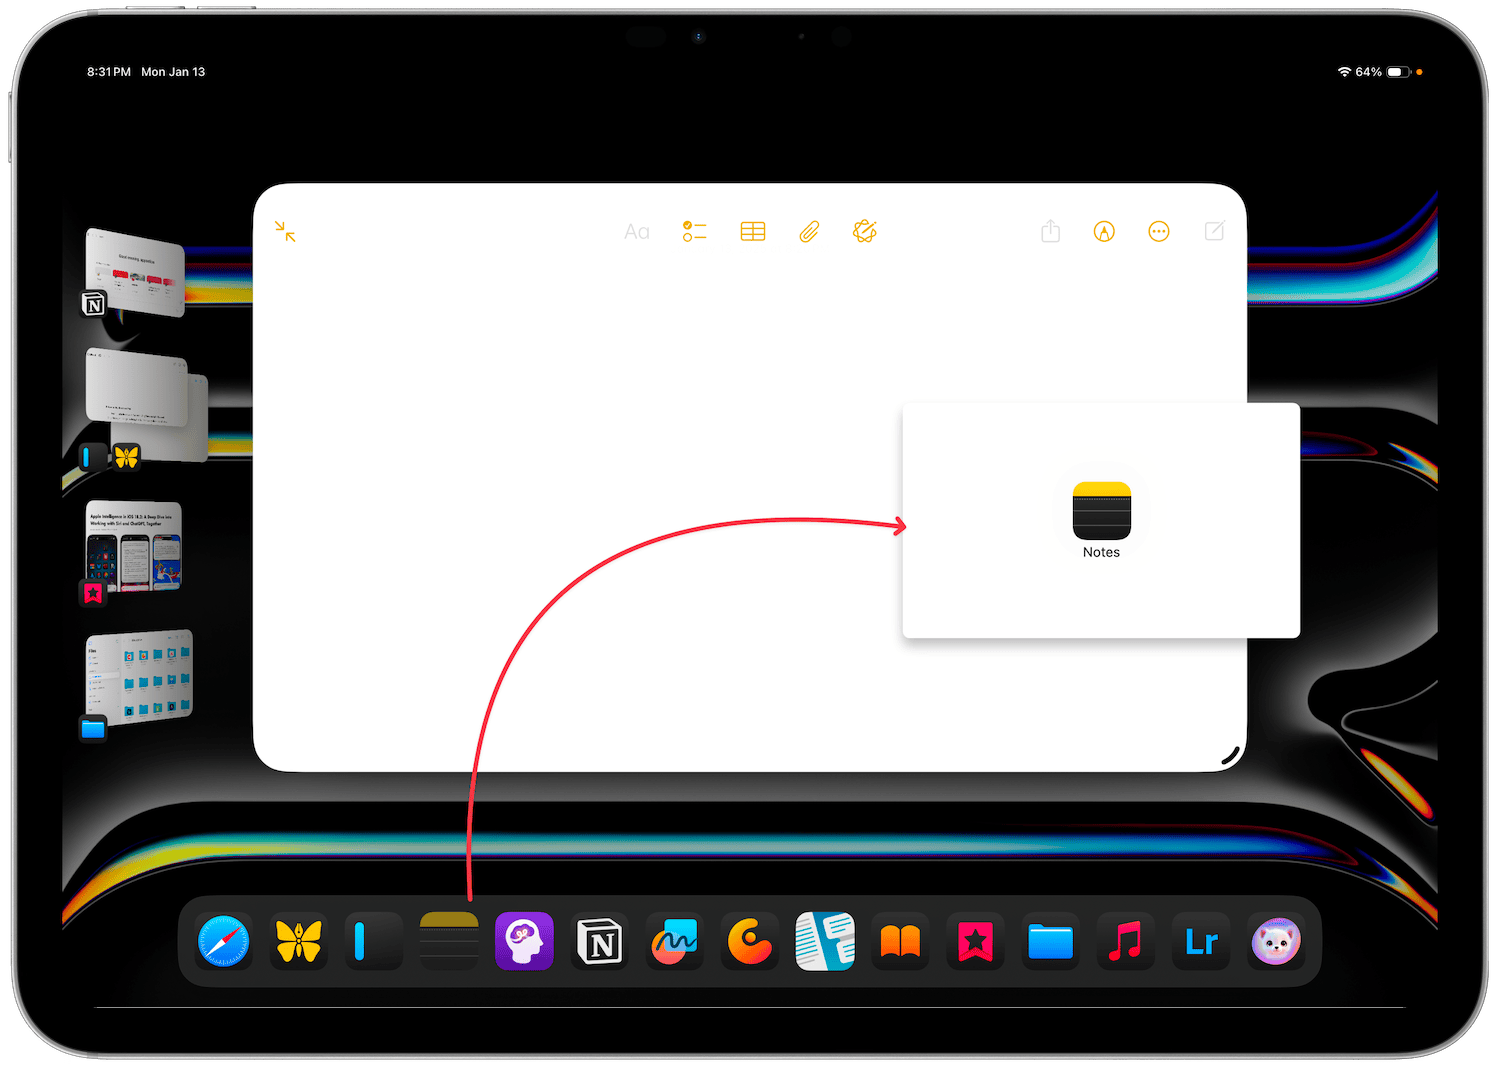
Remember that one stage can only hold four app windows and not four apps. So if you have two windows of an app in a stage, you can only add two more apps.
Adding an app in multiple stages
As far as I know, there’s not a straightforward way to add an app’s window in multiple stages. But there’s a workaround you can use to accomplish this. First, add multiple windows of the same app in a single stage like I showed. Now drag and drop the app windows into different stages. This will allow you to have a single app in multiple stages.
Accessing hidden Dock and recents app strip
I showed you how to hide the Dock and recents app strip in Stage Manager from the Settings app. You can also do this by pressing the Stage Manager icon in the Control Center.
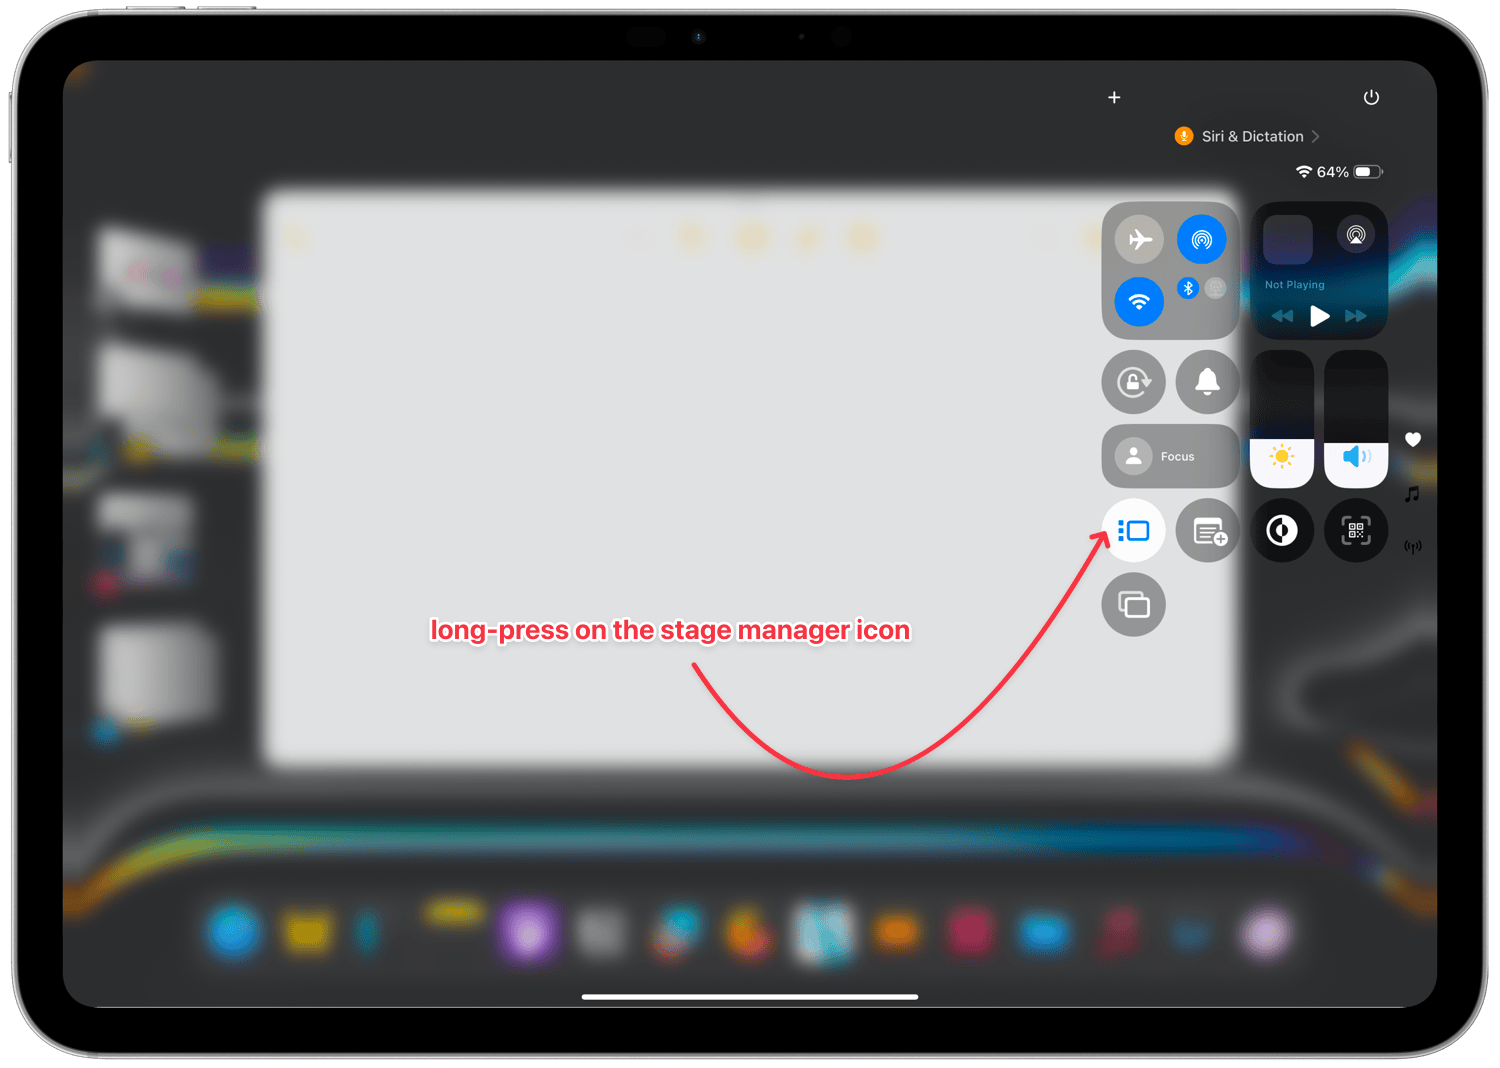
Hiding these two items gives you more space to work with.
But don’t worry, you can access them anytime without unhiding them. In tablet mode, drag from the bottom to bring the Dock and from the side to bring the recents app strip.
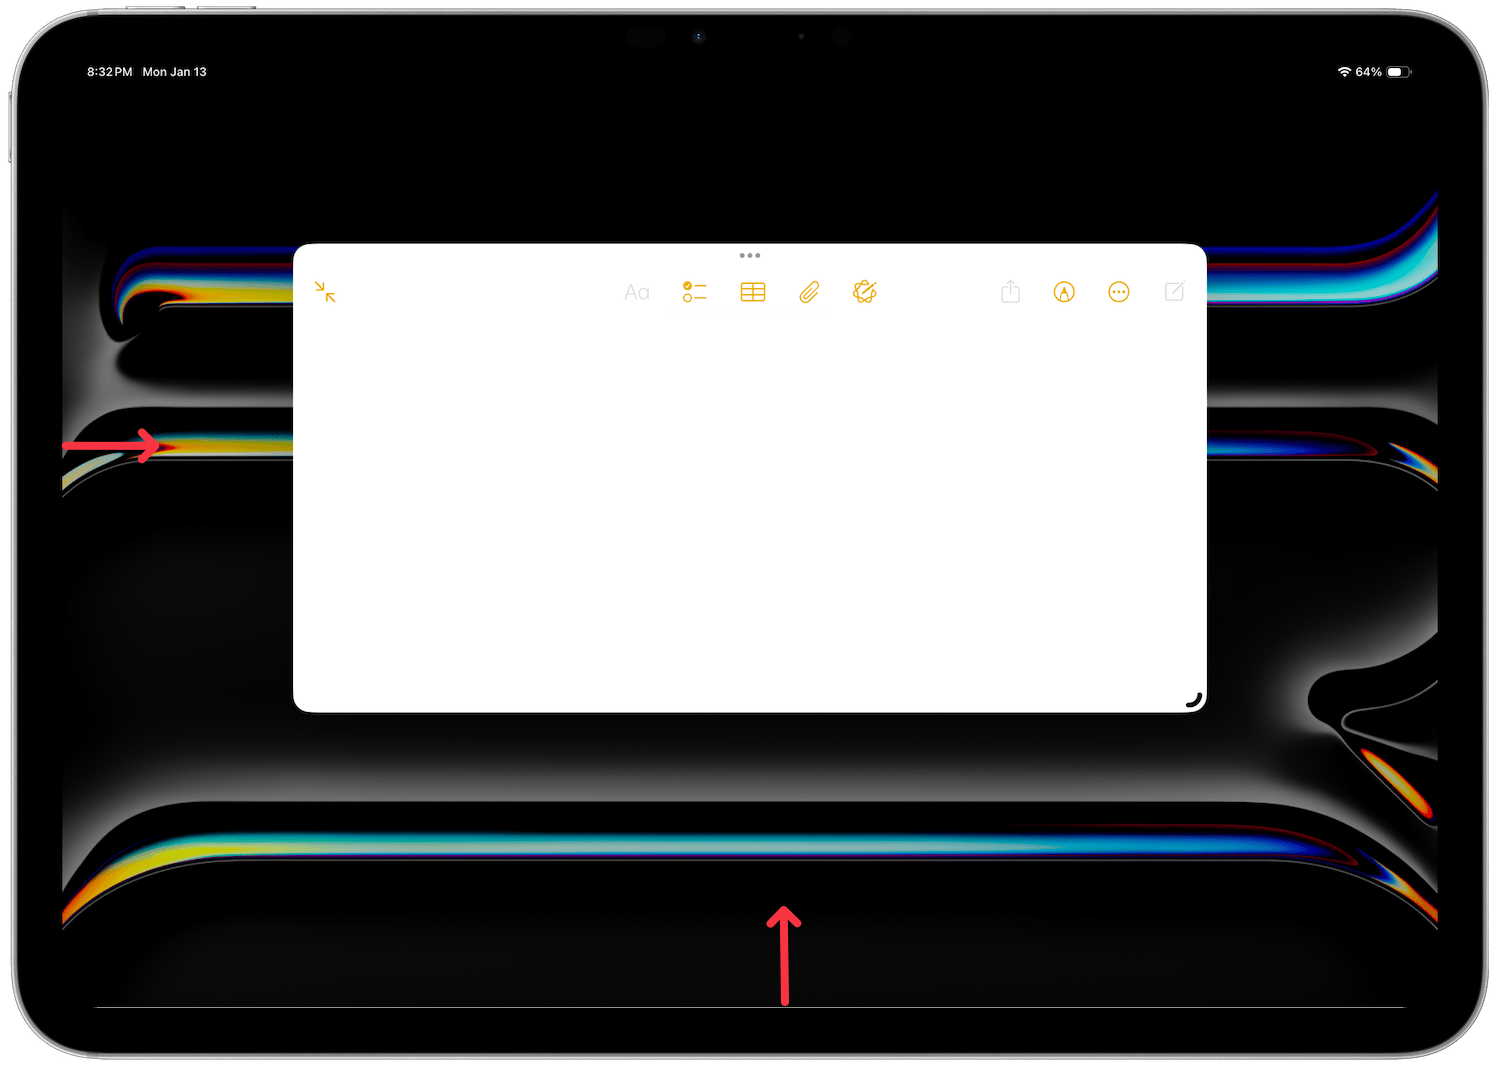
In Magic Keyboard mode, push the cursor into the respective edges of the display to perform the same action.
Stage Manager with an external display
If you use an Apple Silicon iPad Air or iPad Pro, you can connect your iPad to an external display and use Stage Manager. External monitor support doesn’t work in clamshell mode on the iPad, so you have to keep your iPad on all the time. Note that you will need to connect a keyboard and mouse for this to work. It can be the Magic Keyboard or any Bluetooth keyboard and mouse connected to your iPad.
When you connect your iPad to the display, you will notice an extended display view with only your Dock visible.
If you launch an app on the external display, it remains on the external display. You can use all the Stage Manager features I have discussed on the external display as well. You can add multiple apps to a stage, create multiple stages, and move between those stages.
If you disconnect the iPad from the external monitor, all the stages you had on the monitor will be added back to your iPad. I like that iPadOS does a good job of remembering the position of apps when you reconnect the iPad to the monitor.
An external monitor will give you more space to work with so you can have three apps side by side or four apps arranged in quarters.
You can also drag and drop apps between your iPad and external display. So if there’s an app on your iPad that you want to see on the external display, you can simply drag and drop it.
Stage Manager tips and tricks
Here are a few tips that will help you get better at Stage Manager.
- Remember the keyboard shortcuts: If you use a Magic Keyboard, I recommend learning the keyboard shortcuts to make switching between apps and stages easier. I have already mentioned several of them in this article.
- If you ever forget the keyboard shortcuts, hold down the Globe key for a few seconds to reveal the keyboard shortcuts.
- Replace Globe with Caps Lock: Only official Apple keyboards offer a Globe key. If you are using a third-party accessory, you can reassign the Globe key to Caps Lock. To do this, go to Settings → General → Keyboard → Hardware Keyboard → Modifier Keys and assign Caps Lock to work as Globe.
- Get more space: Just like on macOS, you have a setting in iPadOS that increases the display resolution, giving you more space to work. I recommend you turn on this feature. Go to Settings → Display & Brightness → Display Zoom and choose the More Space option.
Stage Manager vs Split View
Choosing between Stage Manager and Split View can be confusing, but I will simplify it with a simple rule of thumb. If you use your iPad in tablet mode, stick with Split View. It’s easy to grasp and works better with the touch interface.
If you connect a Magic Keyboard then Stage Manager makes more sense, but only on the bigger 13-inch iPad Pro and iPad Air. For the 11-inch version, I suggest sticking to Split View unless you have to have more than two apps on the screen.
I know having two multitasking systems on an iPad can be confusing. But I for one am happy that I can choose which system I want to use, as both these have their pros and cons. Also, since you can activate Stage Manager from the Control Center, it only takes a slide and tap to turn it on and off.
iPad multitasking: final thoughts
What do you think about the state of multitasking on the iPad? Let us know your thoughts in the comments.Do let us know if you prefer this type of long-form content over the quick how-to guides we generally publish. Before you go, read this article next to learn how to install fonts on the iPad. I will catch you there, thank you for watching, and have a nice day.
