How to Create and Open ZIP Files on iPhone and iPad (Native Method)
Learn to create and open ZIP files on iPhone and iPad running on iOS 13, iPadOS 13, and iOS 12.

With the launch of iOS 13 and iPadOS 13, Apple has improved its native Files app. For starters, now it supports storage devices allowing you to easily transfer files between different Apple devices. Another new feature of the Files app is the support for ZIP and RAR files. Now, users can compress files into ZIP format and even extract ZIP files. So, in this article, we are going to show you how you can ZIP and unZIP files on your iPhone and iPad. If your device is not running iOS 13, don't worry, we are going to share an alternative method which will also work on iOS 12 devices.
Opening ZIP Files in iPhone and iPad
Before the release of iOS 13 and iPadOS 13, users had to install third-party unzipping apps from App Store to compress and uncompress ZIP files on iPhone. Now, the feature is built into the Files app and is easier to use than any using any third-party apps.
1. Open the Files app and locate the ZIP file. Now, 3D Touch / Haptic Touch (tap and hold) on the file icon. It will open a contextual menu as shown in the picture below.
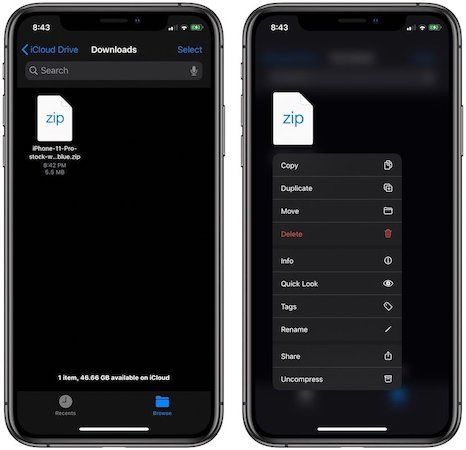
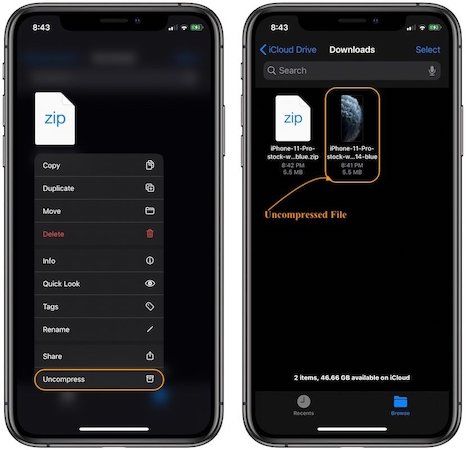
2. Select the last option that reads “Uncompress” and it will extract the files in the same location as shown in the picture below.
Compress Files into ZIP Format in iOS 13 and iPadOS 13
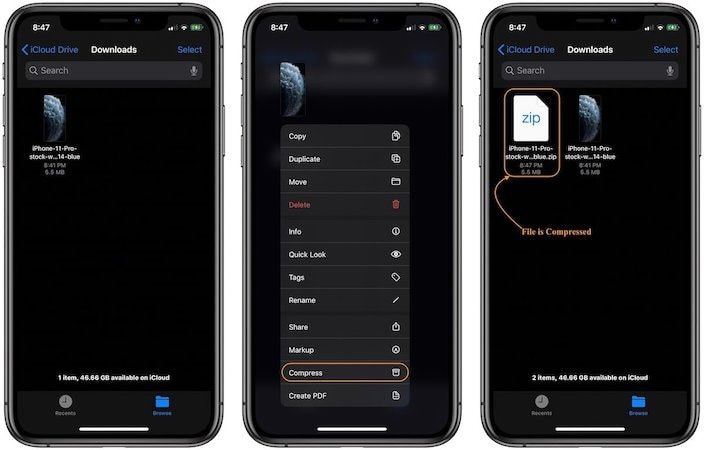
The steps to compress files into the ZIP format is quite similar. First, locate the file you want to compress and then perform 3D Touch / Haptic Touch (tap and hold) to reveal the contextual option. Now, tap on “Compress” button to compress the file. If you want to compress more than one file into ZIP, first, place those files into a folder and then use the above steps to compress the whole folder. It’s as easy as that.
Opening ZIP Files on Older iPhone and iPad (iOS 12)
You can open and compress ZIP files without using a third-party app even on older iOS devices that are still running on iOS 12. To do that, we will use the automation-friendly Shortcuts App that was released by Apple with iOS 12. If you are not using the app, you can install the Shortcuts app from this link. Now, you have two options. You can either choose to create your own ZIP shortcut which can help you ZIP and unzip files on iPhone or you can download the shortcut by clicking on this link (this is an advanced unzipping shortcut developed by the folks at MacStories).
Note: If you want to learn Shortcuts, go check out our article on Shortcuts overview and then learn to create your first shortcut.
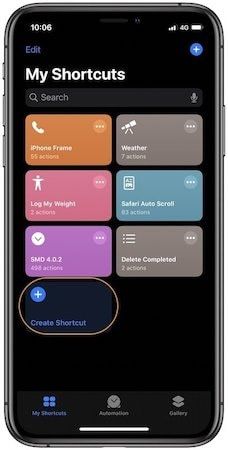
1. Open the Shortcuts app and then tap on “Create Shortcut” button.
2. Now tap on the Search bar and search for ZIP. Select “Extract Archive” button. Similarly, search for “Save File” action and tap on it to add it to your shortcut.
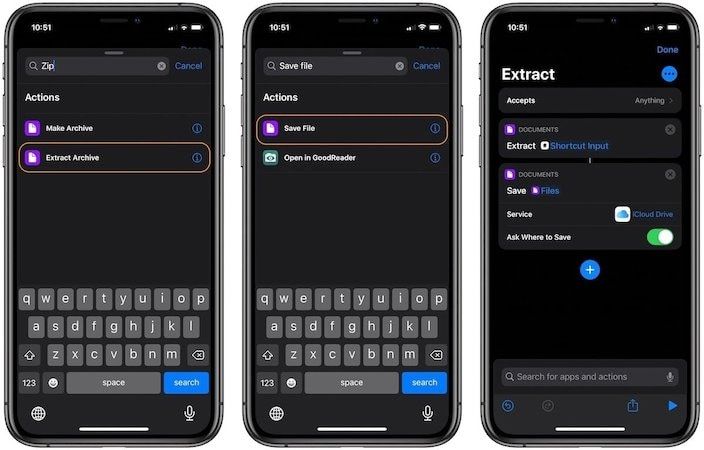
3. Now, tap on the Settings icon on the top-right and name the shortcut. Don’t forget to allow it in the share sheet.

Using the Shortcut to UnZIP files on iPhone
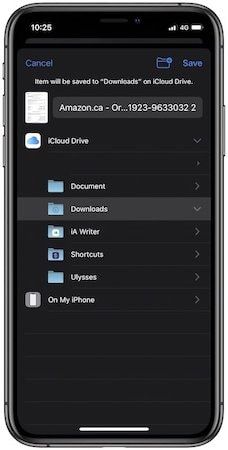
Now that your shortcut is in place, all you need to do is perform 3D Touch / Haptic Touch (tap and hold) on the ZIP file you want to uncompress and then tap on the “Share” button. Now, tap on Shortcuts and then on the name of the shortcut (the name that you kept for the shortcut while chasing it). The shortcut will now extract the file and present you with a dialogue box asking where you want to save your file. Choose the desired location and you are done.
Similarly, you can use the “Create Archive” button in the first step to create a shortcut that will ZIP your files instead of extracting them.
Extracting ZIP Files on iPhone: Final Thoughts
As you can see, Apple has made it really easy to deal with ZIP files on iPhone and iPad with the latest OS updates. The Shortcut method on iOS 12 is a bit convoluted at first but once you set up the shortcut, it’s quite easy to use. If you find problems in following the steps, let us know in the comments section below and I will answer all your questions.


