
10 Tips to Clean Up Mac and Make It Faster
In this article, we are going to show you 10 steps that you can take to clean your Mac and make it faster in 2023.
macOS is a very efficient operating system and keeps itself functioning at optimum performance. However, that does not mean that nothing can go wrong. As you keep using your Mac for months and months, old files and caches fill up, causing your Mac to slow down. That’s why experts recommend cleaning up your Mac once every few months. In this guide, we will show you how to clean up Mac to release storage, make it faster, solve software issues, and improve the overall performance of your machine.
Why you should clean up your Mac
While it is not required to clean up your Mac weekly or monthly, it is a good practice to tidy things up once every few months. The main reason you should clean your Mac is that your Mac accumulates tons of residual files that fill up the storage and make it slower. From file caches to uninstalled app residues to redundant backups, unwanted files slowly but surely fill up the storage on your Mac.
Cleaning your Mac once every few months ensures your machine runs at its full potential. It will also help you release lost storage, remove too many start-up apps, malware (Yes! Macs can get infected), and more. In this article, we will take a look at all these problems and show you how to clean them up.
How to clean up Mac in 2023
There was a time when cleaning your Mac was an arduous process. But in 2023, we are blessed with several software that can get the job done in minutes. One such software, and the one we prefer to use, is CleanMyMac X. It brings all the tools that you need to clean your Mac. But at $34.95/Year or $89.95/lifetime, it is expensive. We find it worth the cost but you might not. So, in each section, we have mentioned an alternative that is either free or significantly cheaper.
Since we are going to do a step-by-step cleaning, it’s good to have an idea of the things we will clean. Here are the steps we are going to take to clean your Mac. If you are interested in a specific step, you can use the table of content to move directly to that step.
- 1. Clean cached files
- 2. Remove junk files
- 3. Remove unwanted login items
- 4. Delete mail attachments
- 5. Uninstall apps without leaving residual files
- 6. Delete large and old files
- 7. Remove duplicates
- 8. Delete redundant backups
- 9. Remove malware
- 10. Run maintenance scripts
1. Clean cached files
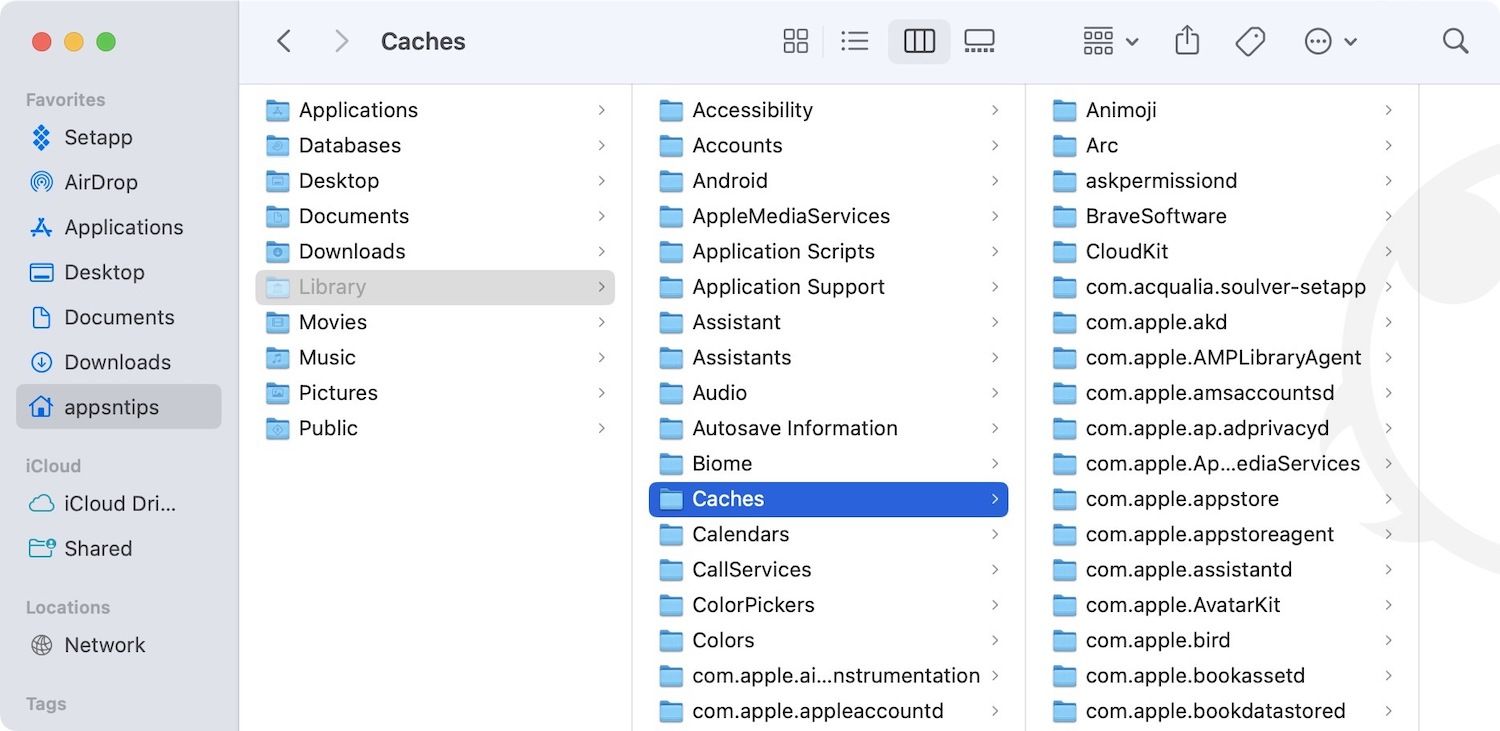
For providing fast access to some files, your Mac stores a lot of files as cache. A cache file is a temporary file that is created by your apps, browsers, and other programs to help you open them faster. However, sometimes these cache files become corrupt and cause a problem. In some cases, they also build up over time, eating up precious storage space on your device. We will start by clearing this cache files. Since this a part of the hidden file system, you won’t be able to access it normally.
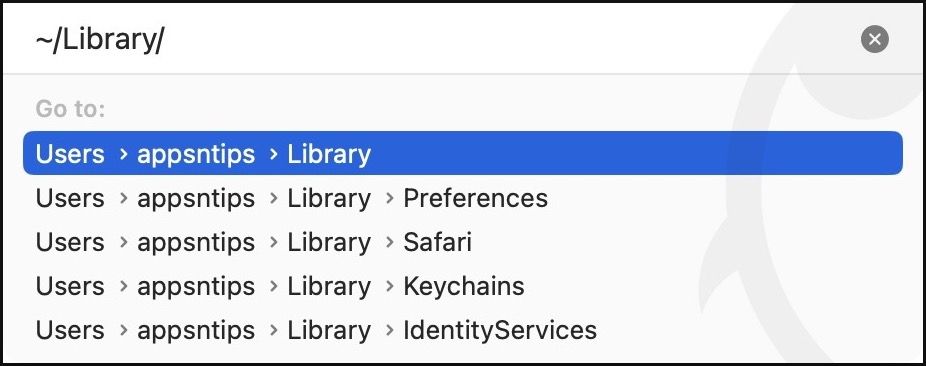
To access the cache folder, open a Finder window and then hit the “Cmd+Shift+G” keyboard shortcut. It will open a “Go to folder” search directory. Type or copy and paste “~/Library" as shown in the picture above and hit enter. It will open the Library folder. Here, locate the "Caches" folder and delete its content. To delete the content, select all the files (Cmd+A) and then hit the "Cmd+Opt+Delete" key to permanently delete the files.
2. Remove junk files
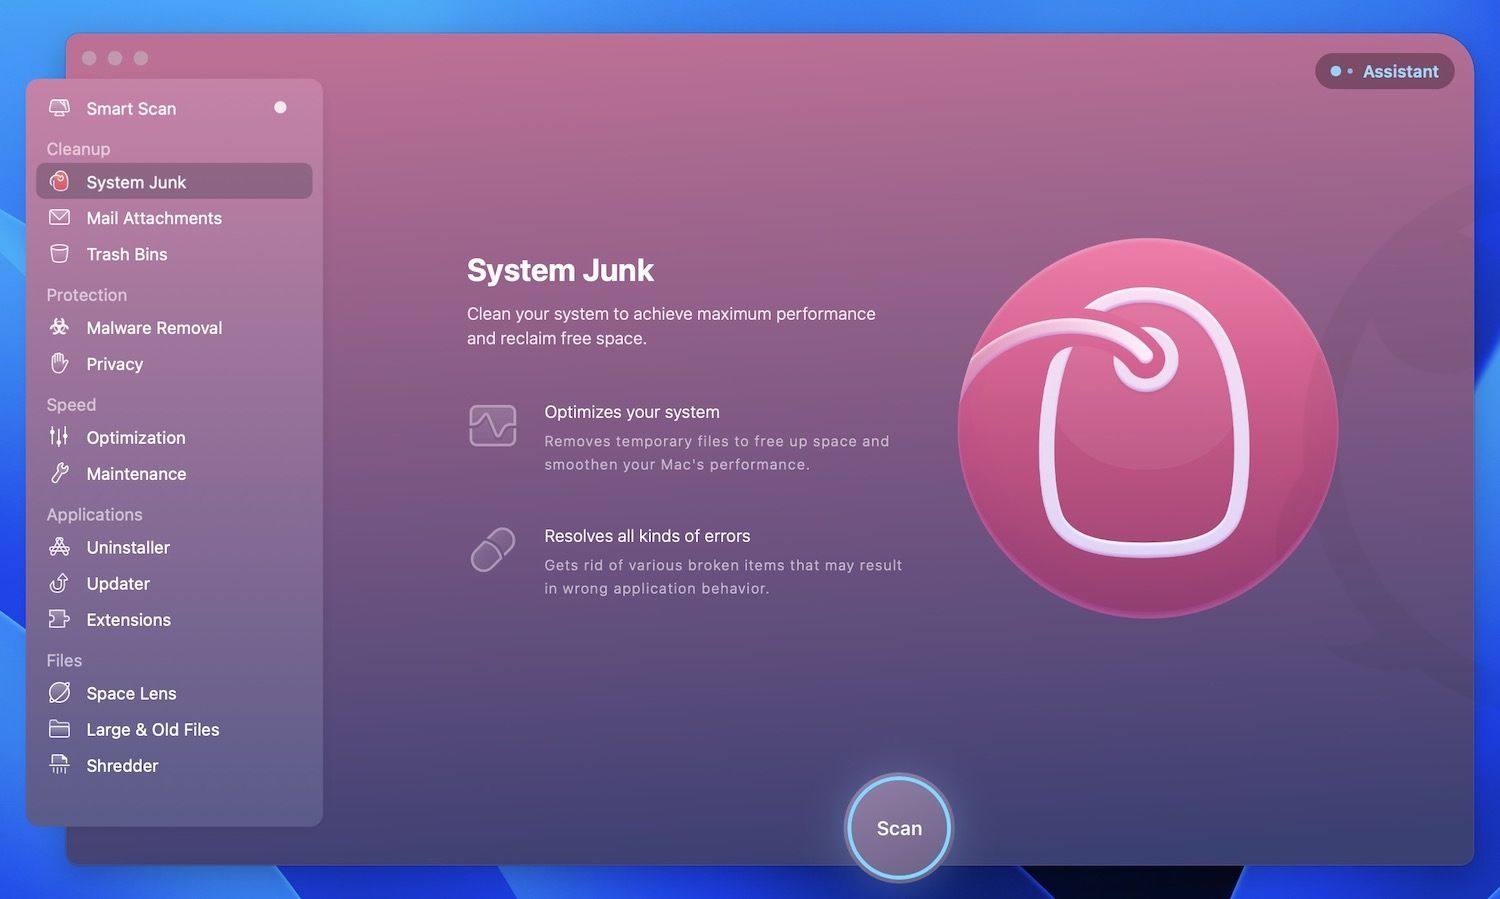
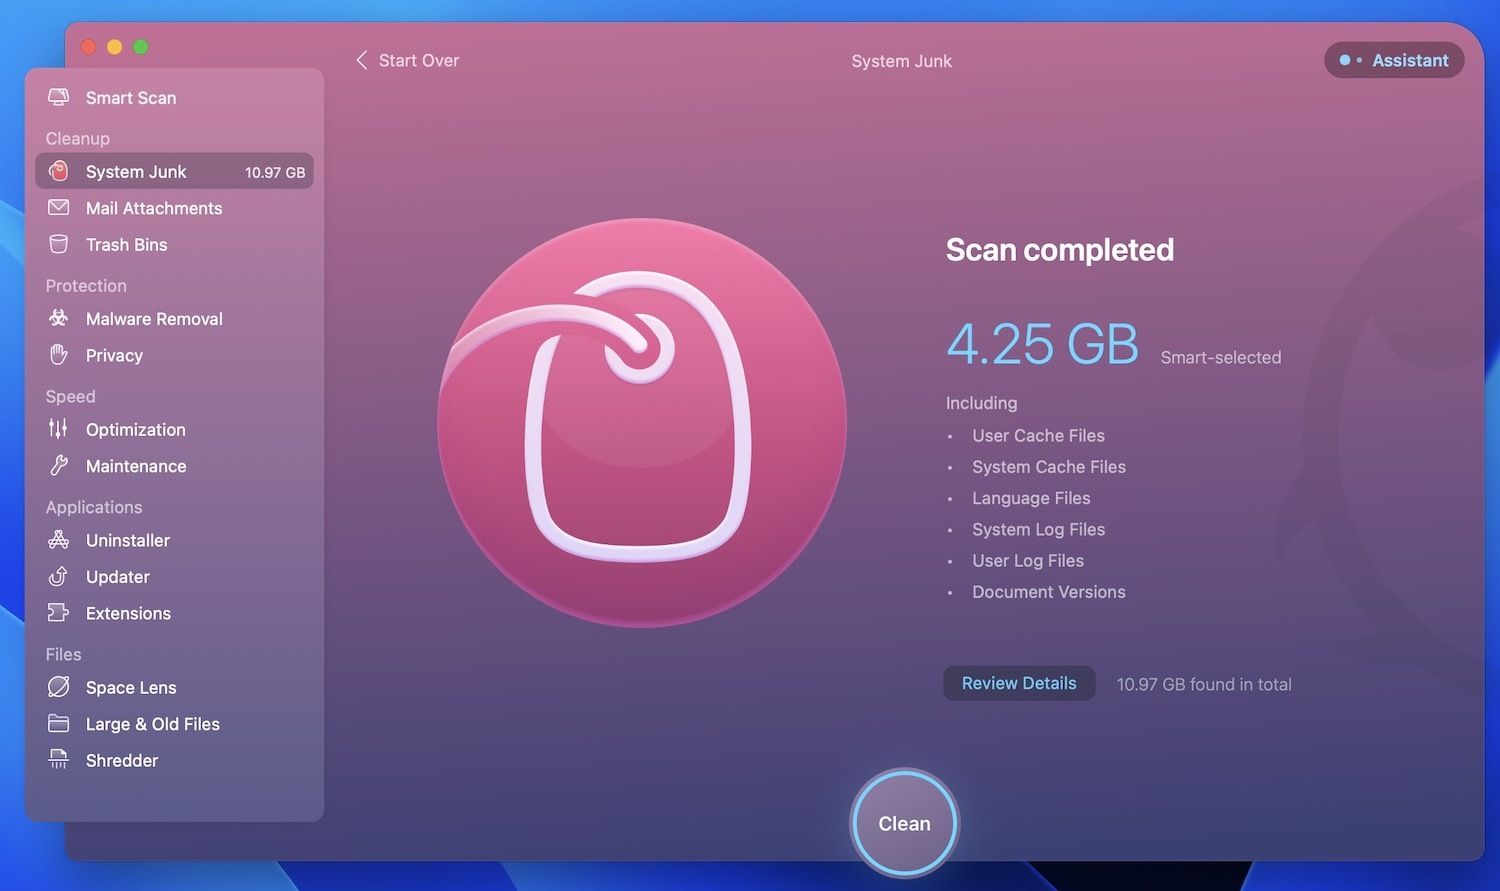
Cache is just a part of all the junk files that your Mac accumulates over its usage. There are many other types of junk files that macOS builds up, including system junk files, residual files, browser caches, mail attachments, and more. You can manually remove some of these junk files, as we did in the first step, but it’s hard work. An easy way is to use CleanMyMac X. Launch the app and select the System Junk option. Now, click on the Scan button, and it will identify all the junk files. It takes less than a minute to scan your Mac. Now, click the Clean button, and the app will permanently purge the junk files.
I use CleanMyMac X to scan my Mac every month and it finds anywhere around 3 to 5 GBs of junk data to clean. When I first used the app to scan my Mac, it was able to release more than 12 GB of storage. If you don’t believe me, install the free trial of the app and check it out for yourself.
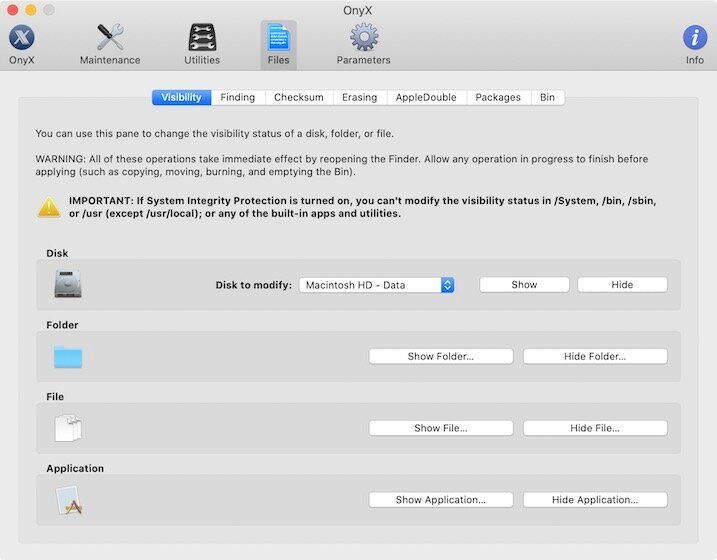
If you want a free app that does the same thing, the best option is to use OnyX. I have featured OnyX in my best free Mac apps list as it’s the best free Mac cleaning app you can get. You can use this app to perform miscellaneous maintenance and cleaning tasks. The only problem with OnyX is that sometimes it cannot differentiate between junk and system files. So, after every scan, you have to check the files it recommends you delete. If you are not familiar with the macOS file system, I suggest you avoid using it. That’s why I prefer using CleanMyMac X. I know it will not delete any system files, and I can hit the clean button with gusto.
- Get Clean My Mac X: Free Trial, $34.95/Year or $89.95/lifetime license
- Get OnyX: Free
3. Remove unwanted login items
Login Items are those apps that automatically launch when you start your Mac. The feature is excellent for launching apps automatically. However, since every other app seems to ask for login permission these days, it is better to check your permissions. If you have numerous login items, your Mac will launch them simultaneously while it boots up, which will slow down your Mac. In the worst-case scenario, it might even make your MAC unusable for a few minutes.
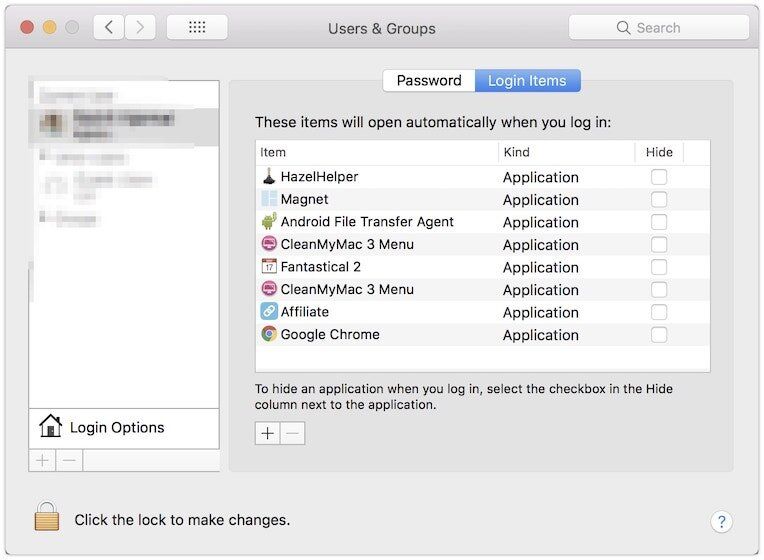
To check which apps have permission to launch when you boot up your device, go to System Preference → Users & Groups → Login Items. Here, you will see a list of all the apps that have permission to launch when booting up. Look at your list and remove the items you don’t need to start when booting up. To remove an item, click the lock icon and enter your password to make changes. Now, select the items you want to remove and click on the minus sign (−).
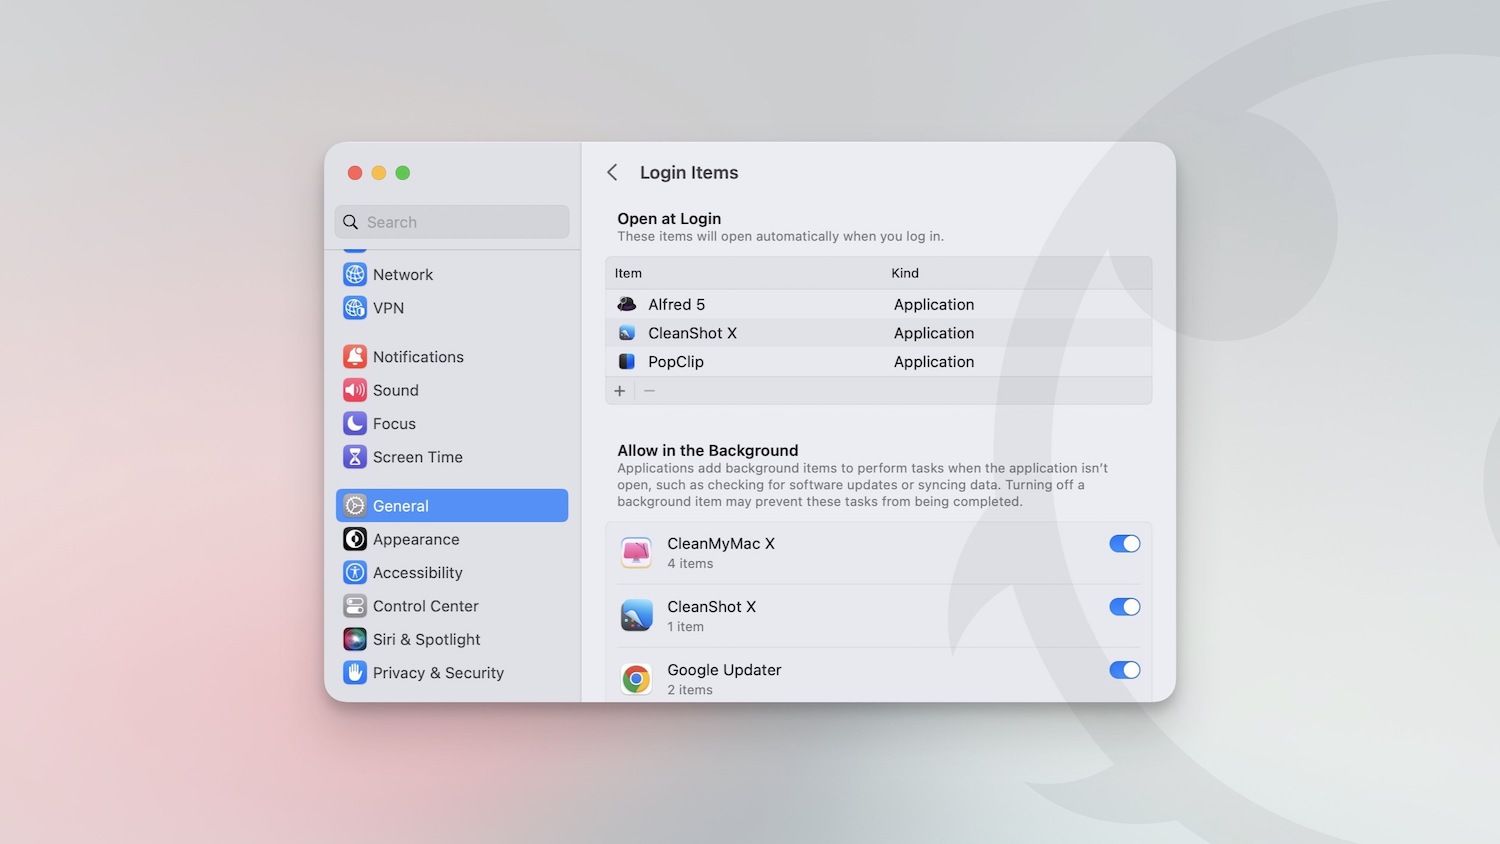
How you disable login items in macOS Ventura is slightly different, as the new operating system comes with a System Settings app instead of the deprecated system preferences app. To disable login items and stop apps from launching at startup in macOS Ventura, go to Menu → System Settings → General → Login items and disable the toggle next to the apps you want to remove. For a step-by-step guide, please click the link above.
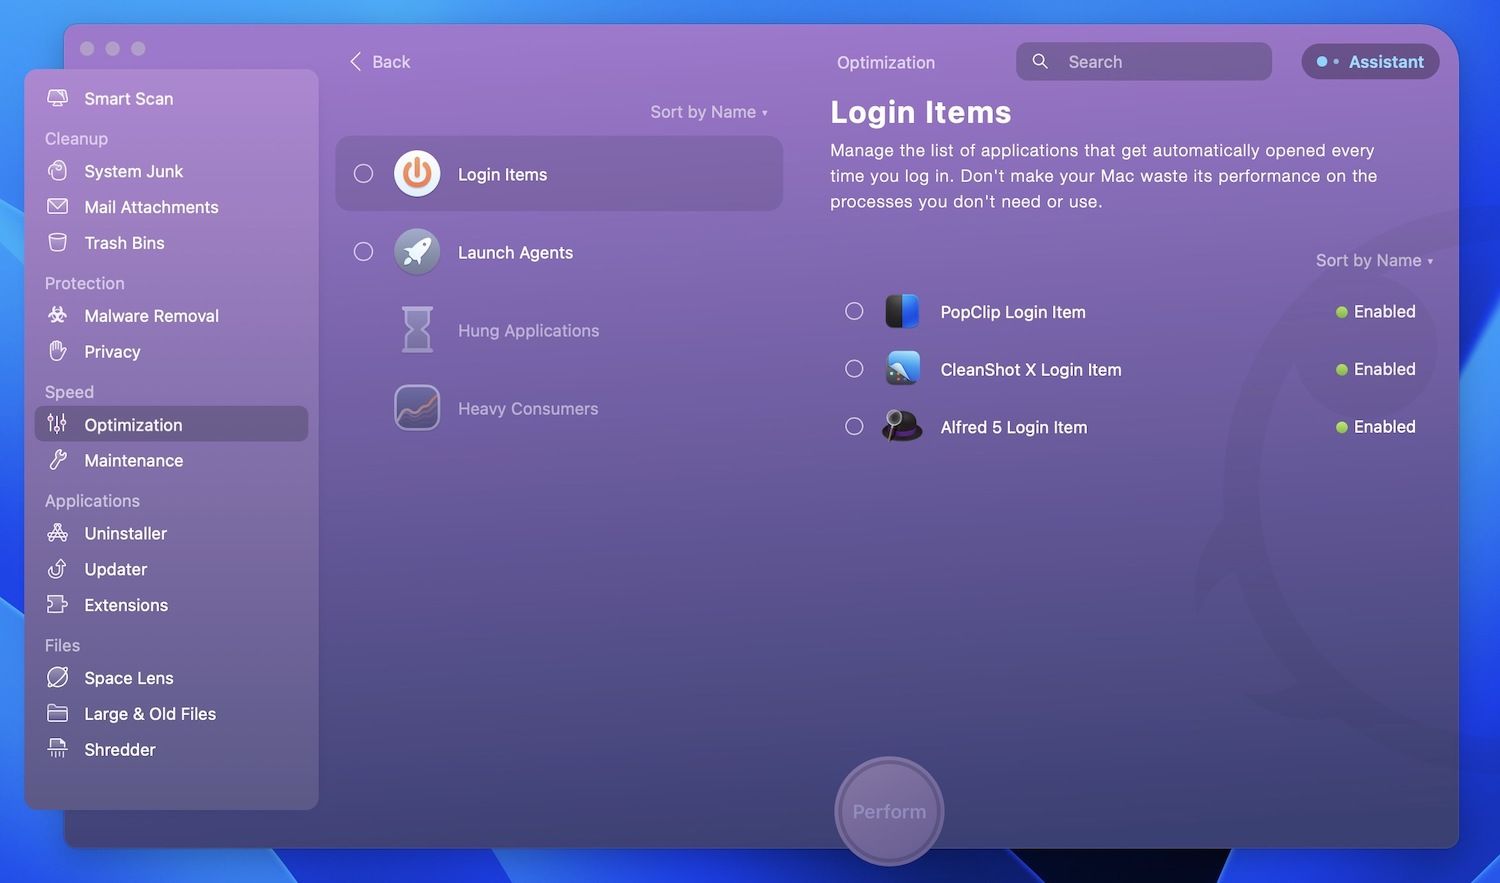
If you have bought CleanMyMac X, you can use it to remove the login items. Launch the app and go to Optimization → Login Items. Here select the items that you want to remove and click on the Remove button.
4. Delete mail attachments
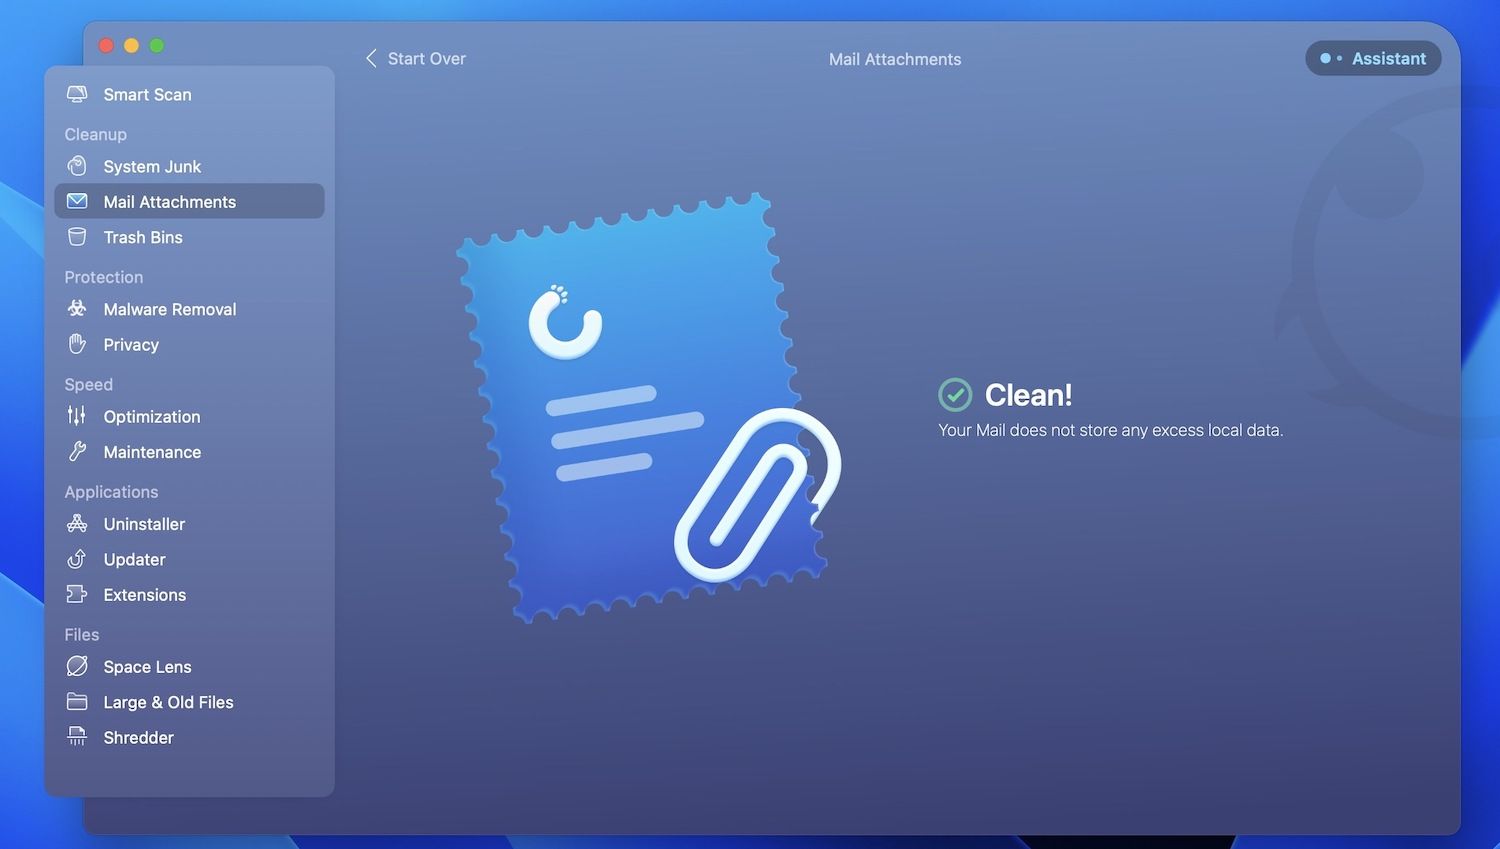
Everyday users receive dozens of personal, professional, and promotional emails. Some of these emails come with attachments that may include PDFs, word documents, pictures, and more. Sometimes we don’t download these files and only double-click to open them. We don’t realize that when we double-click to open an attachment, the Mail app downloads the attachments in its download folder. Double-click on enough attachments and a big chunk of your storage is filled with useless files. So, how will you clean your Mac off these files? On CleanMyMac X, you can launch the app and go to Mail Attachments. Now, Hit the Scan button to find the files and then clean.
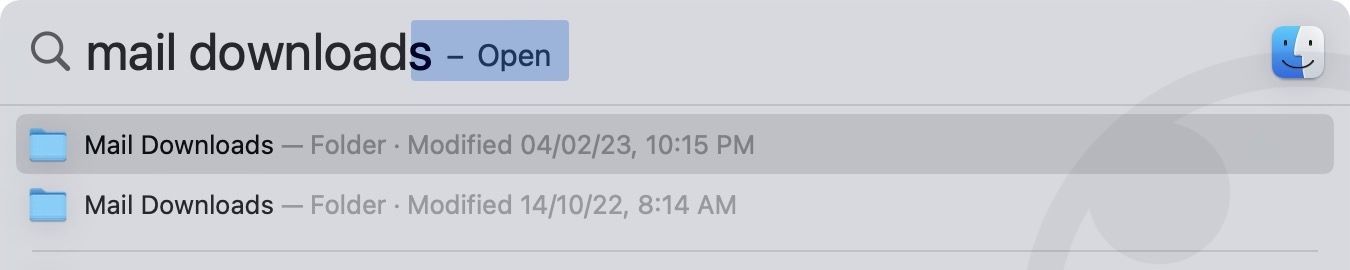
If you want to do it manually, launch Spotlight (⌘+Space) and search for Mail Downloads. Hit enter to open the folder. Here select all the files (Cmd+A) and permanently delete the files (Cmd+Opt+Delete).
5. Uninstall apps without leaving residual files
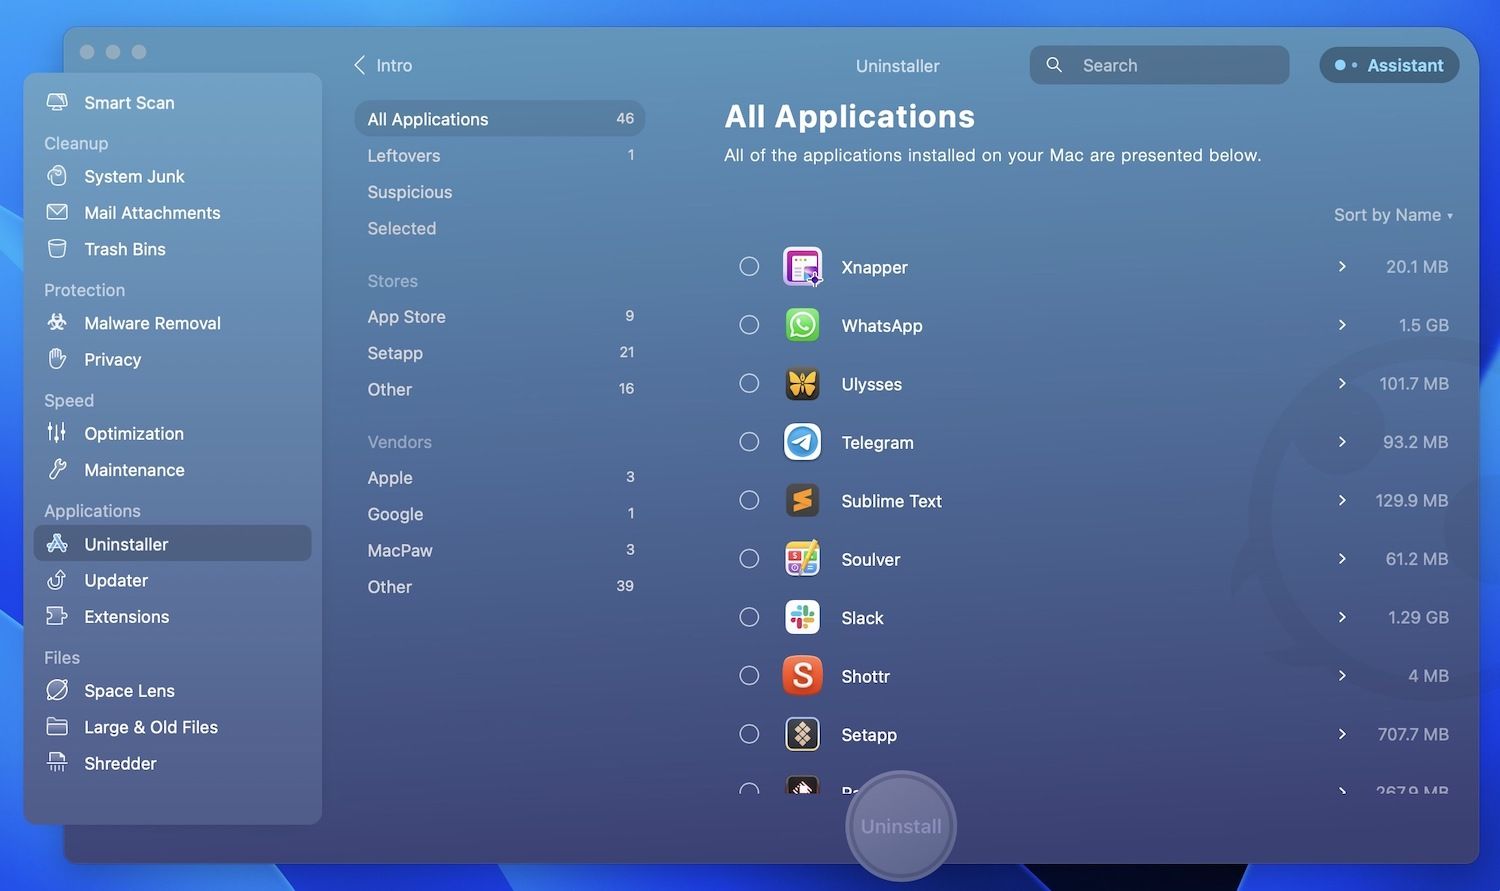
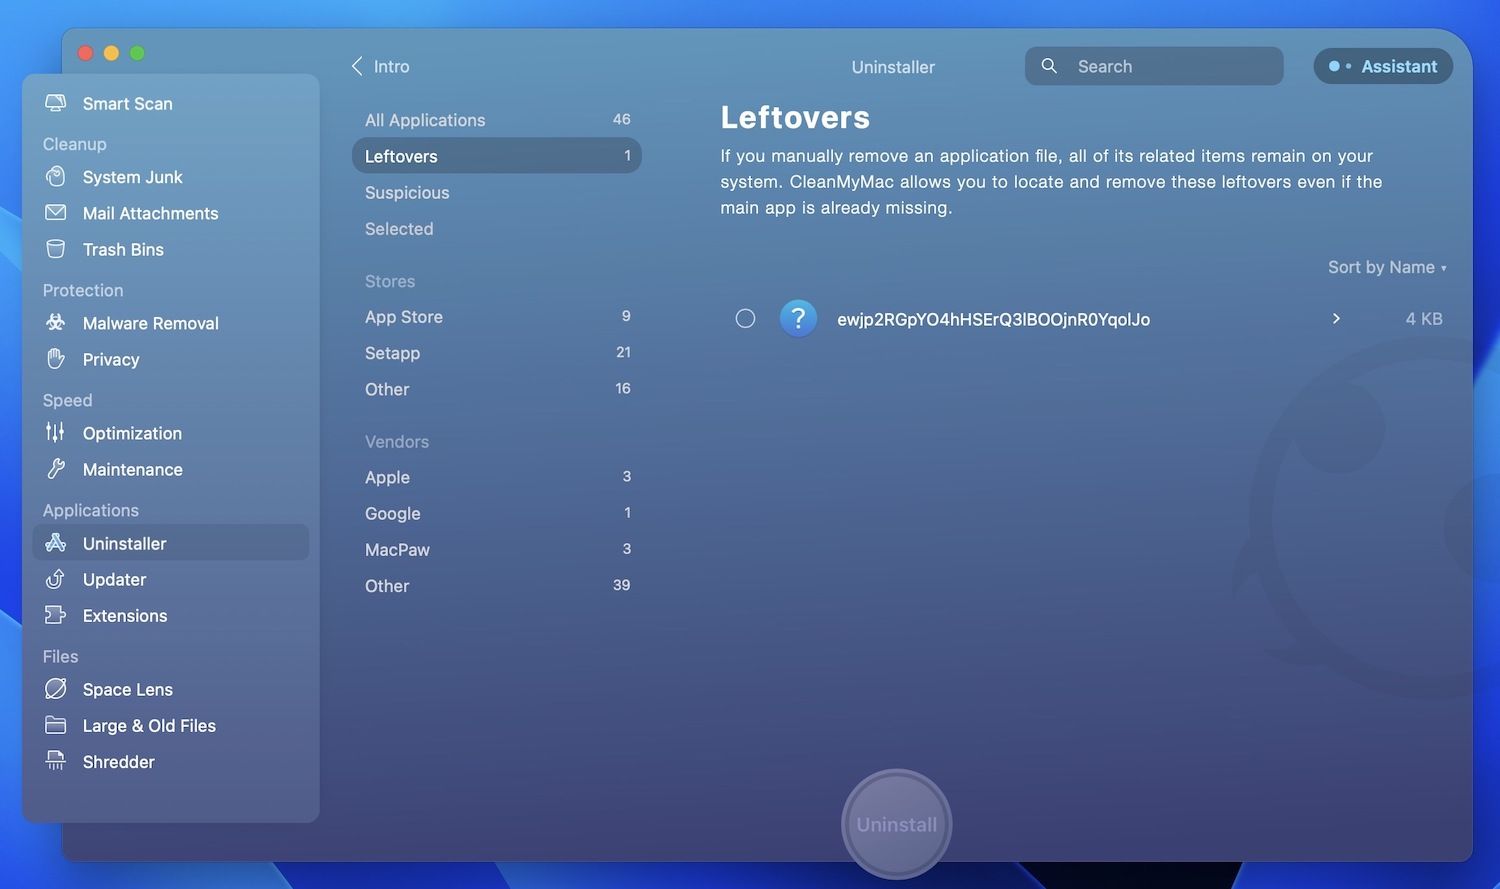
macOS makes it very easy to uninstall files. However, when you uninstall a file using the native method, your apps are not installed completely. The apps leave residual files that clutter up your Mac’s storage. If you uninstall apps you have used for a long time, these apps will leave bigger residual files. If you have already bought CleanMyMac X, you can use it to uninstall apps cleanly, as it removes all residual files. To uninstall an app with CleanMyMac X, click on the Uninstaller tab, select the app or apps ( you can uninstall multiple apps), and click the Uninstall button.
Another great thing about CleanMyMac X is that it also lets you delete any residual files that past apps have left on your device. To delete those residual files, click on the Leftovers tab → select the residual files and click on the Uninstall button to remove them.
The best free alternative to thoroughly uninstall unwanted apps is AppCleaner by freemacsoft. To uninstall an app, simply drag and drop the app in the AppCleaner’s window and it will find all the files associated with the app. Click on the “Remove” button to delete the app along with all its files. The only drawback of this app is that it doesn’t allow you to remove residual files that are already on the system.
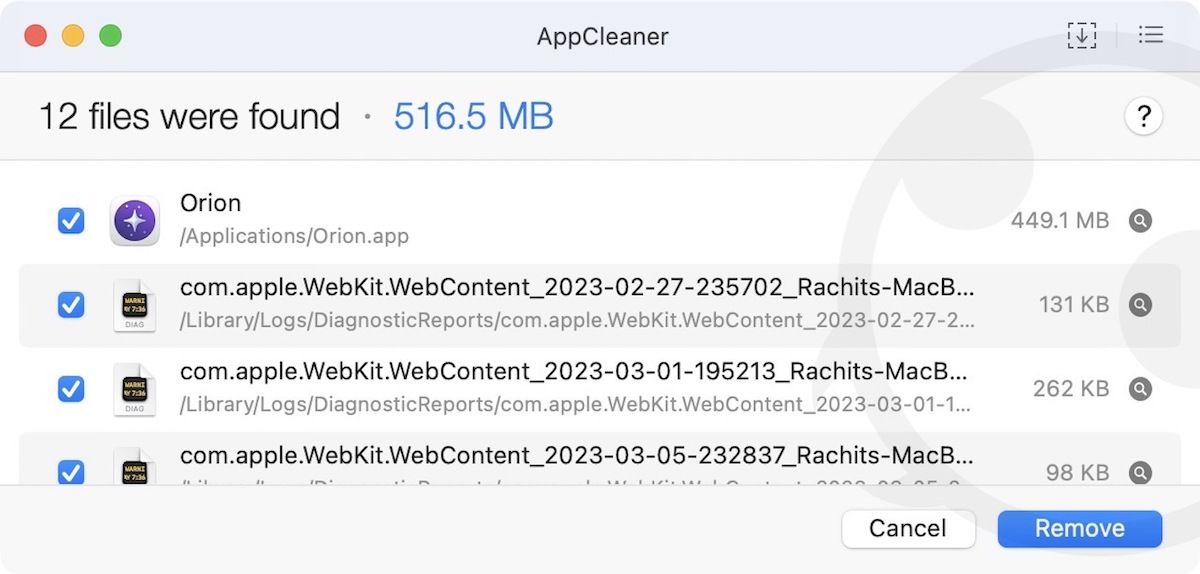
Get AppCleaner: Free
6. Delete large and old files
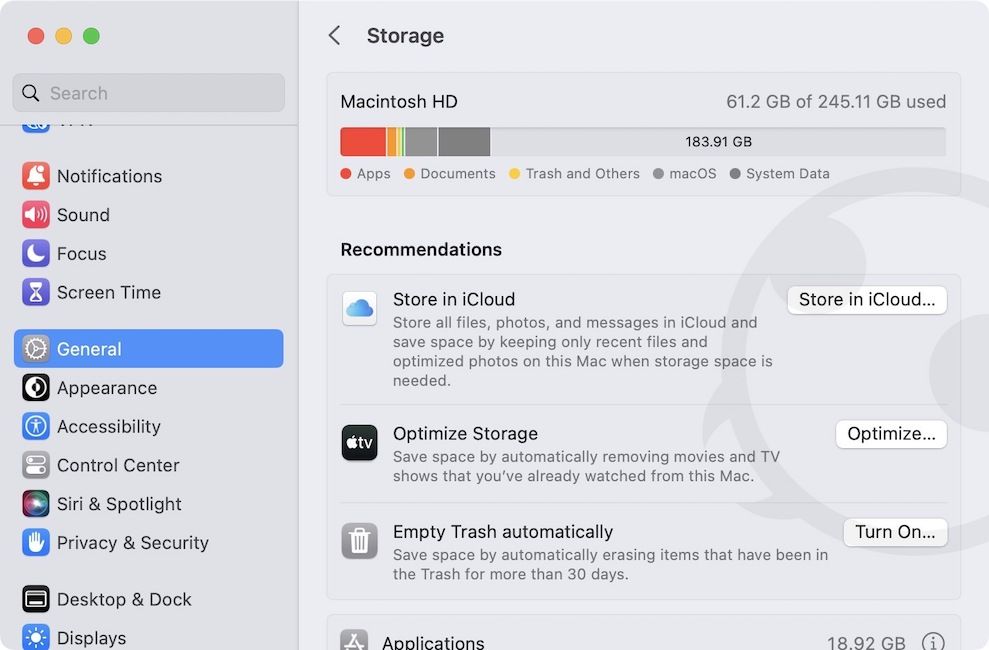
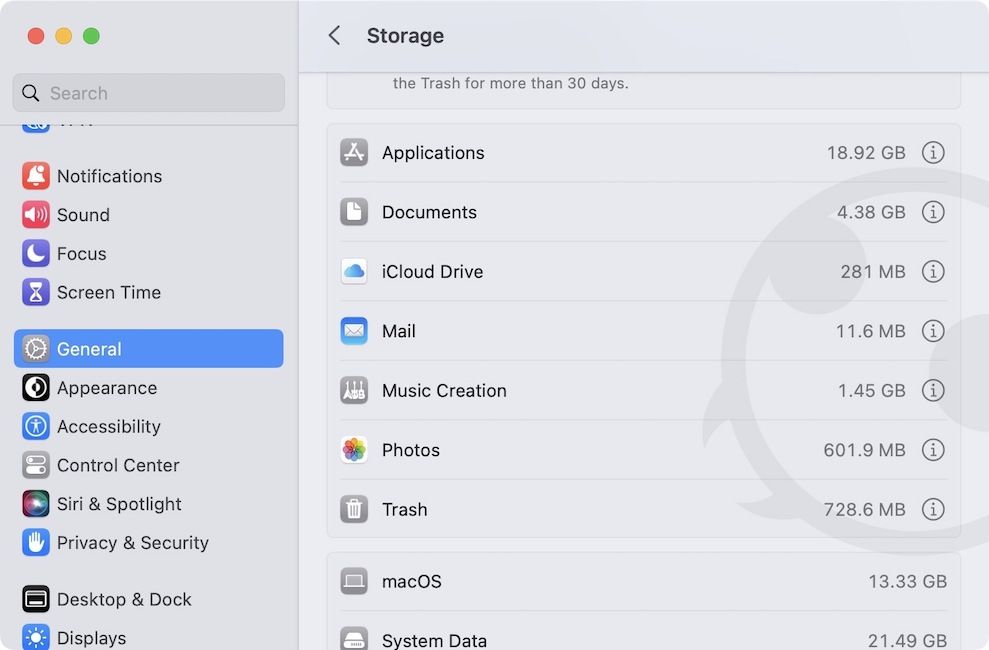
Over the years that we have been using our Macs, we download a lot of files that we forget to delete even when they have served their purpose. It leads to the accumulation of files on our Macs that sit there and do nothing other than eat precious storage. There is a native way to find and delete those files and apps. But like other manual methods, it’s cumbersome, and you can never be sure if you got them all. In the older macOS versions, go to Menu → About this Mac → Manage.
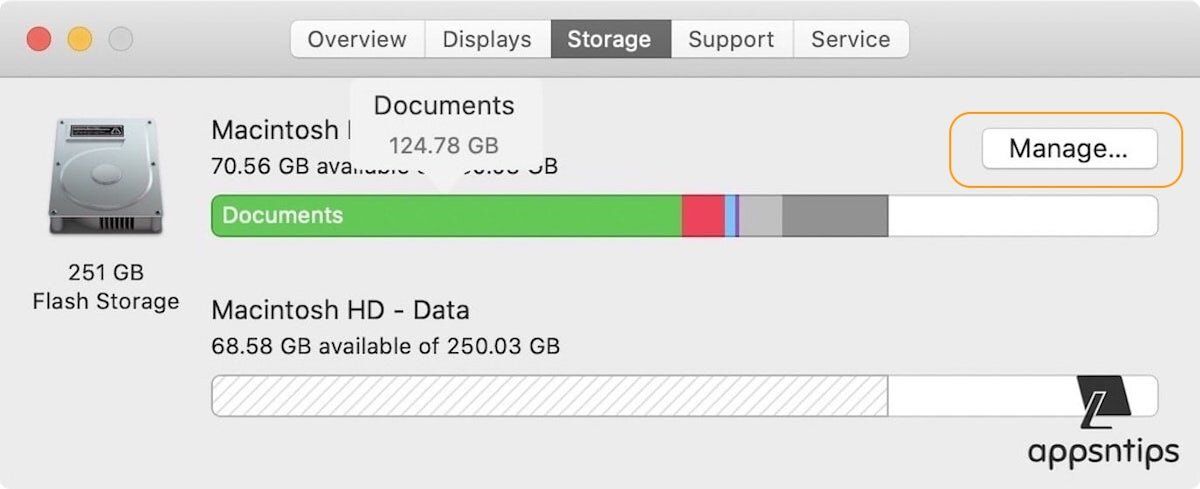
Here, you will system recommendations for files and apps that are taking the most storage space on your Mac. You can choose files in every category (Applications, Documents, iCloud Drive, etc) and click Delete to remove it and optimize space. In macOS Ventura and newer versions of macOS go to Menu → System Settings → General → Storage. Now click on the (i) button next to a category, select the item you want to delete, and click the Delete button.

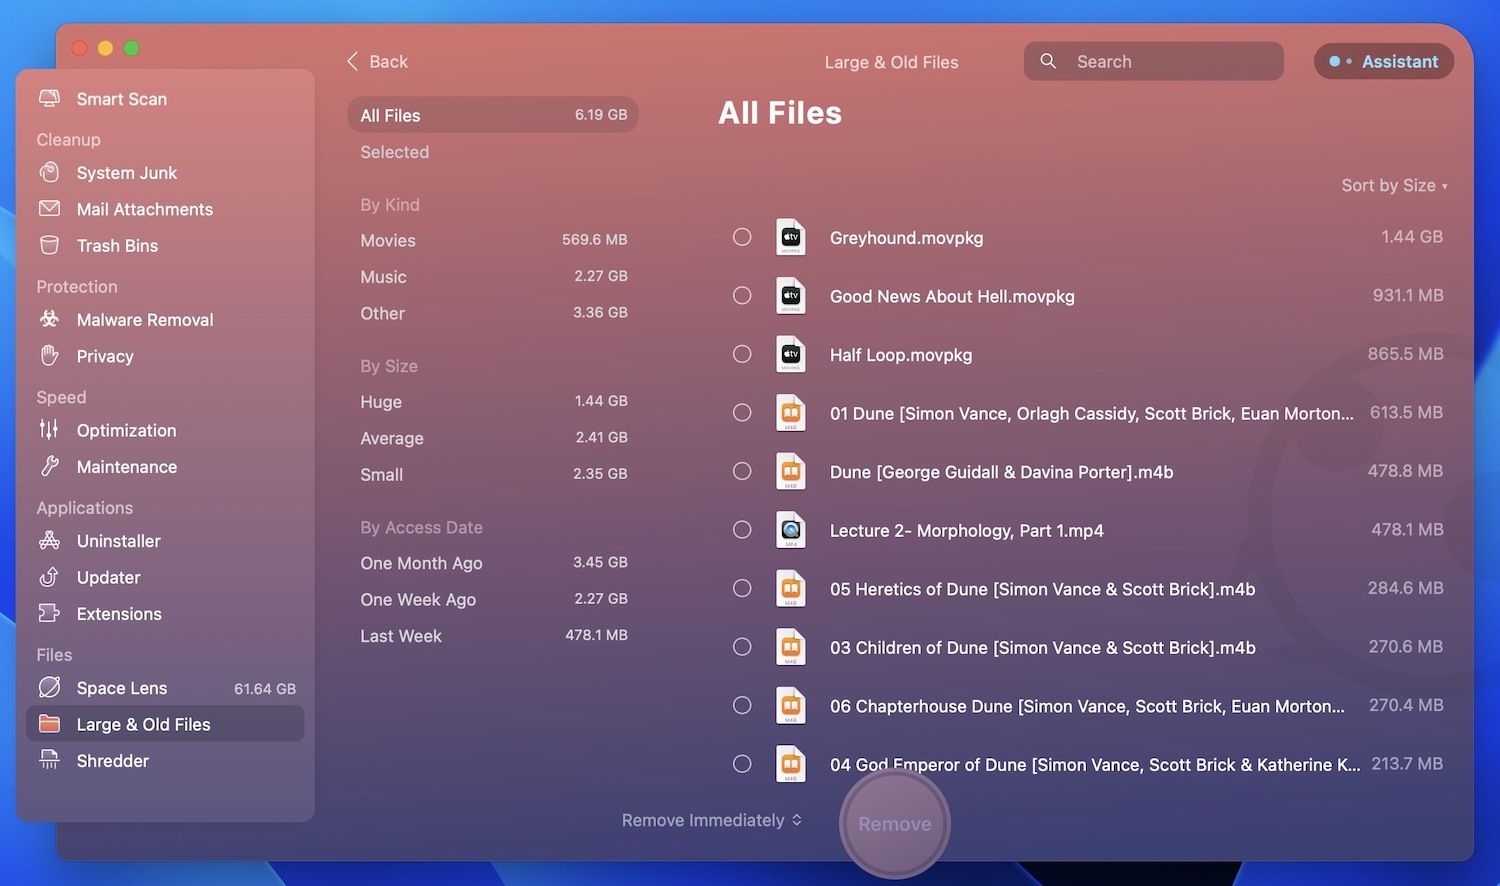
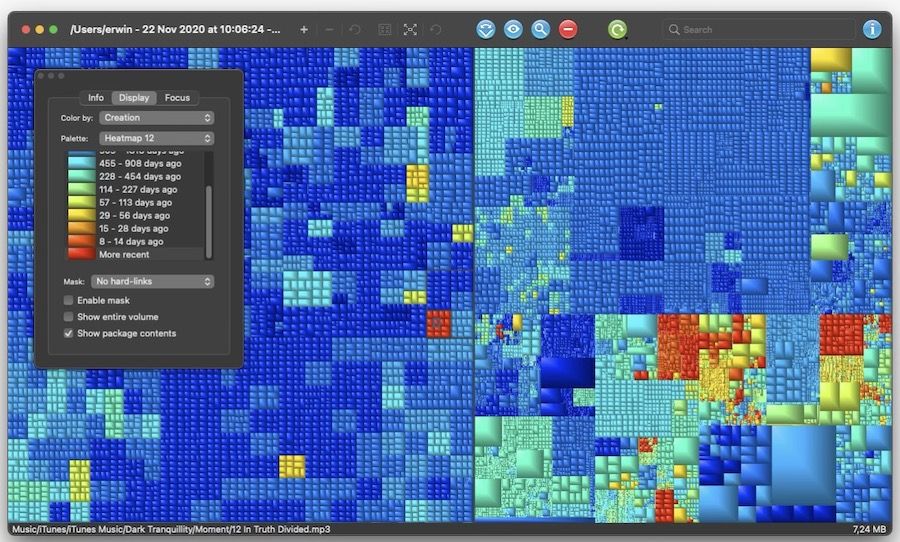
If you want to use third-party apps to make your work easier, you have a couple of options. First is the CleanMyMac X. It has a Space Lens feature that builds your storage map and lets you visualize and find storage hogging files. If you don’t want to review all the files, you can use the Large & Old Files feature to quickly find the biggest culprits.
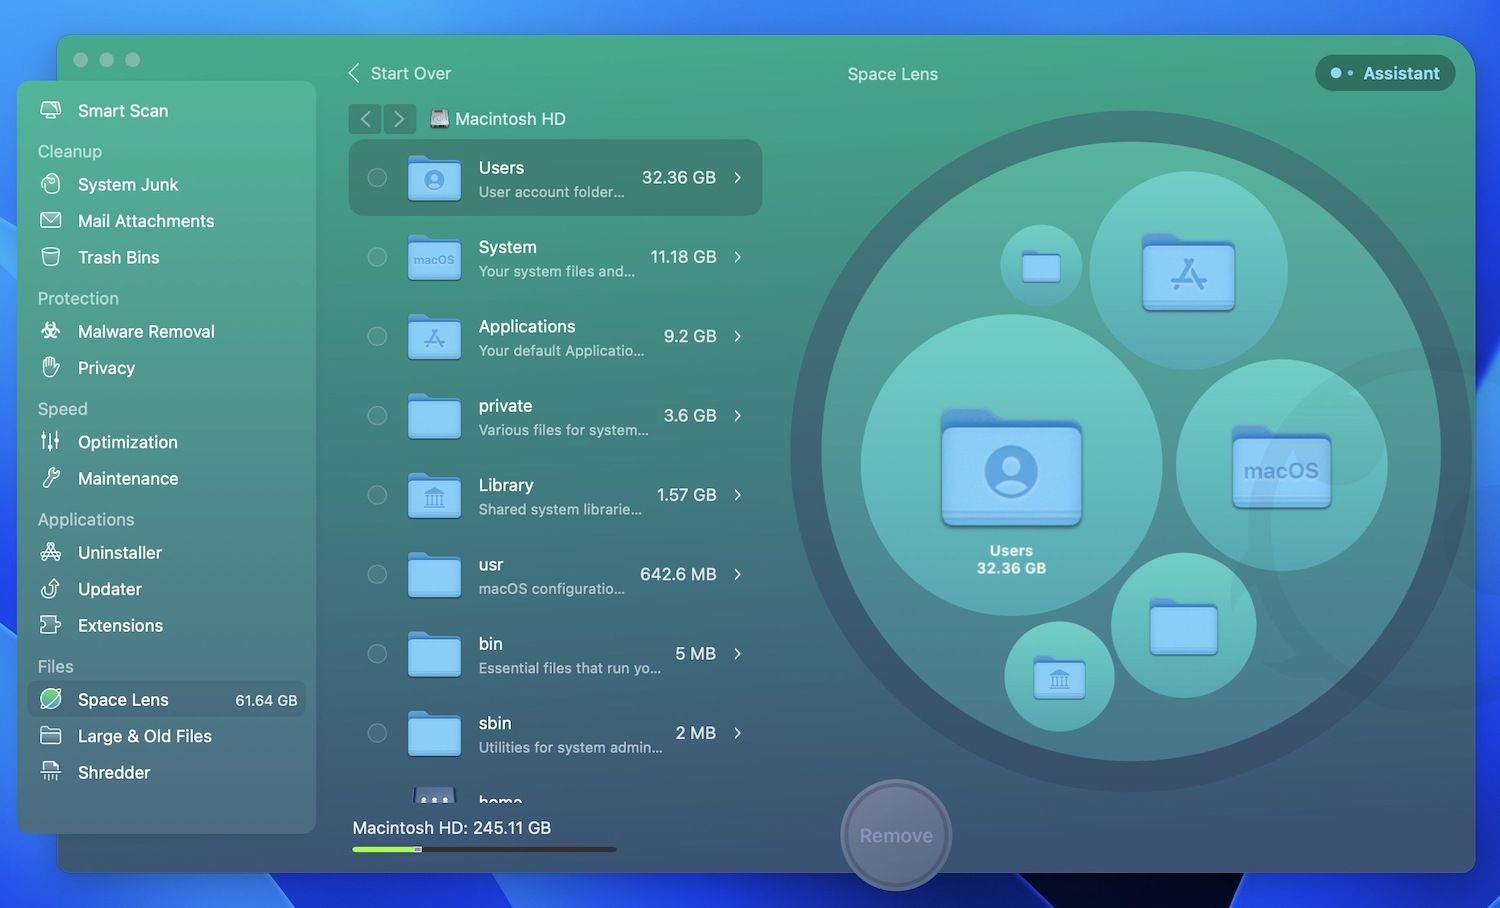
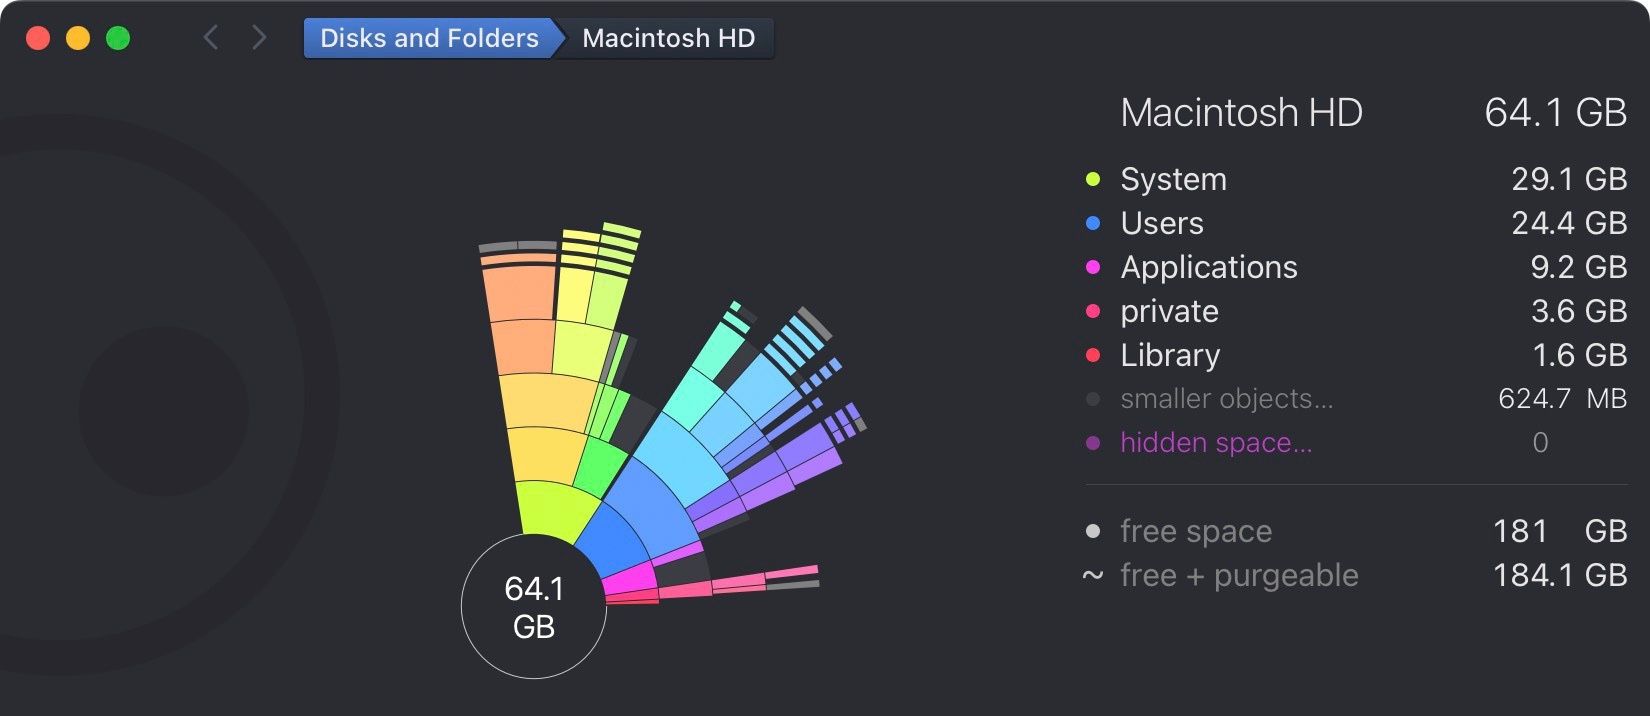
Another such app is DaisyDisk. It scans your entire Mac and gives a beautiful graphical representation of its storage. The app represents all the folders and files occupying your Mac’s storage in easy-to-navigate and color-coded concentric circles. The bigger the circle, the larger the size of that folder on your Mac. Clicking on a circle is equivalent to opening a folder. Using its graphical interface, you can easily find those pesky large and old hidden files, and delete them to release storage on your Mac.
If you are looking for a free option, there is another app called GrandPerspective which performs almost the same function. That said, its UI is not good, and you will find it a bit confusing. You can get it from its website for free or pay $2.99 to download it from the Mac App Store.
7. Remove duplicates
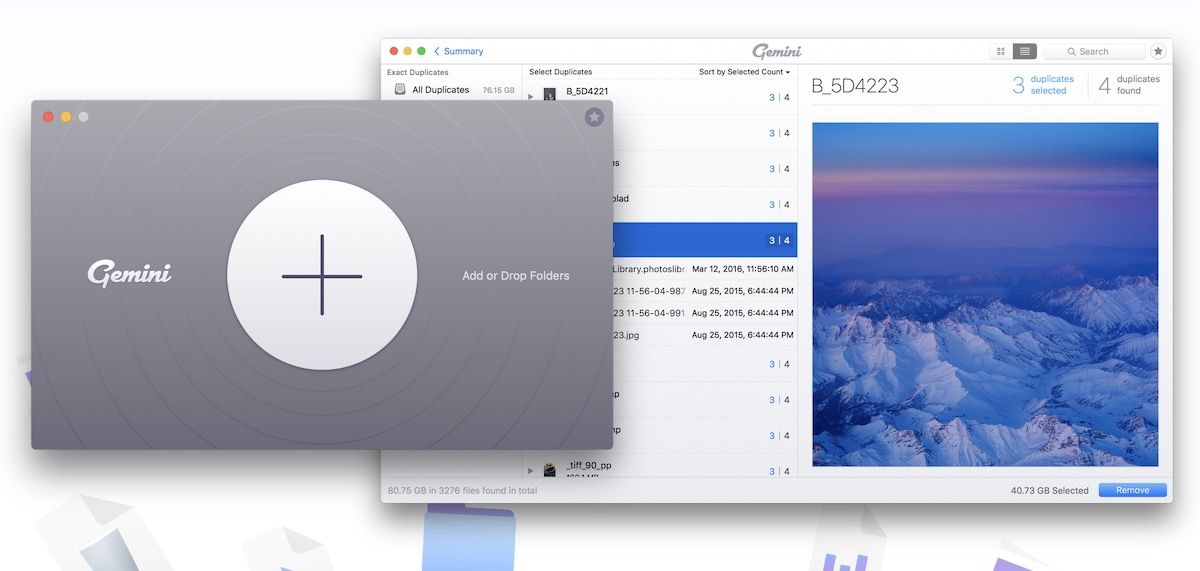
One of the biggest culprits of lost storage on your Mac is duplicate files. We copy and move a lot of stuff on our Macs, and sometimes we forget to delete the original file and are left with two copies of the same file. It also happens when we are taking pictures. We tend to take multiple shots to ensure that pictures came out right. Since everything is synced back to the Mac, those multiple shots eat a lot of storage. Thankfully, there is an easy way to find and delete duplicate files on your Mac.Our favorite app to do this is Gemini 2.
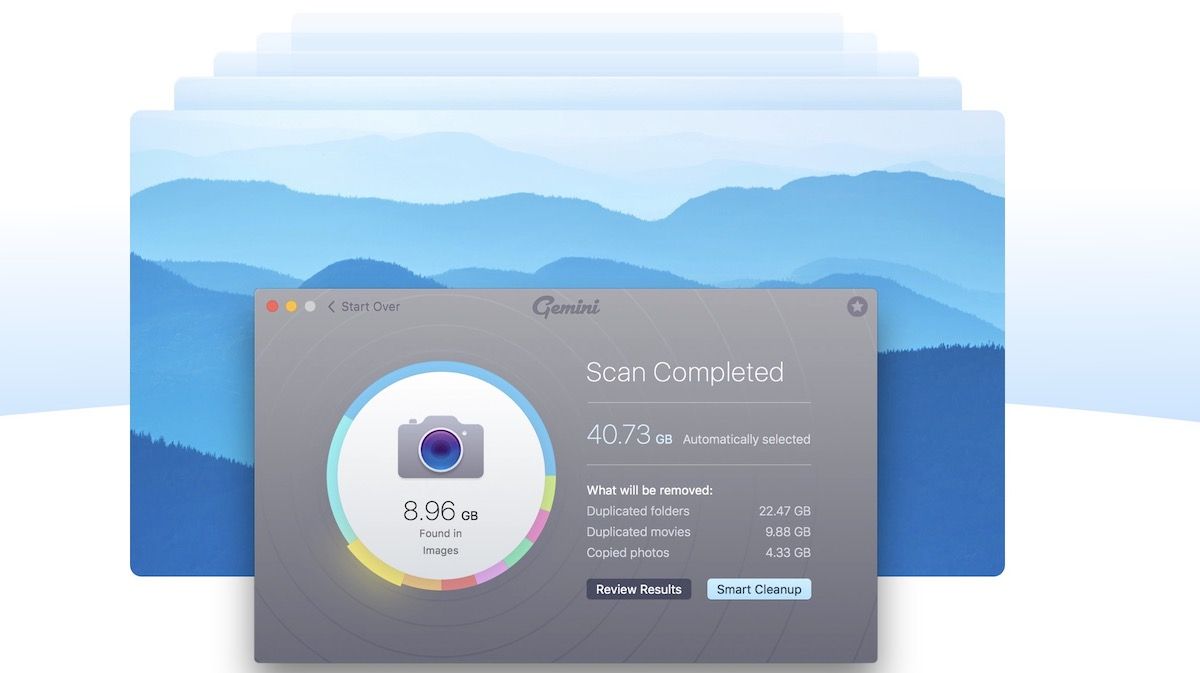
Once installed you can use the app to scan your Mac and in a few seconds or minutes, it will catalog all the duplicate files and show it to you. The best part is that it doesn’t automatically delete duplicate files but gives you an option to pick and choose the version that you want to keep. Another good app that can help you do the same is the Duplicate File Finder Remover (Free, $19.95). It is also a cheaper alternative to Gemini 2. That said, for us, Gemini 2 has worked great and we prefer it over any other duplicate file finding apps for the Mac.
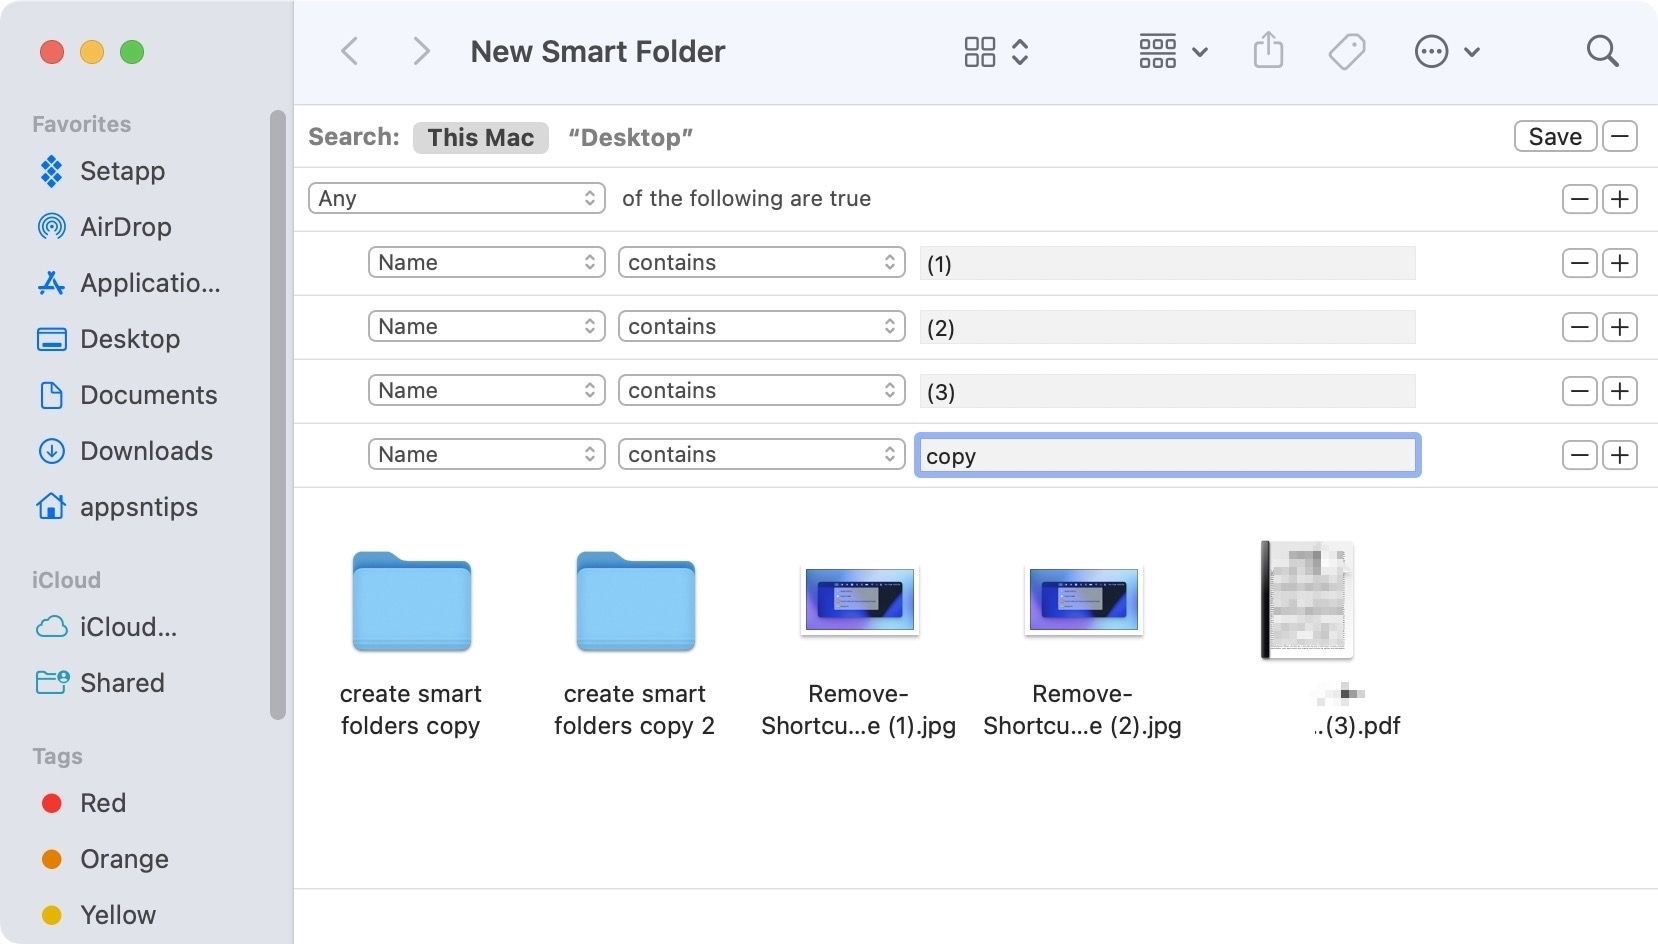
If you want to do it manually, you can try it but it’s going to be a chore. Also, you will only be able to find duplicates with the same name. That means you won’t be able to find duplicate photos and any file with a modified name. First, open a Finder Window and then go to File → New Smart Folder.

We know that Mac saves every duplicate file with a moniker (1), (2), (3), and so on. Create the rule as shown in the screenshot below, and it will find all the duplicate files. You can learn more about smart folders on Mac by visiting our linked guide.
Get Gemini 2: Free, $19.95/year or $49.95 for lifetime license
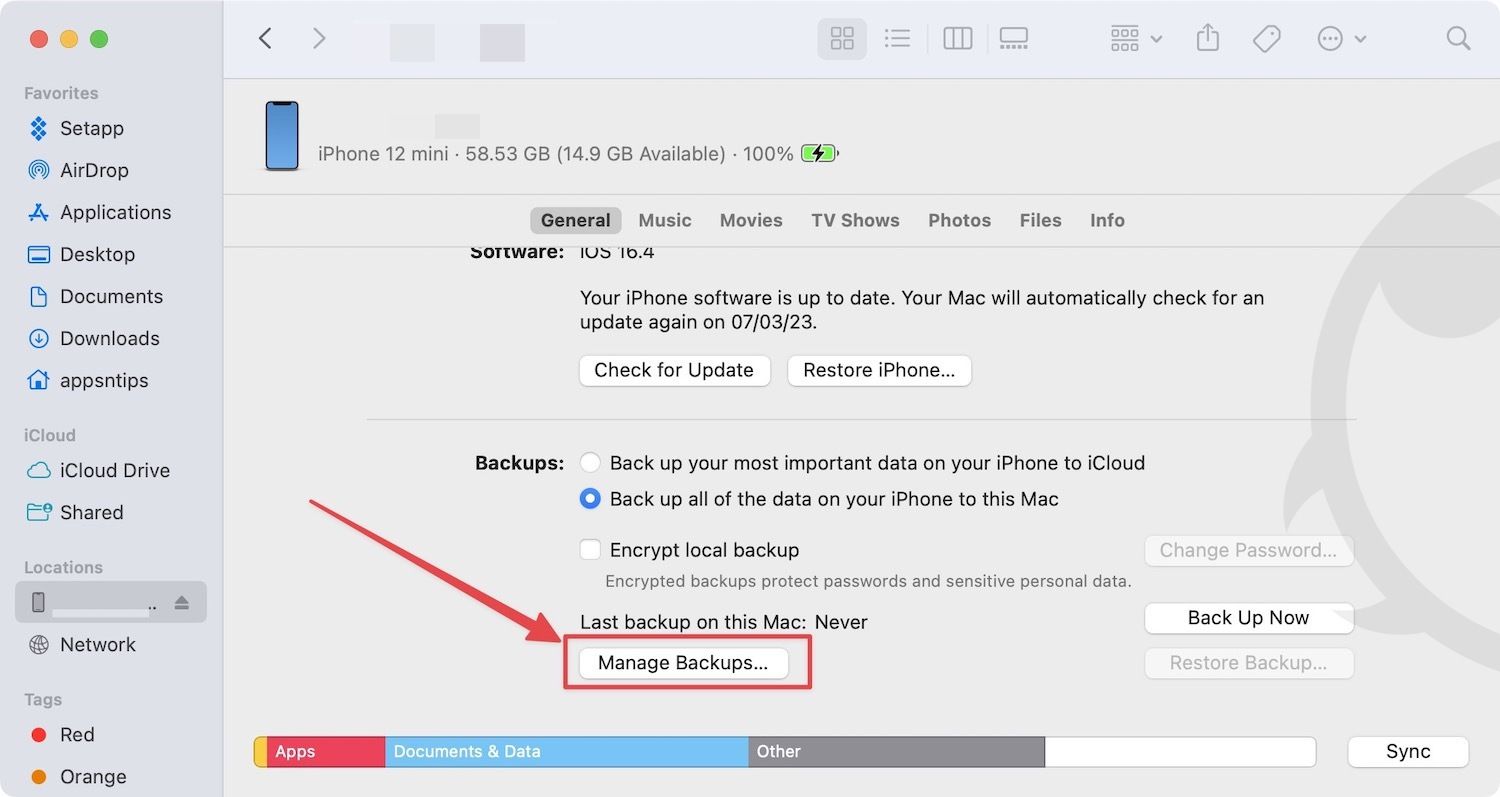
8. Delete redundant backups
If you create backups of your iPhone on your Mac, you need to take this step to clean your Mac. Most of us end up creating multiple backups of our iPhones. If you are someone who likes having multiple backup points, it’s okay. But if you are keeping multiple backups without meaning to, then it’s time to clean them out.
To delete iPhone backups on your Mac, first connect your iPhone to Mac using the lightning cable. If you have the newer MacBook Pro or MacBook Air (2016 models and later), you might need a dongle. You can find a list of best dongles in our MacBook Pro accessories article. After you connect the phone, launch Finder. Here, click on the name of your iPhone in the sidebar and then scroll down and click on Manage Backups. You will see a list of your backups which you can select and delete as per your needs.
9. Remove malware
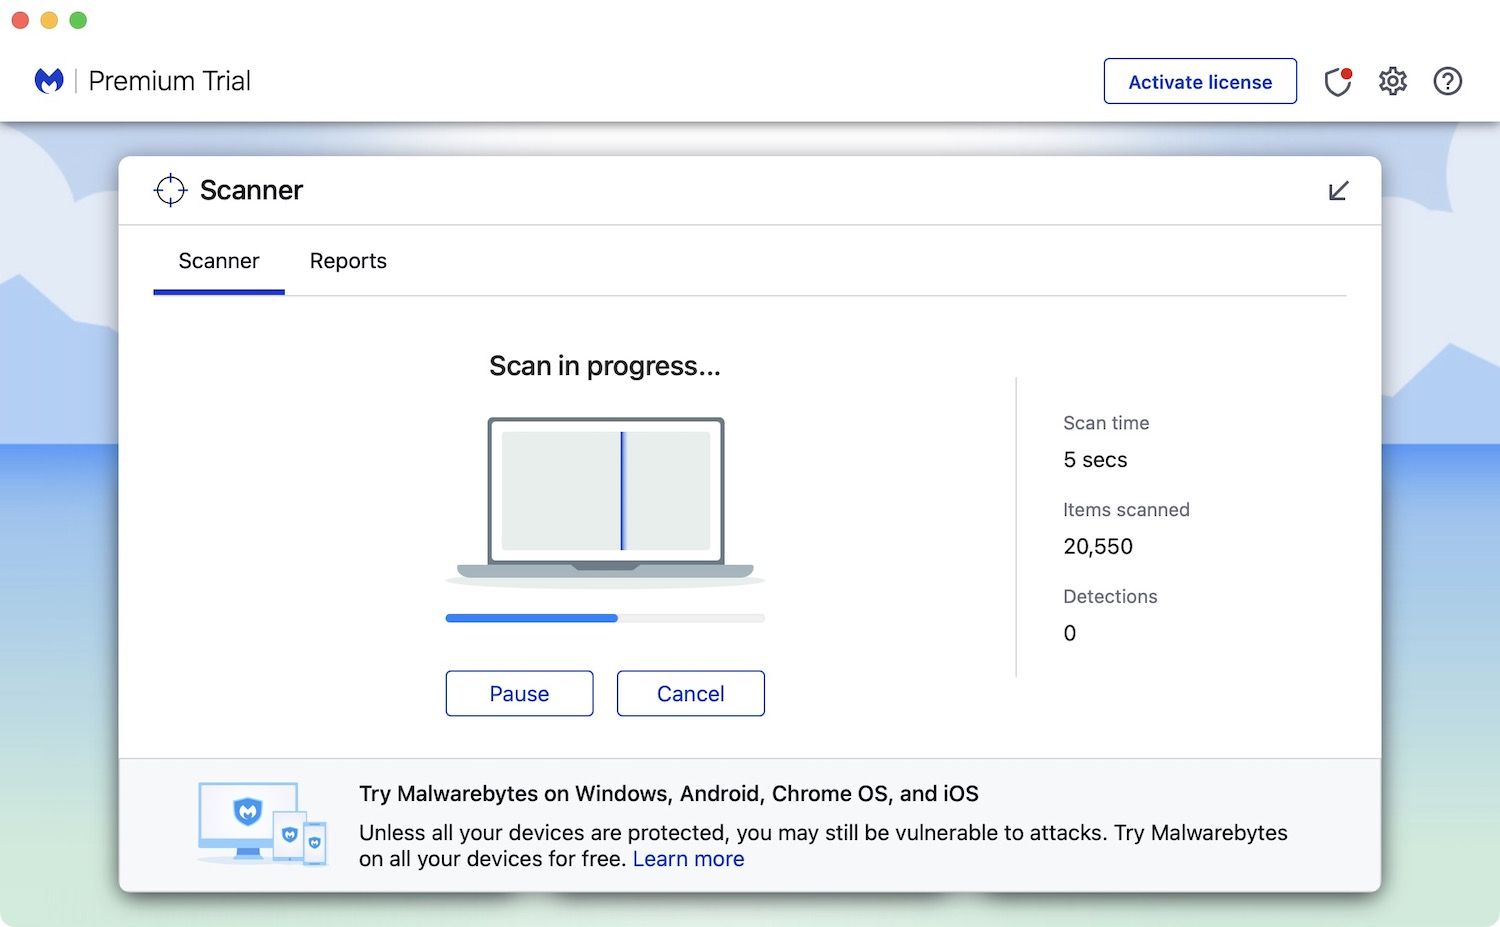
While it's true that macOS is safer against viruses than Windows machines, it is not invincible against every type of malicious attack. According to security researches, malware attacks on Mac are on the rise, increasing with each passing year. From simple phishing attacks to ransomware which completely locks down your Mac leaving it unusable unless you pay a hefty ransom, there are several types of malware that can infect your Mac. One of the most prominent attacks on Macs happens in the form of adware which bombards you with ads. If your Mac is suddenly feeling slow or you are seeing more ads than usual, chances are that you have been attacked by malware. The best tool to fight against malware is Malwarebytes.
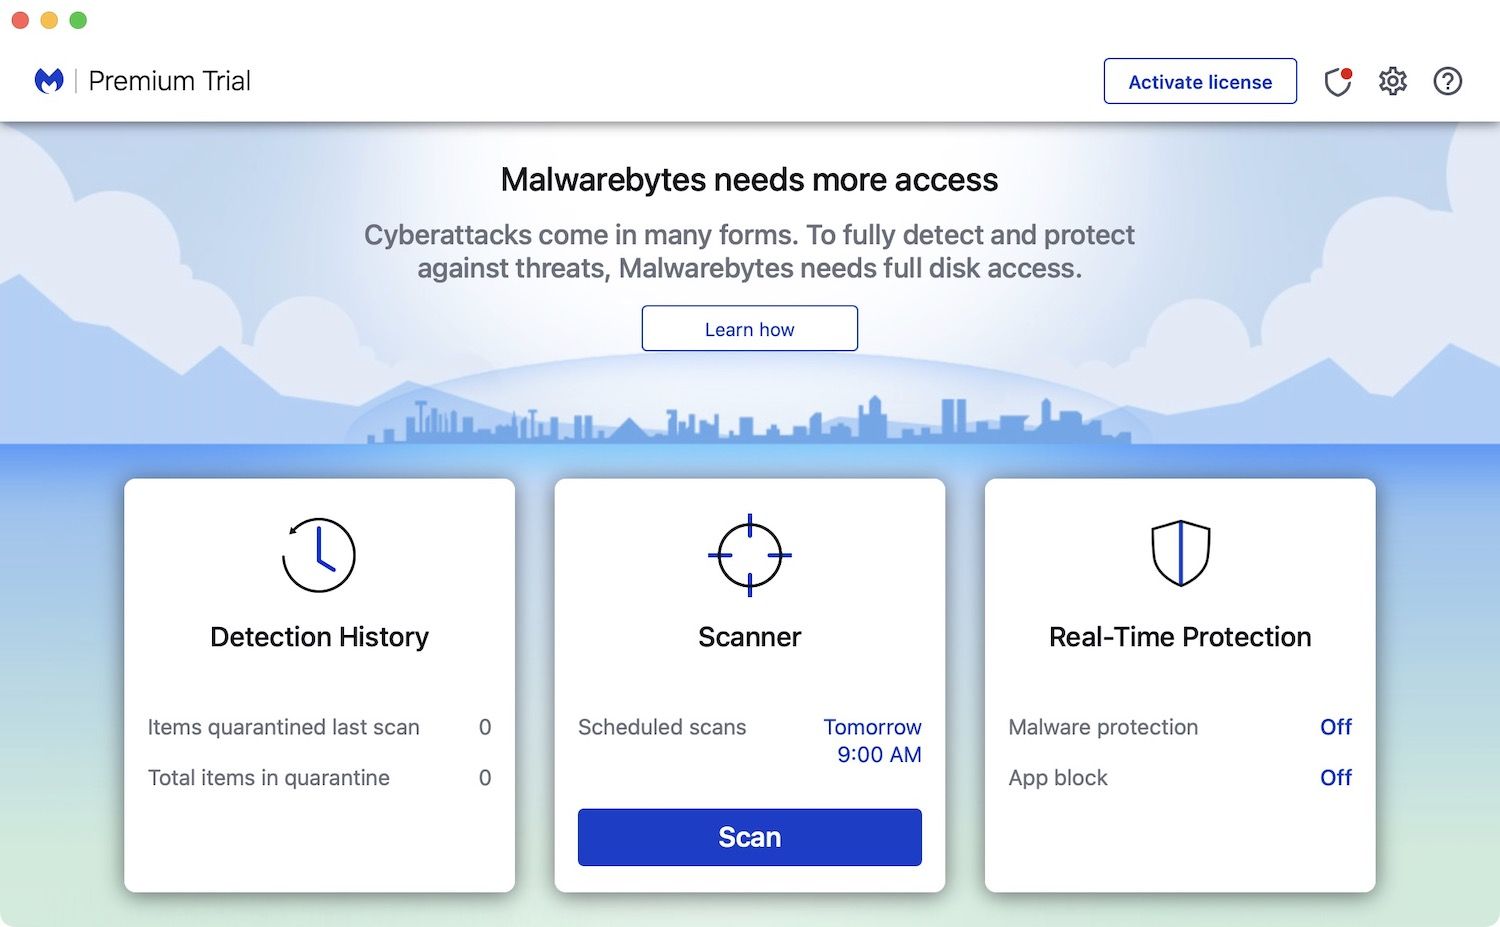
Malwarebytes is the best defense against malware for Mac. The app is free to download and use for a trial period after which you will have to upgrade to paid plans to continue using it. If online security matters to you and you want to keep your Mac clean and run it efficiently, do give this app a try. At the very least, download the app and scan your Mac once to see if you have been infected or not. If you have been infected, Malwarebytes will find the malware and remove it for you, making your Mac clean again.
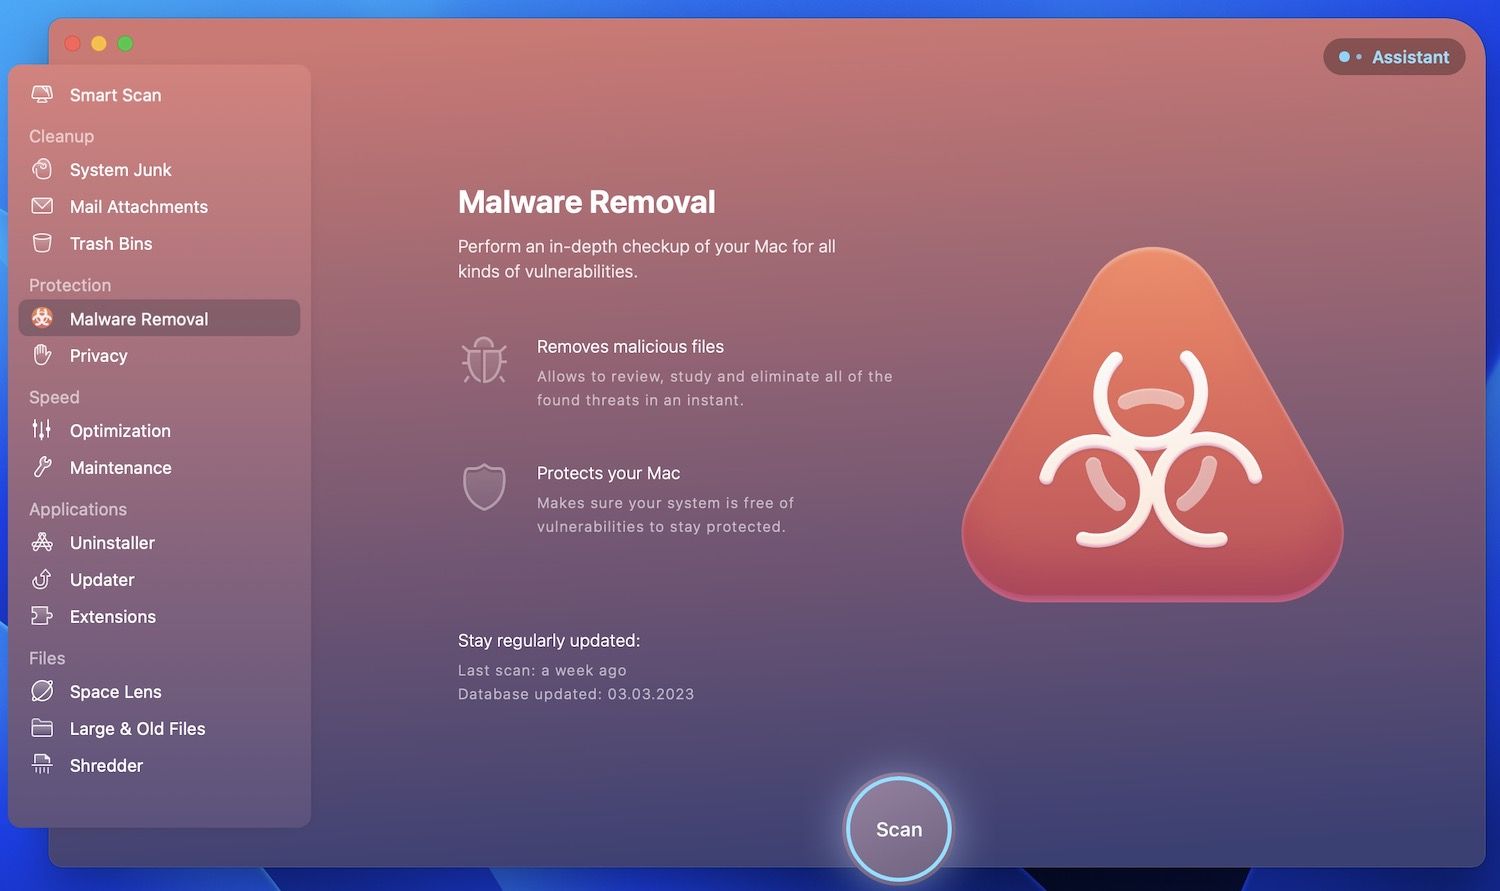
CleanMyMac X recently launched a new Malware removal tool. I don’t know if it’s as good as the one Malwarebytes brings, but it is quite powerful. If you don’t want to pay for yet another new program and have purchased CleanMyMac X, you can use it to scan your Mac and find and fix vulnerabilities.
Get Malwarebytes: Free trial, $39.99/year
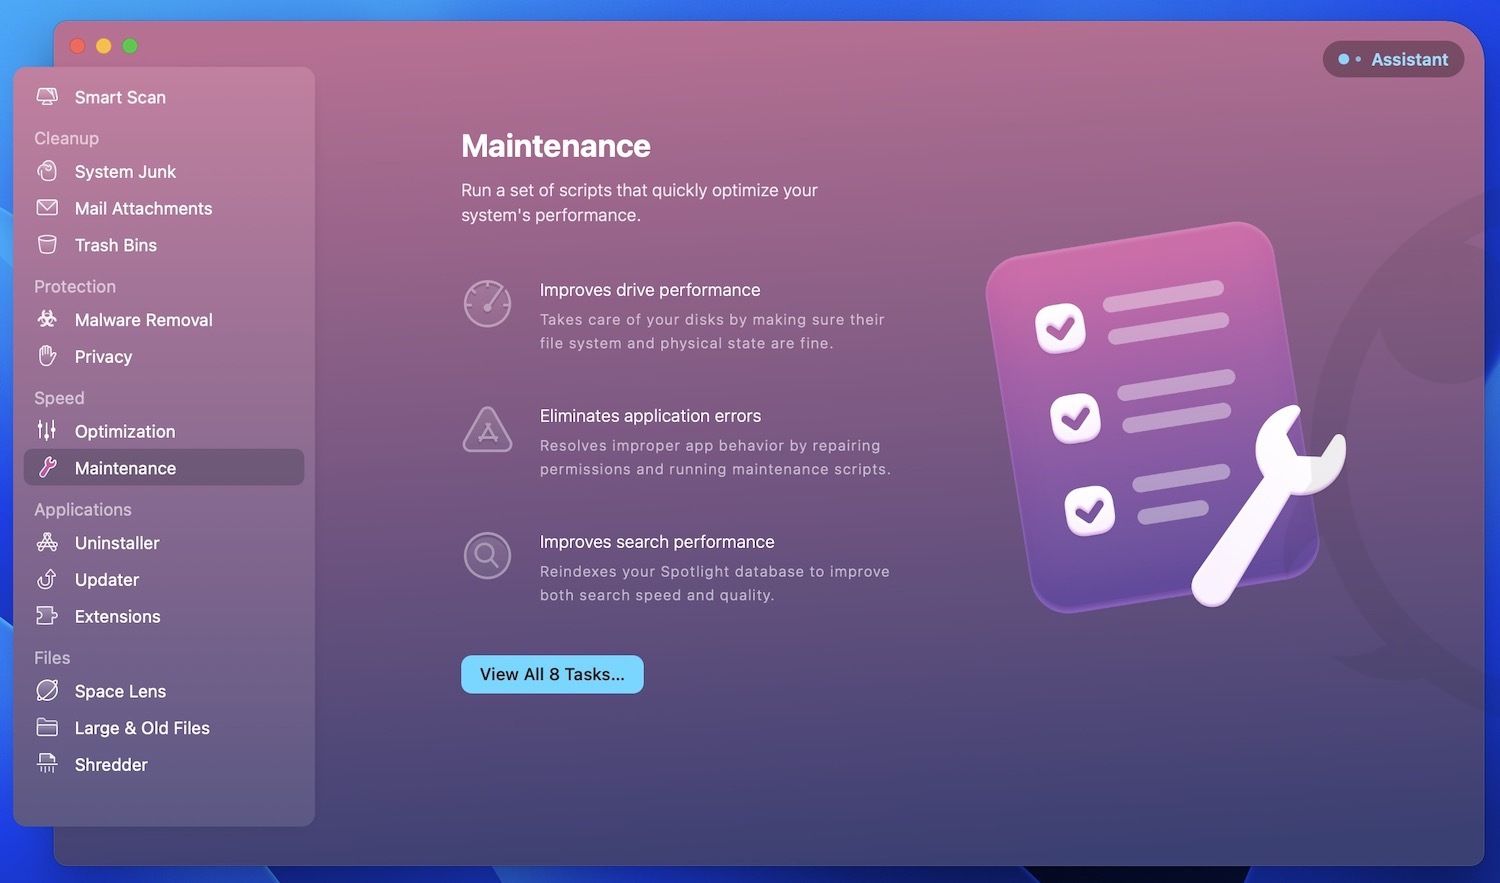
10. Run maintenance scripts
After you are done with all the steps and thoroughly cleaned your Mac, the final step is to run some maintenance scripts. Both CleanMyMac X and OnyX offer a comprehensive maintenance scripts library. When run these scripts will do things like rotate system logs, remove temporary items, and run several other useful system optimizations. CleanMyMac X takes this one step further and allows you to do other things such as flushing DNS cache, reindexing Spotlight, freeing up RAM & purgeable space, repairing disk permission, and more.
Talking just about maintenance scripts, you can run them manually using simple Terminal commands. Terminal commands are useful and I have mentioned several commands in our MacBook Pro tips and tricks article. So, go check them out if want to learn something new. Anyways, to run the maintenance scripts open Terminal either through the Spotlight search or by navigating to Finder → Applications → Utilities and double-clicking on Terminal.

Now, copy and paste the below command and hit enter/return.
sudo periodic daily weekly monthly
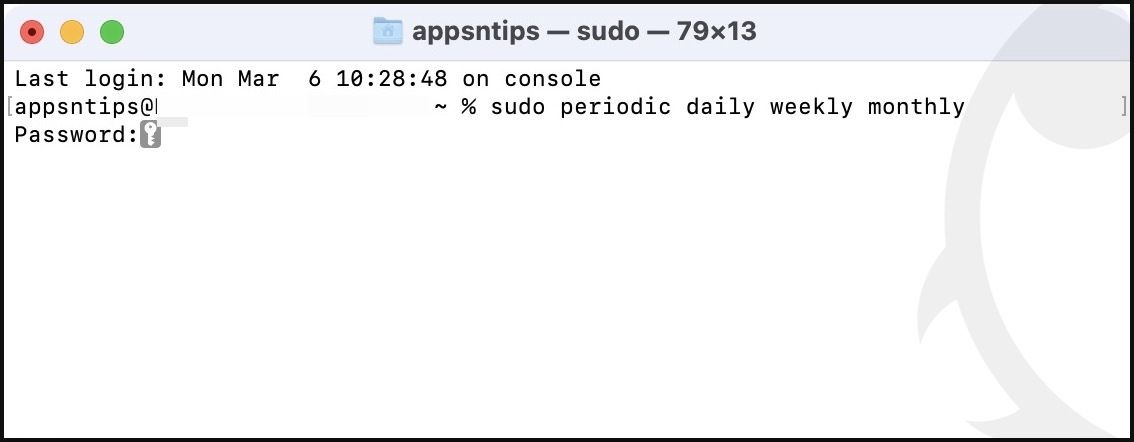
It will ask for your user password. Enter it and then hit enter/return again. Note that it won’t show your password while you are typing it for security reasons, so don’t get flustered. Just type the password and hit enter/return. Once you do that, Terminal will run maintenance scripts and you will get a prompt after it’s done.
You can also check when the last maintenance script was run. Again open Terminal, paste the below command, and hit enter/return.
ls -al /var/log/*.out
How to clean up Mac with a single click
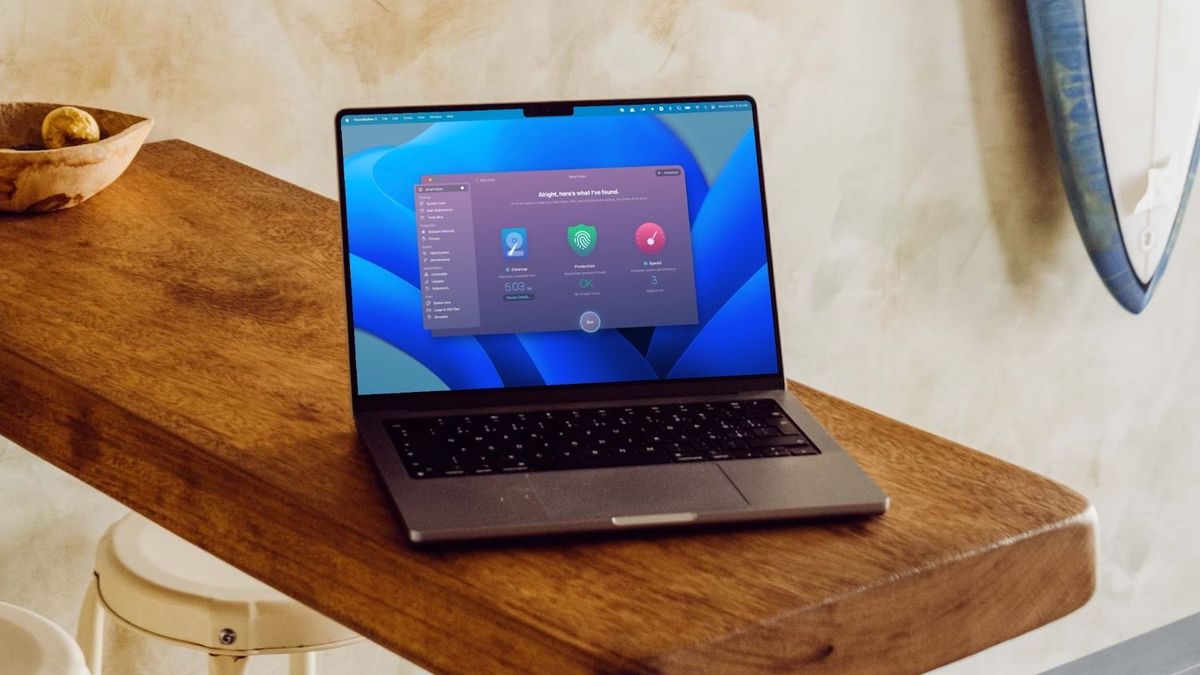
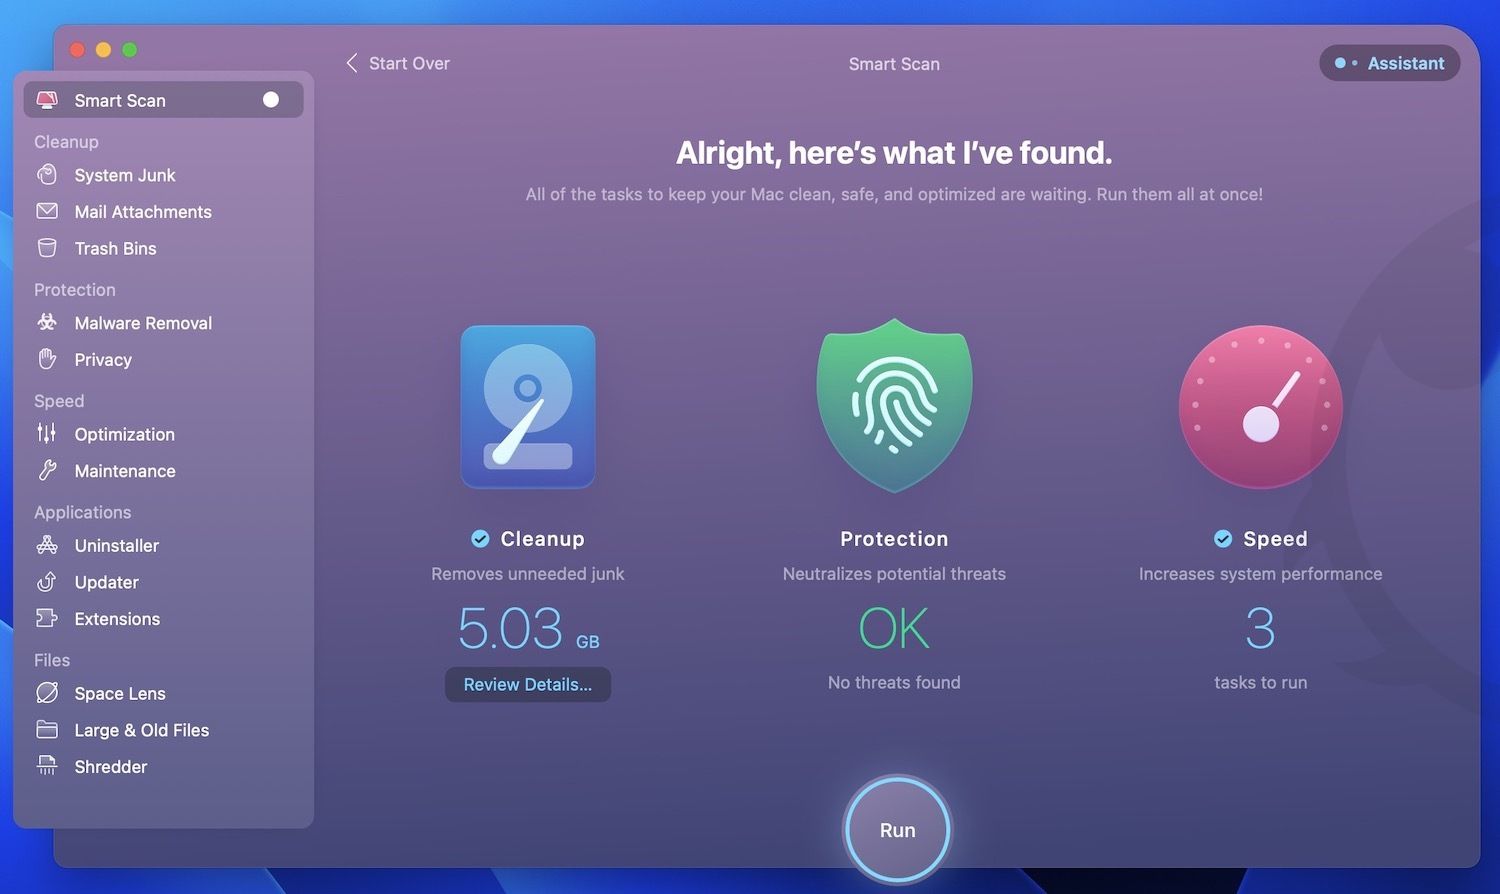
The above steps show you how you can clean your Mac manually. If you don’t want to spend any dollars, you can use the manual methods to clean your Mac or use the free third-party tools that are mentioned in the article. The reason why I choose CleanMyMac X is that it allows me to do all the cleaning with just one click. CleanMyMac X offers a Smart Scan feature that you can run with one-click. The smart scan feature not only finds and remove junk files but it also clears caches, deletes mail attachments, run maintenance programs, finds and deletes malware, and more.
How to clean your Mac: final thoughts
I have covered every little thing you can do to clean your Mac. I have mentioned both the paid apps that make it easier to clean your Mac and the tedious but free methods. So use them as you wish and clean your Mac to get a more optimized performance.