Best iCloud Security Features You Are Probably Not Using

One of the best reasons to get into the Apple ecosystem is the hardware and software security features that come with it. You get features like Secure Enclave, advanced fingerprint protection in Safari, FileVault encryption on Mac, stringent app review guidelines that keep malware apps at bay, and many more.
Apple has also built several security features in its cloud services, ensuring your data is protected when it syncs across devices. There are also several user-facing features in iCloud that can further tighten the security of your data.
In this guide, we will tell you about the best iCloud security features you probably are not using.
iCloud security features you should enable right now
Your Apple ID and iCloud are the core of the Apple experience. They ensure that your devices are always talking to each other and that your data syncs across devices. To get the best protection possible, Apple has built several security features, which you should enable right now.
- Two-factor authentication
- iCloud Security Recommendations
- iCloud Private Relay
- Hide My Email
- Secure Notes
Two-factor authentication
The first thing you should do, if you have not already done so, is to enable two-factor authentication in your Apple ID. This ensures that even if someone gets access to your passwords, they cannot log into your Apple account to cause havoc.
With data breaches wreaking havoc even on password manager services like LastPass, enabling two-factor authentication on all your accounts is necessary. Here’s how you can enable two-factor authentication on your Apple ID.
1. On your iPhone or iPad, launch the Settings app and tap on your name.
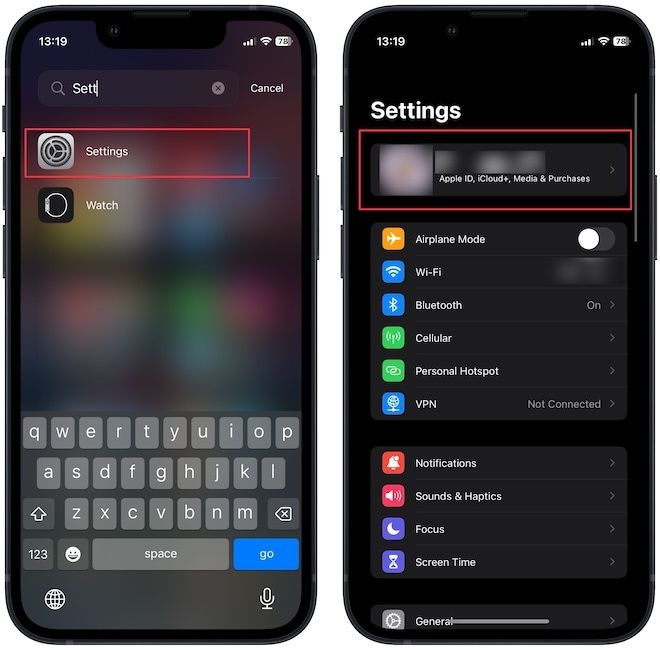
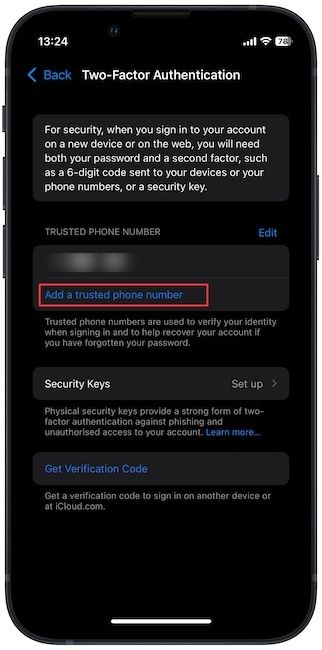
2. Now, tap on Sign-In & Security and choose the Two-Factor Authentication option.

- You should see a setup screen asking you to enter a trusted number. Once you verify a trusted number, the 2FA will start working. If you want more robust security, you can even use a physical security key.
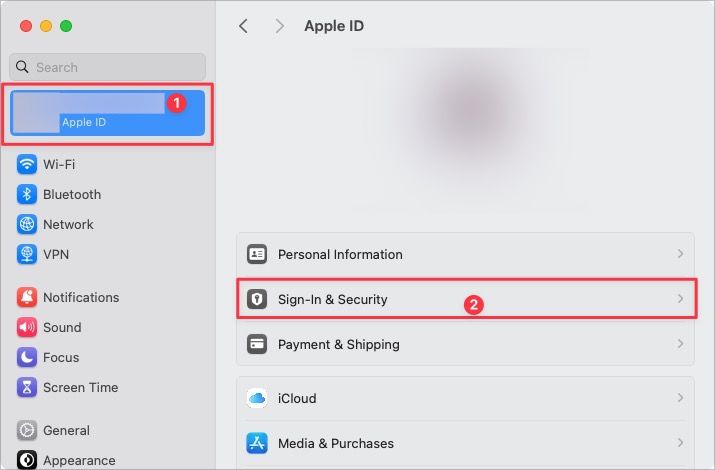
3. On a Mac, click on the and choose the System Settings option.

4. Click on your name and select the Sign-In & Security option.
5. Now, click on the Two-Factor Authentication option.
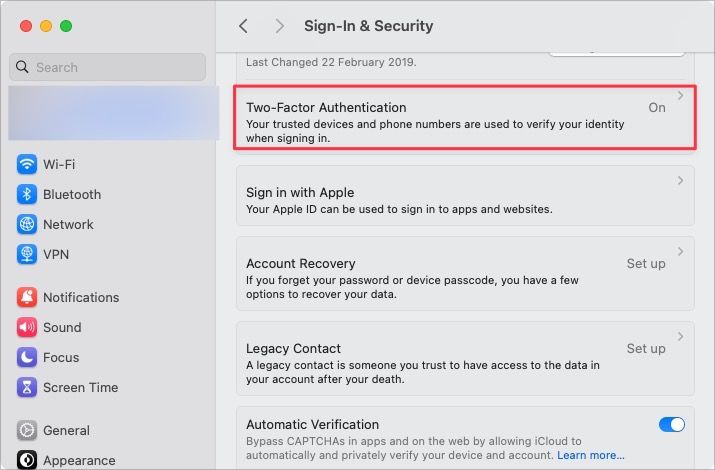
Now, follow the on-screen prompt to set up two-factor authentication on your Apple ID.
iCloud Security Recommendations
If you use the iCloud Keychain for generating and saving passwords, you will love this security feature. Keychain has a free tool that monitors your passwords for data breaches and compromised logins and informs you if it ever detects any such activity. It also tells you if you are using a weak password and will ask you to change it to strengthen the security.
You should always check these iCloud Keychain security recommendations, as they can save your accounts from getting compromised, especially if you use the same passwords across multiple accounts (which you should never do).
To check security recommendations on your Mac:
1. Use the menu to open System Settings.

2. Scroll the left sidebar, click on Passwords, and verify with your Mac login password.
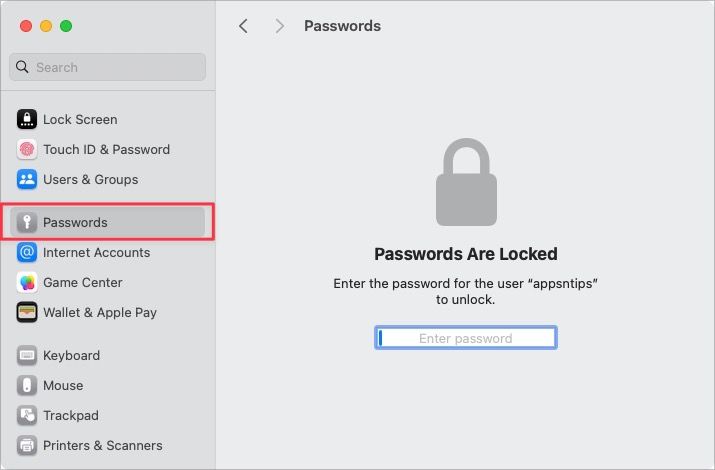
3. Now click the Security Recommendations option.
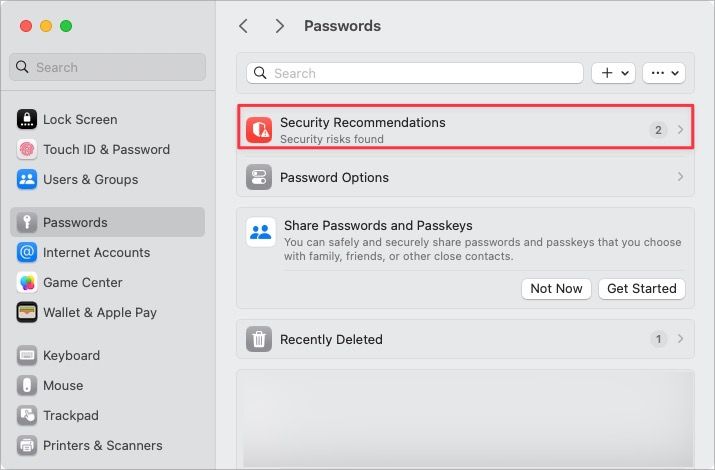
4. As you can see, it’s recommended that I have two weak passwords and I should change them.

5. When you click on a recommendation, you will notice that you get Change Password on Website Option.
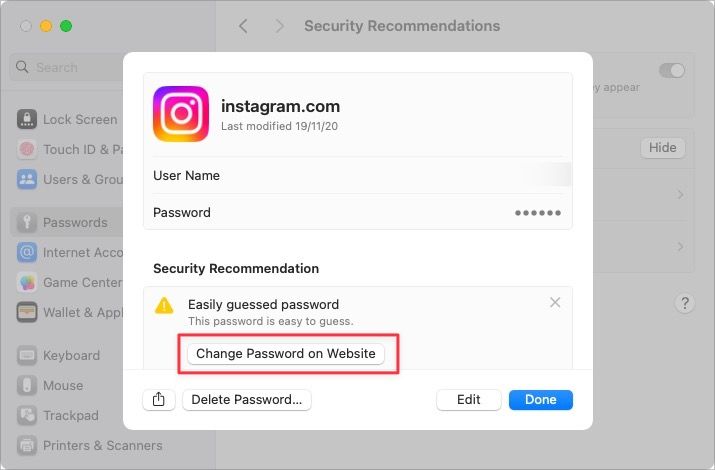
Clicking on this link will take you to the website, and you can reset your password there. You can also check Security Recommendations on your iPhone or iPad:
1. Launch the Settings app and open Passwords setting.
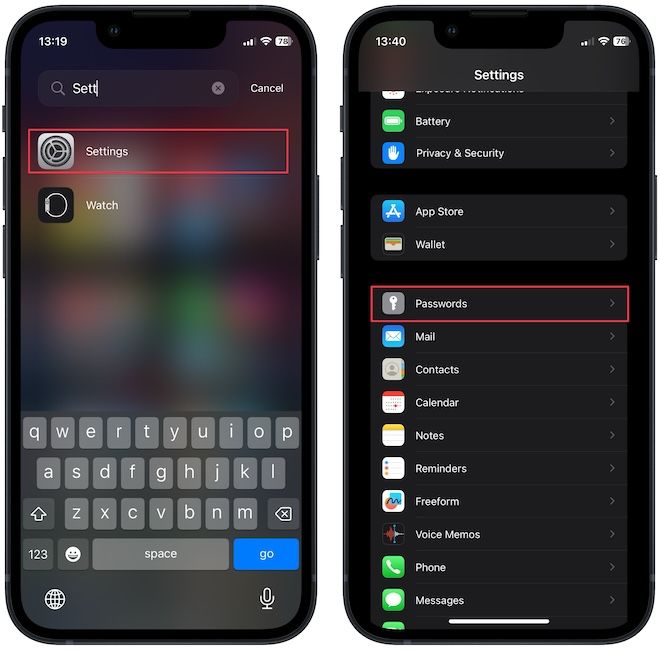
2. Click on the Security Recommendations option, and you will notice all the accounts with weak or compromised passwords.
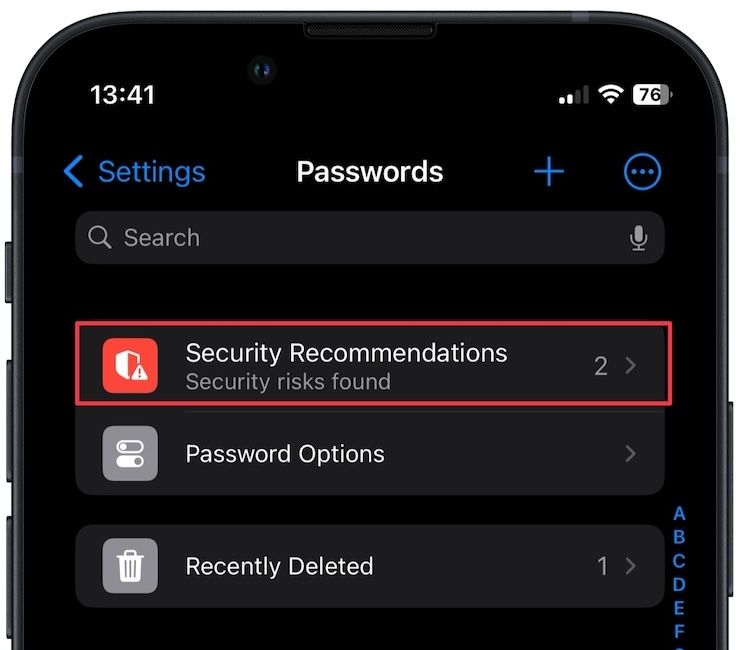
3. Like on Mac, tapping an item will reveal the change password on the website button. Tap on it to visit the website to change your password.
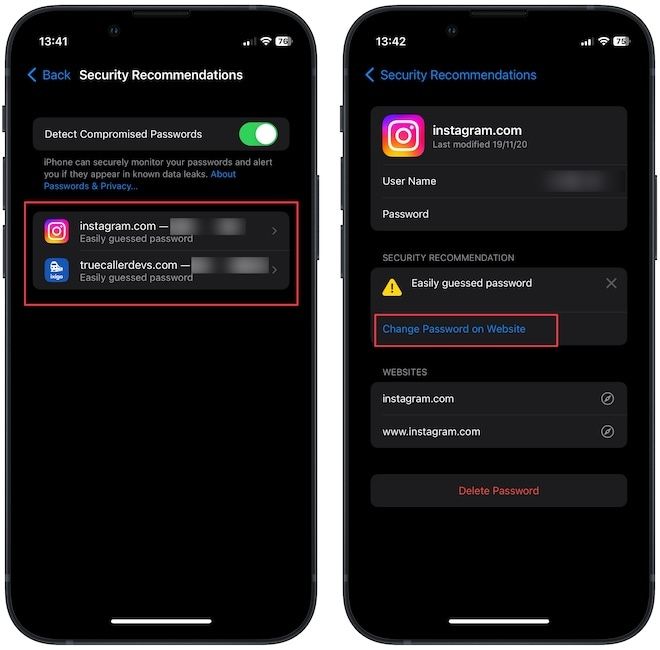
Most password managers charge you money for this feature, but you get it for free with Apple.
iCloud Private Relay
When you browse the internet, your network provider can see your DNS records and IP address, among other information. Your ISP and the websites you visit can use this information to build a profile on you for targeted advertising.
If you want to protect your browsing history, iCloud Private Relay is an excellent option. When you enable this feature, even Apple cannot see what you are browsing. With Private Relay active, when you browse the web on Safari, the information goes through two separate and secure internet relays.
iCloud Private Relay encrypts your DNS records so neither Apple nor your ISP can see which websites you visit. If you want to protect your online browsing privacy, this is a feature you must use.
Here’s how you can activate iCloud Private Really on your Mac and iPhone.
Use iCloud Private Relay on Mac
1. Use the Menu to open System Settings.

2. Click on your name and choose the iCloud option.
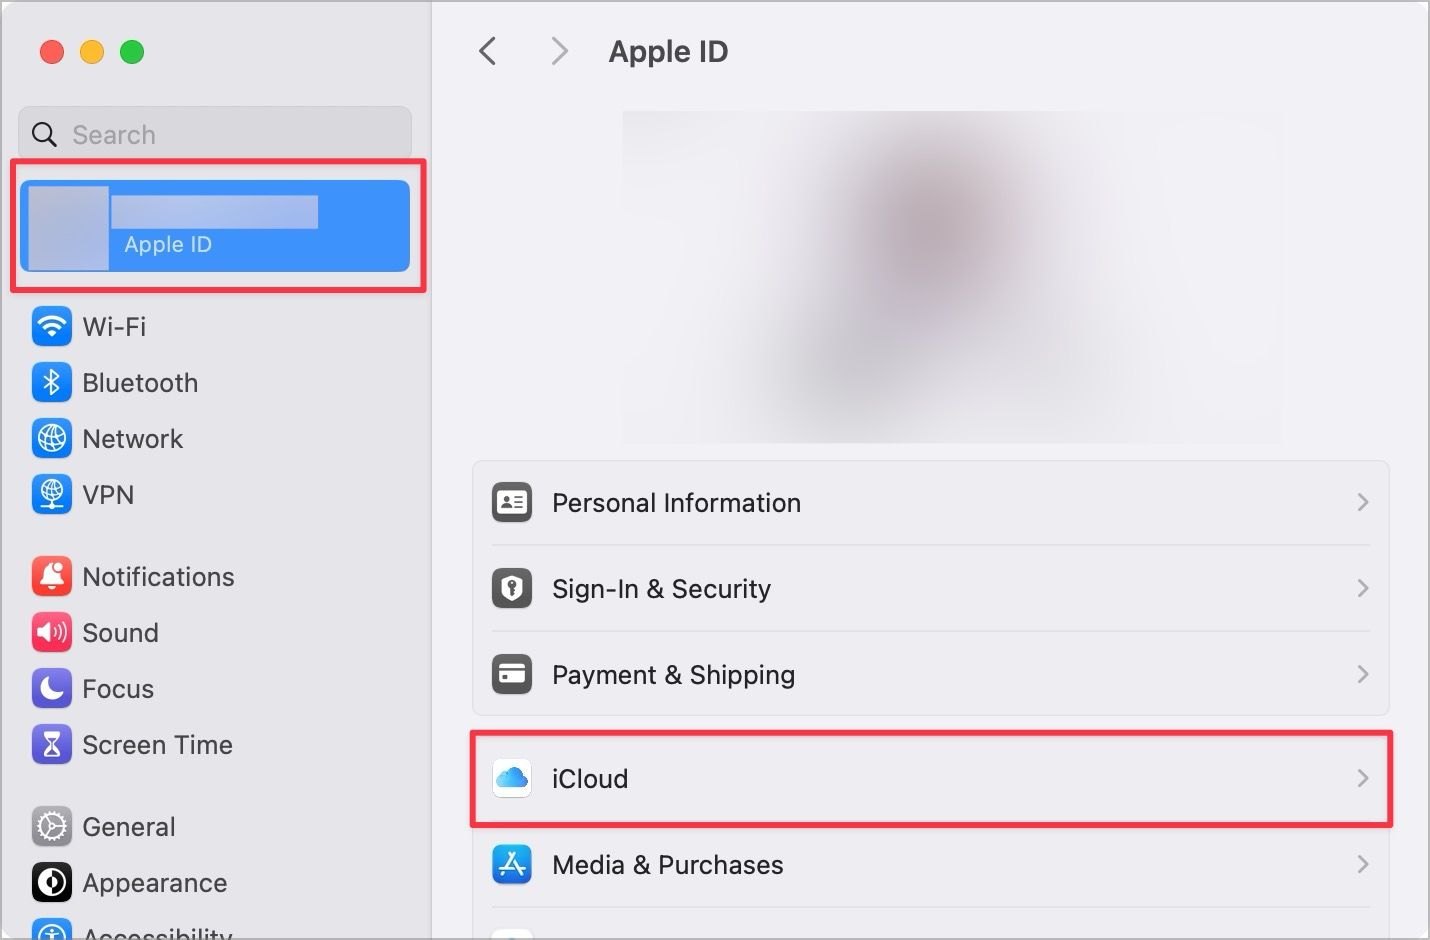
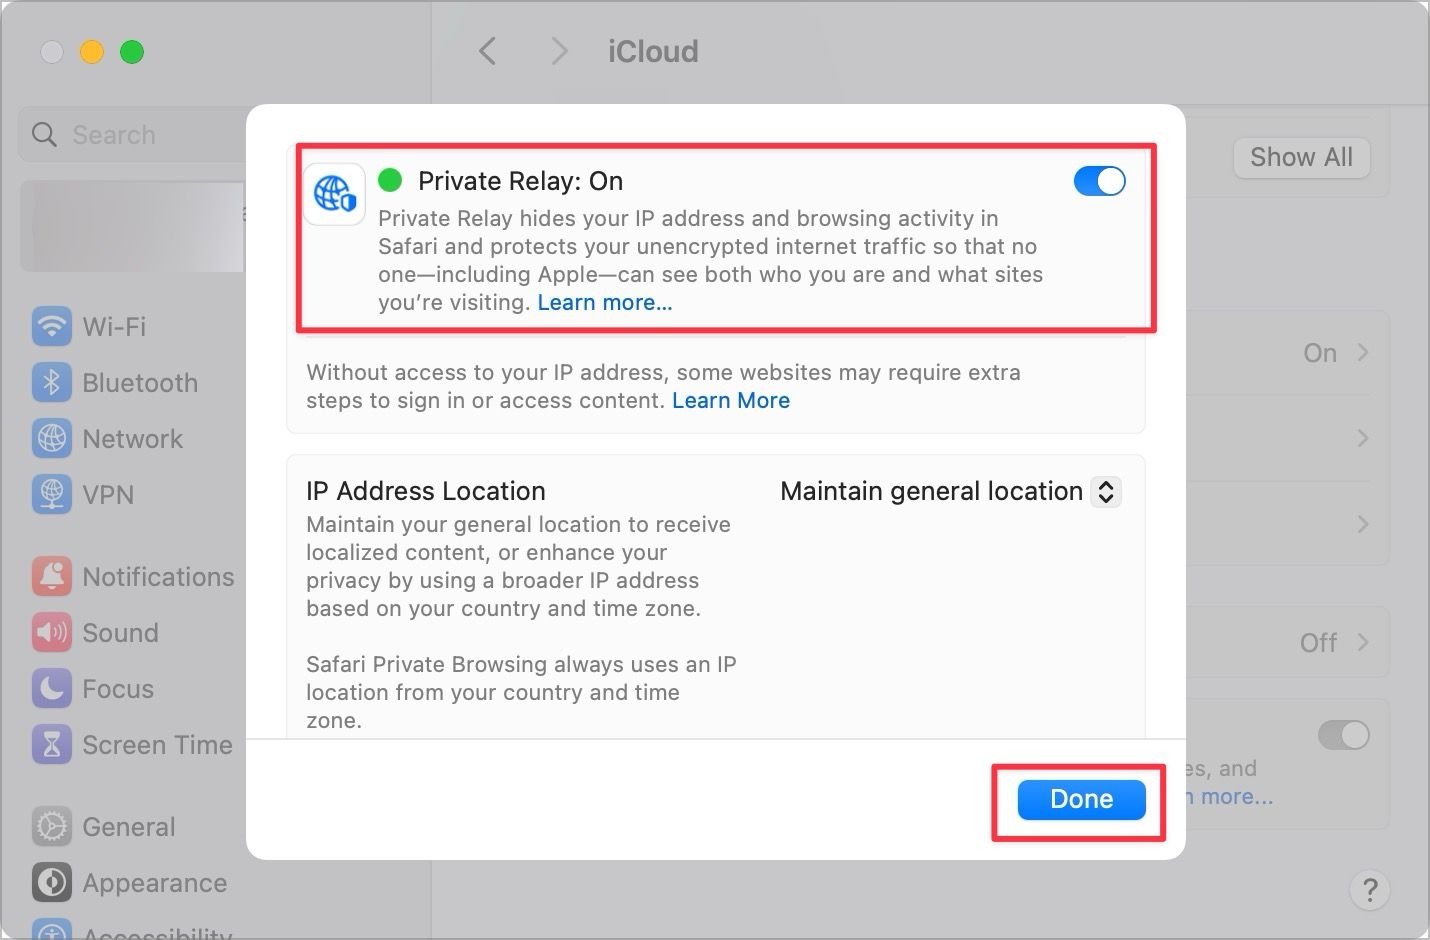
3. Now, scroll down to iCloud+ section and click on Private Relay.
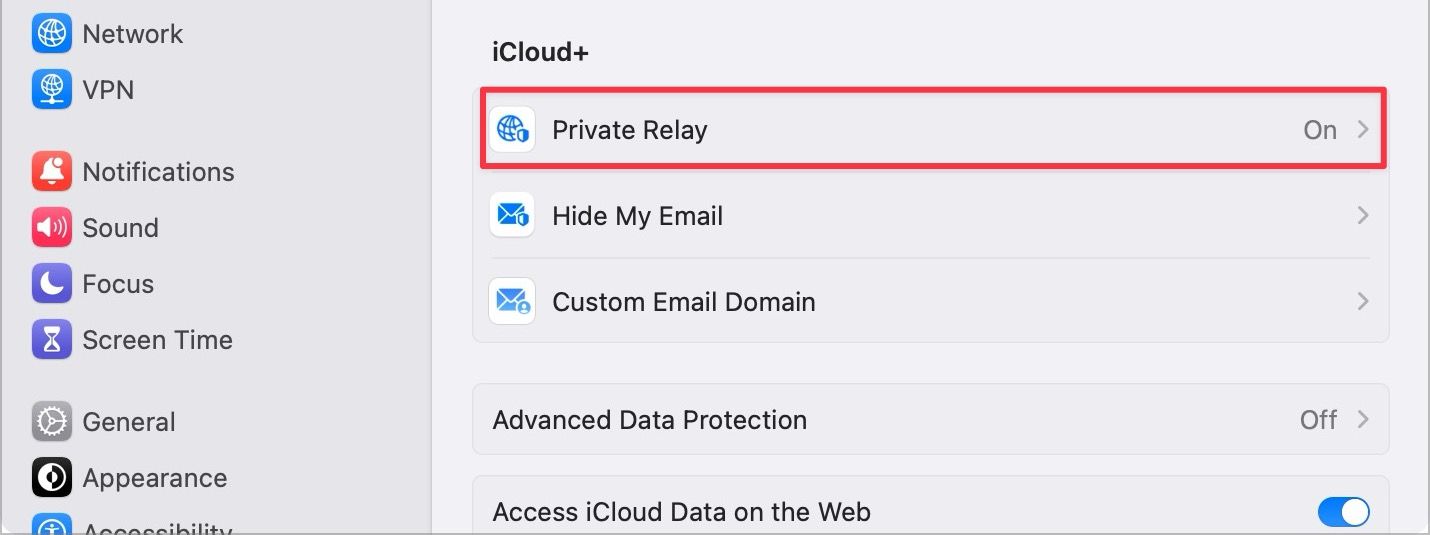
4. Turn on the toggle and click the Done button to save changes.
Use iCloud Private Relay on iPhone or iPad
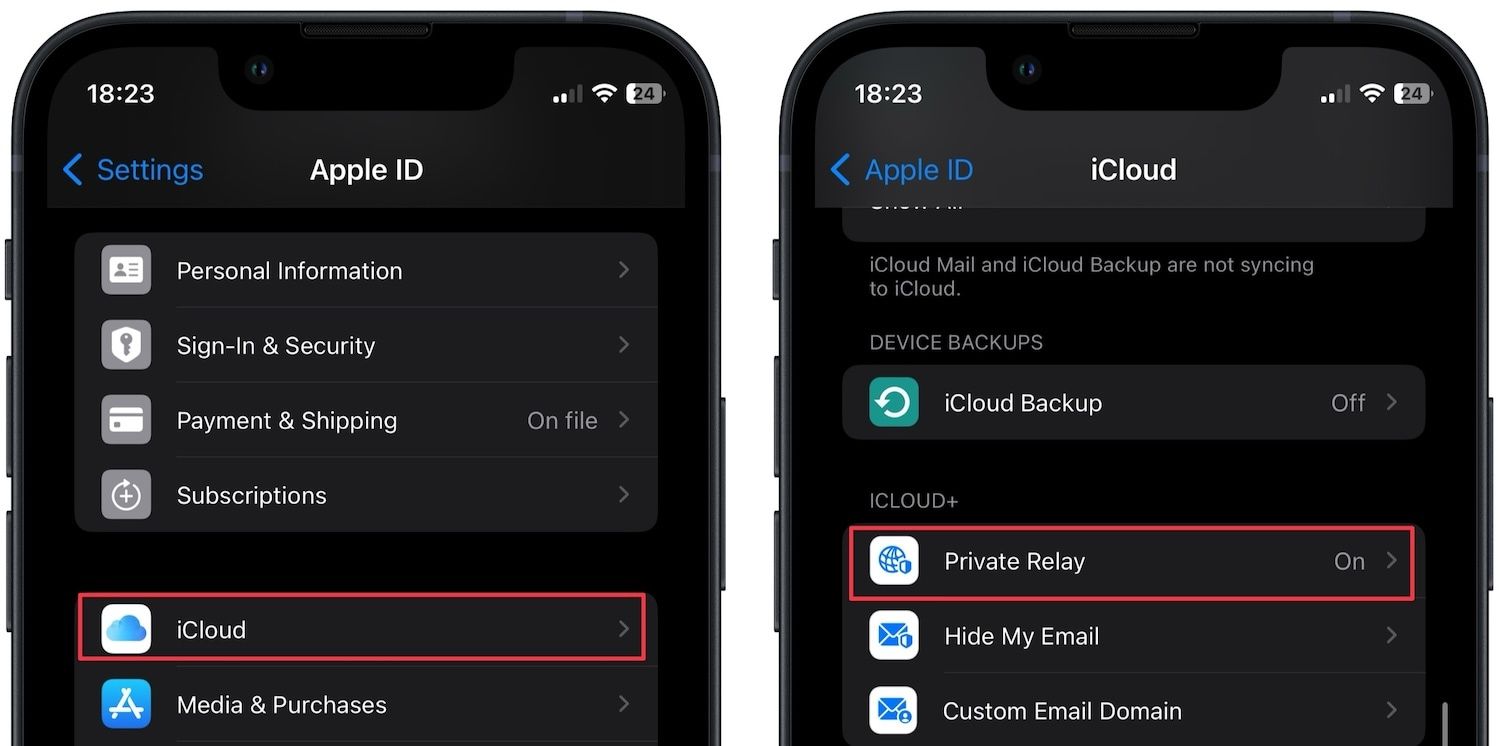
1. Open the Settings app and tap on your name.

2. Tap on iCloud and scroll down to iCloud+ section. Here, tap on Private Relay.
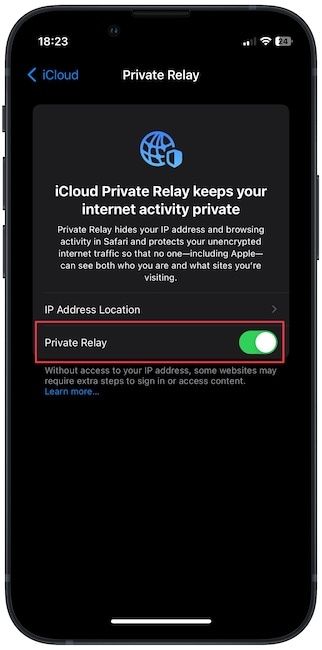
3. Turn on the toggle to enjoy this feature.
Hide My Email
iCloud+ users also enjoy another security benefit that allows them to hide their email addresses when signing up for a new online account or app. Apple’s Hide My Email feature allows you to generate random email IDs that you can use to sign up for different services.
This way, the service doesn’t get access to your private email address, while you can receive all the emails. Even if your email address is revealed in a breach, you don’t have to worry about your private email address getting into the hands of nefarious entities.
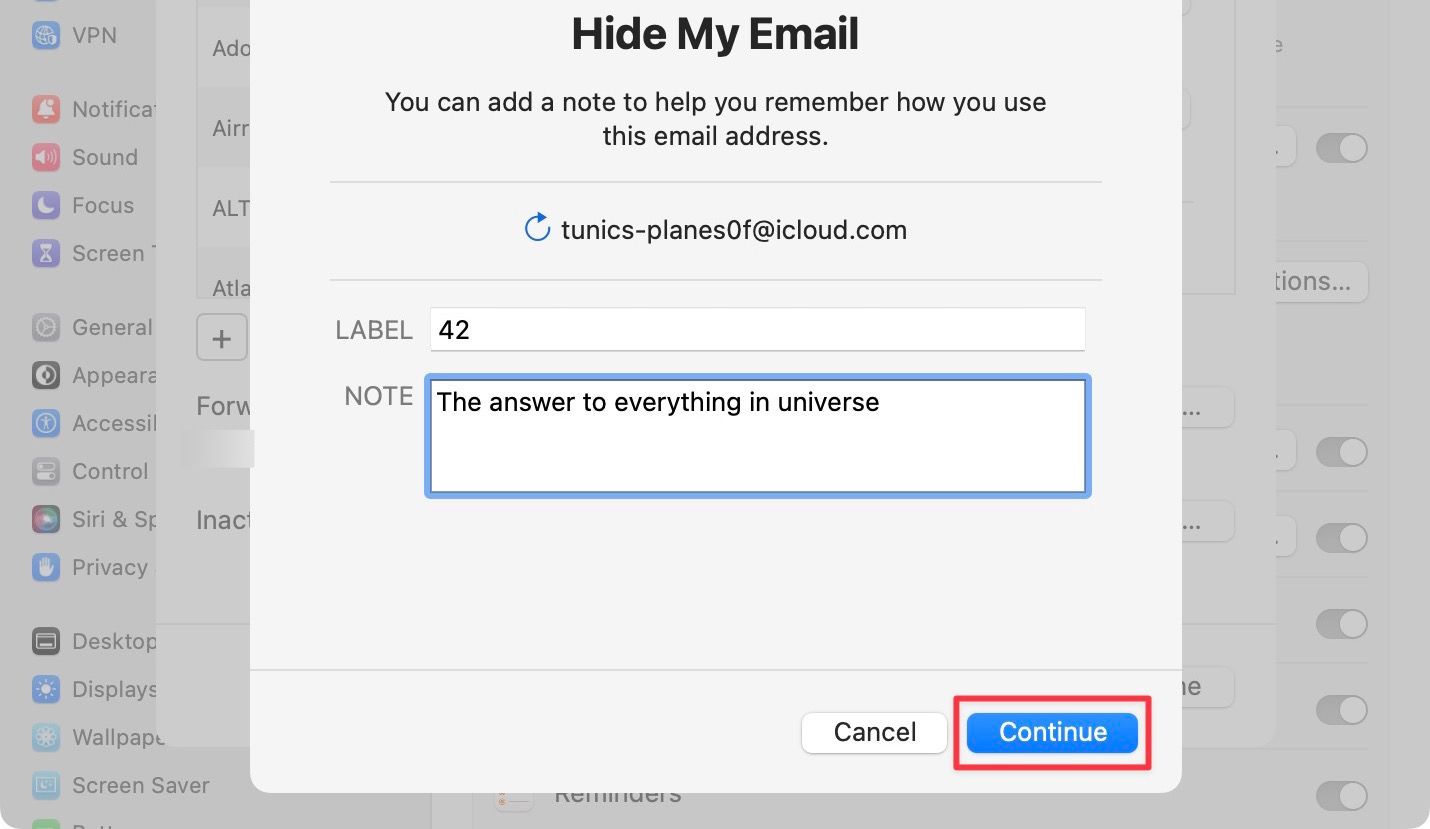
Another benefit of using randomly generated email addresses is spam reduction. Since you are using different randomly generated email addresses for different accounts, if you start receiving too much spam, you can easily find the culprit website.
Deleting the email address corresponding to that website will end your email spam issue. We have already covered how to use this feature to generate temporary email IDs, which you can read by clicking the link.
Secure Notes
Secure Notes is not technically an iCloud security feature, but you should know about it. While most people understand that the iCloud Keychain can store your passwords, they don’t know that you can also save secure notes for hosting sensitive information. Here’s how you can use this feature to secure text information.
1. Use Spotlight to launch the Keychain Access app.

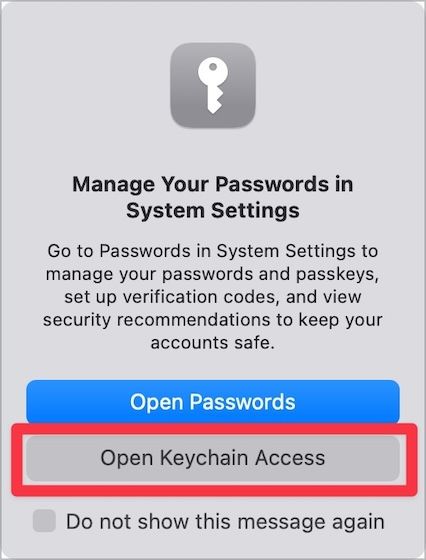
2. In the pop-up window, choose the Open Keychain Access option.
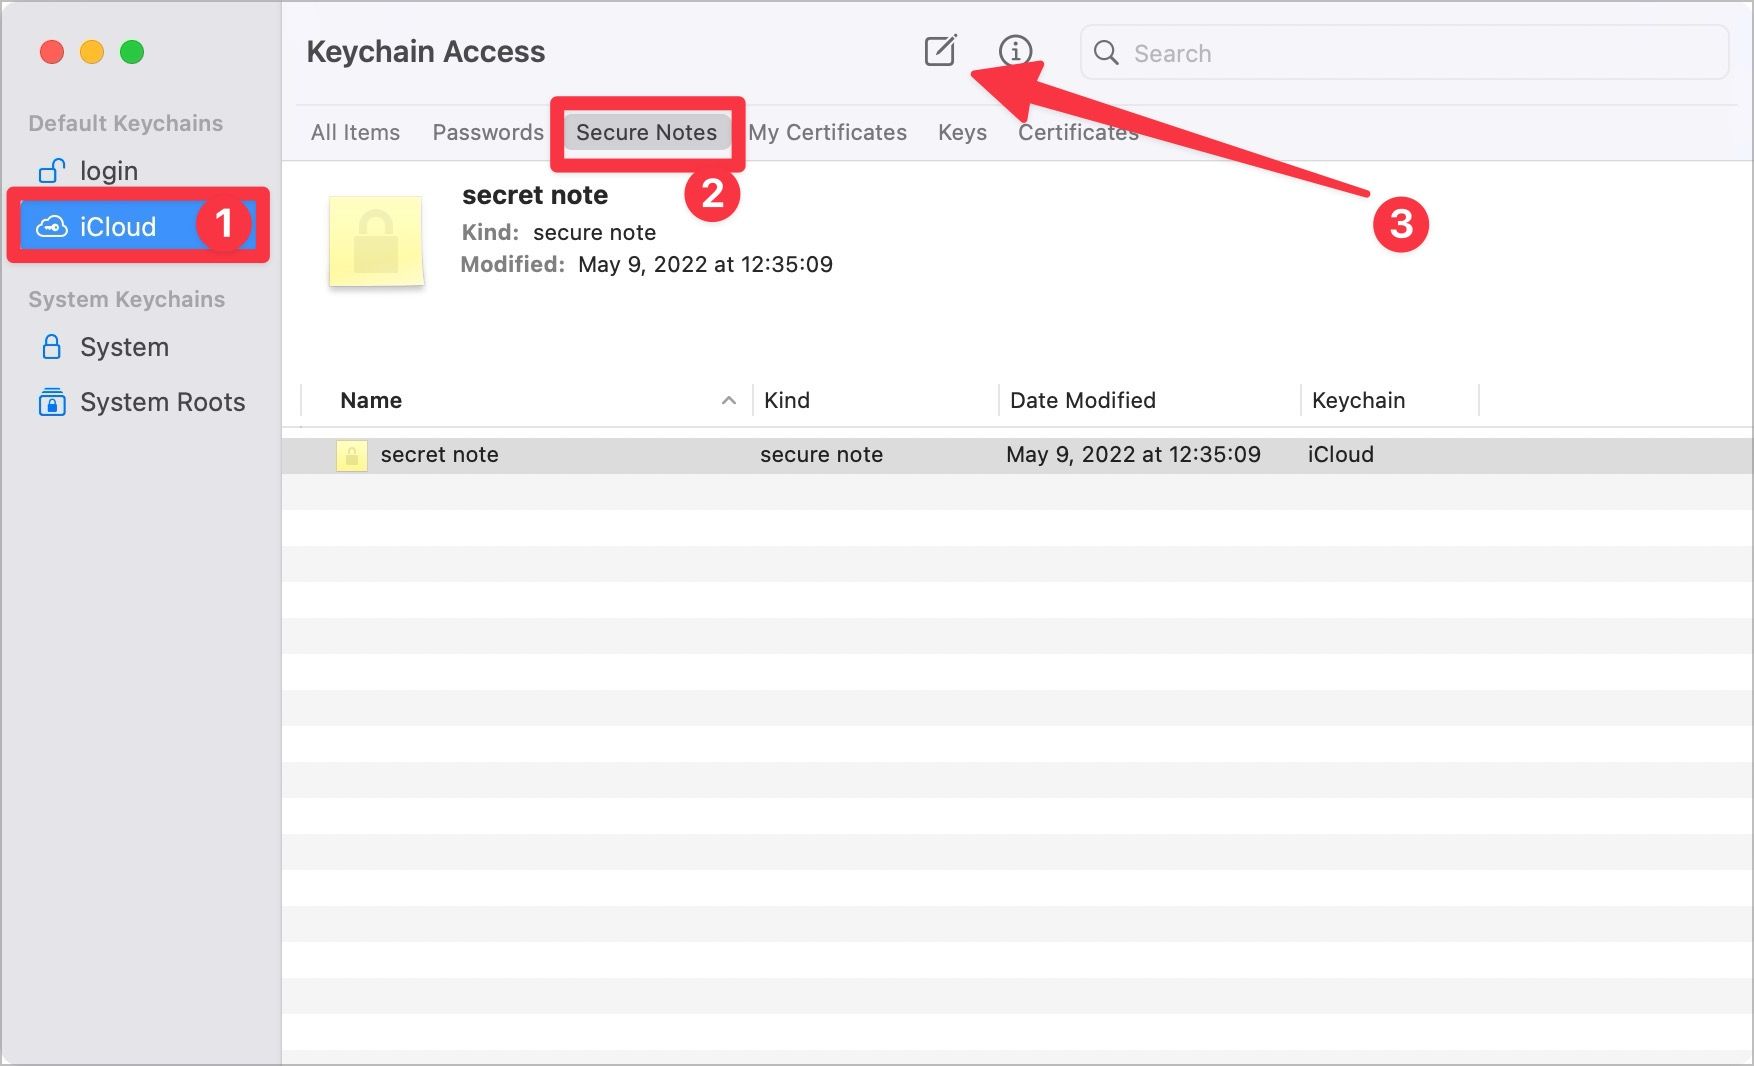
3. Select iCloud in the left sidebar and choose the Secure Notes option. Click the compose button at the top to start a new secure note.
4. Give it a name and type your content. Click the Add button to save the secure note.
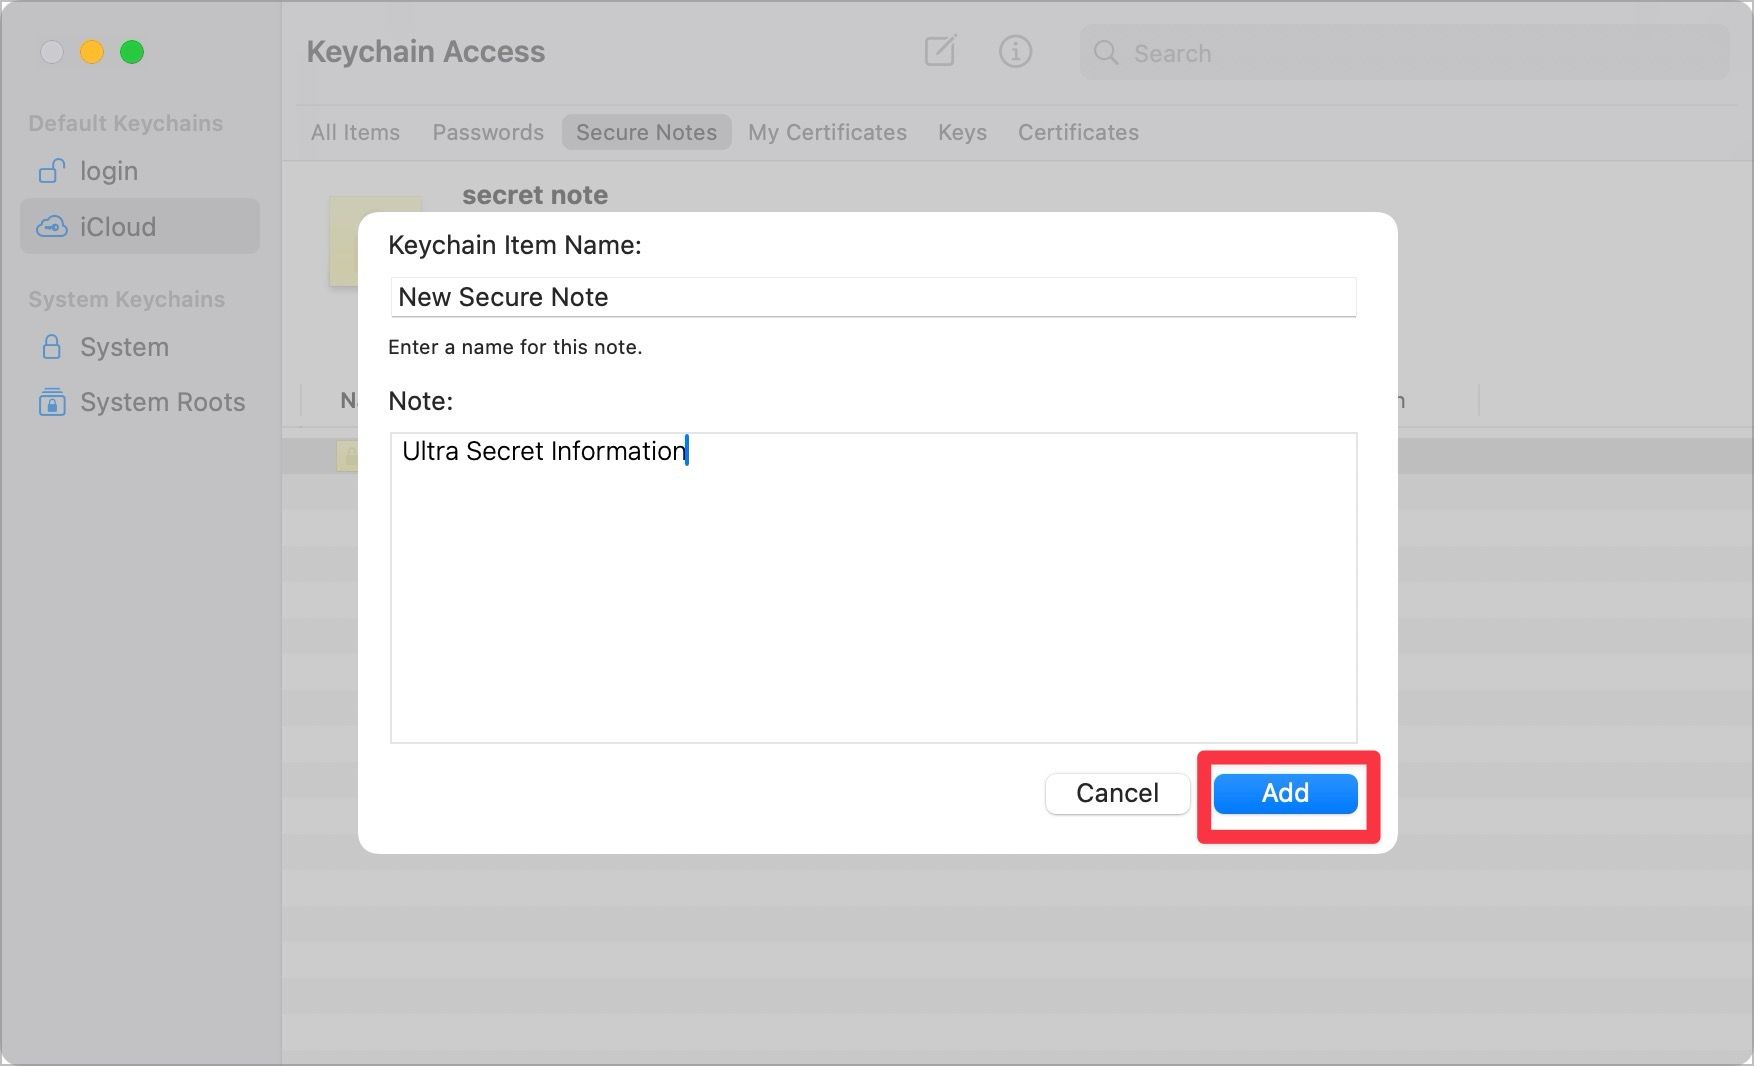
Now, when anyone wants to open the note, they have to enter your Mac’s password to access it.
Use these iCloud security features to enhance your privacy
These are the best iCloud security features that we believe everyone should use. You can use these features to strengthen your Apple ID, secure your Internet browsing, and track your passwords and online accounts.
We hope you enjoyed this guide. If you found it useful, please share it with your friends and family so they too can benefit from it. It will also help us get more eyeballs, so we would appreciate the gesture.


Comments ()