10 macOS Sequoia Settings You Should Change Now!!
macOS Sequoia is an excellent update with headlining features like Apple Intelligence, window tiling, a standalone password manager, and more. However, like classic Apple fashion, many of its quality-of-life improvement features are hidden in settings and are turned off by default. In this guide, I will show you 10 macOS Sequoia settings you need to change to make it even better.
1. Remove spaces from tiled windows
macOS Sequoia has finally added a window tiling feature that makes it easy to work with multiple app windows. You can click the link in to view our guide on this feature.
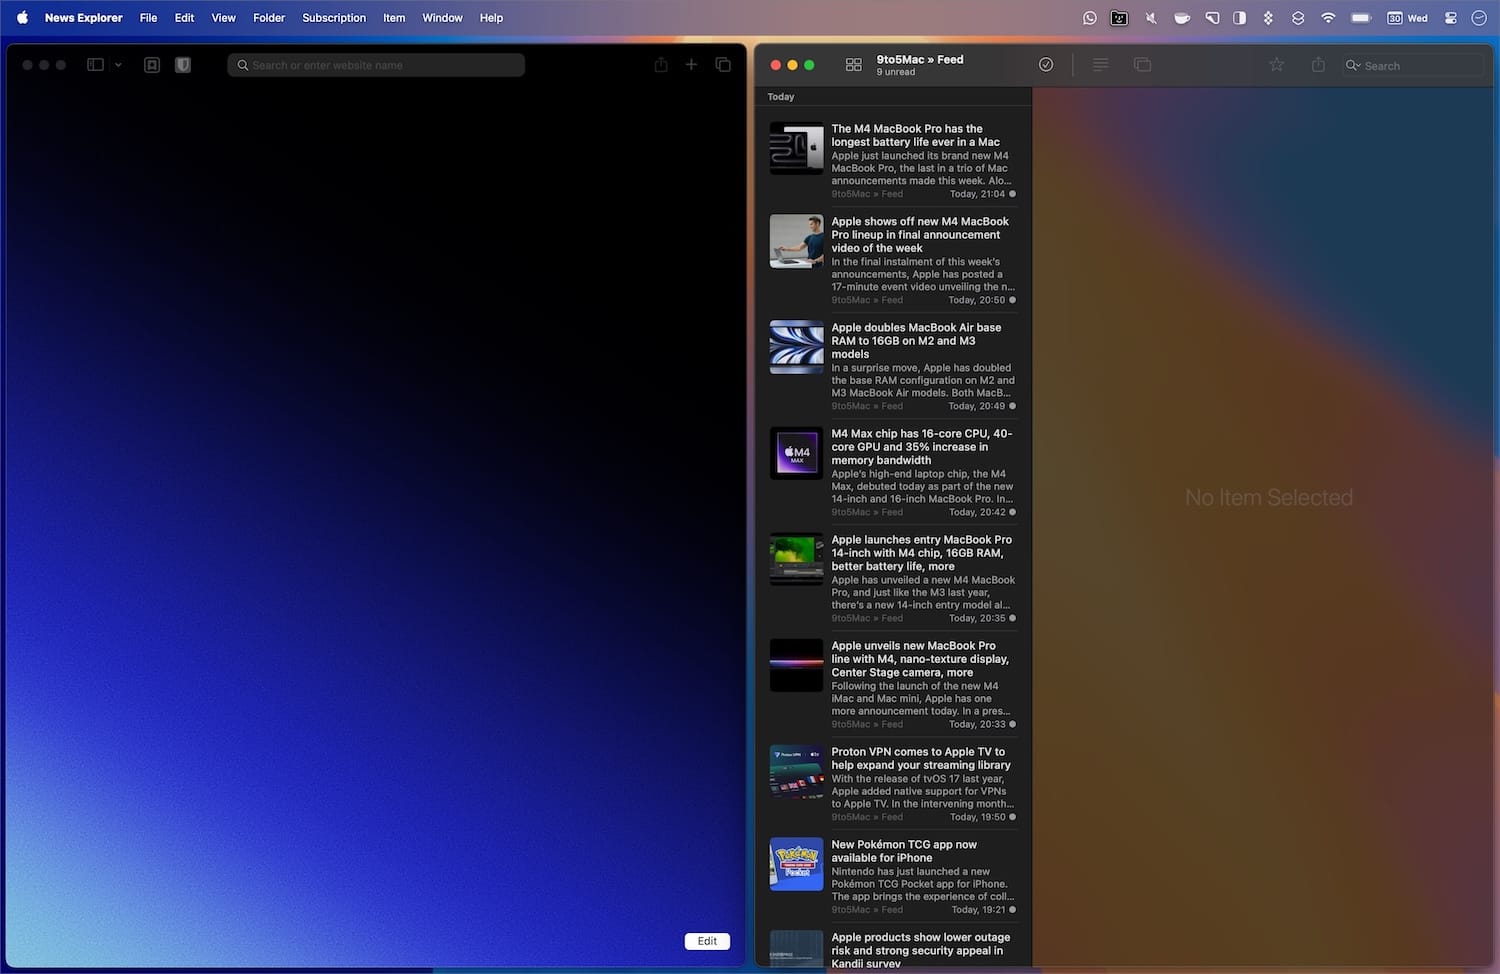
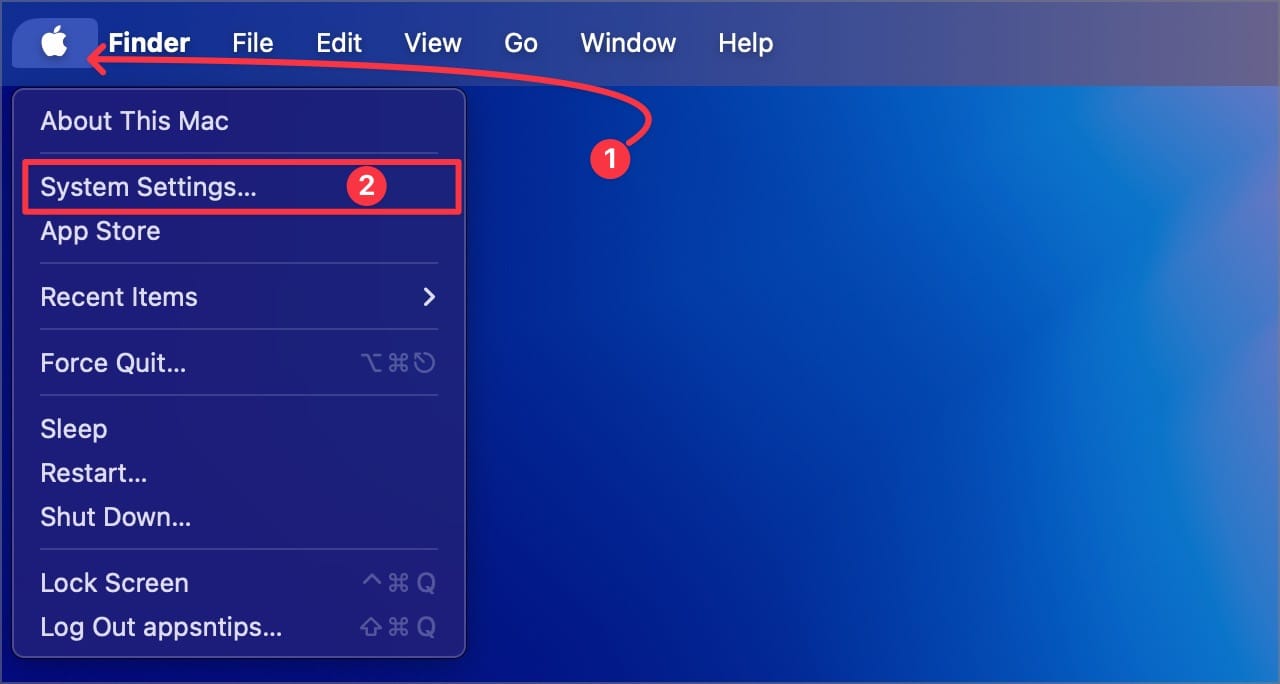
I want to draw your attention to one specific aspect of this feature. When you tile windows on Mac, you will notice a padding between the windows. If you don’t like this, you can remove it.Use the Apple Menu to open System Settings.
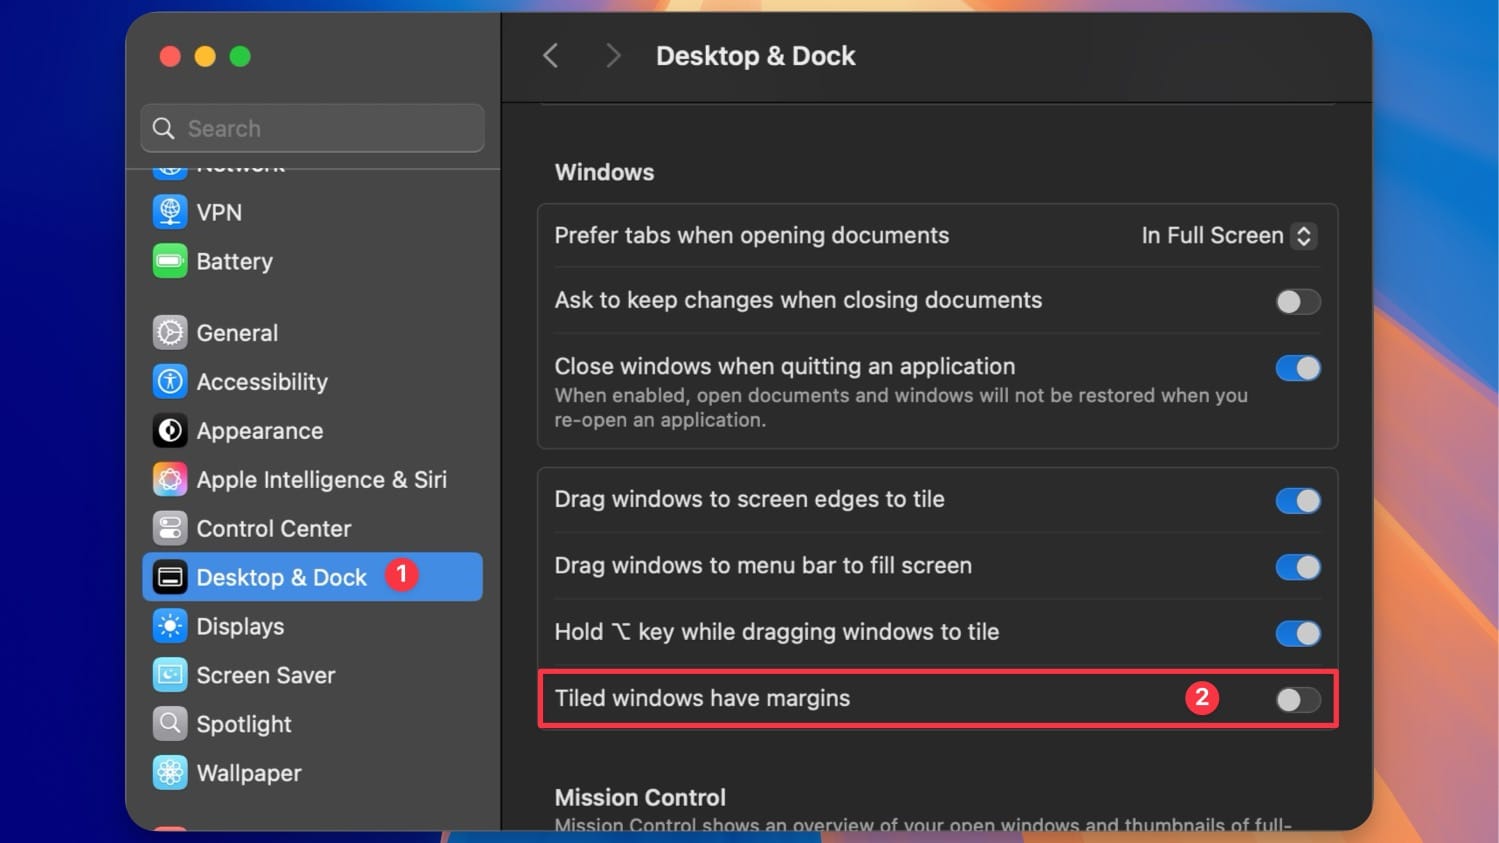
Go to Desktop & Dock settings and scroll down to the Window section. Now, turn off the toggle for the Tile Windows have margins option, and the space between the app windows will disappear.
2. Enable Double-Click to Minimize
Macs have always had this weird behavior when you double-click on an app’s title bar. For apps like Safari, it stretches them vertically, and for Finder, it elongates horizontally.
With macOS Sequoia, you can finally fix this. First open the System Settings app.

Now, click on Desktop & Dock. Here, you will see a Double-click a window’s title bar to option. By default, it’s set to zoom, which causes the weird behavior I mentioned.
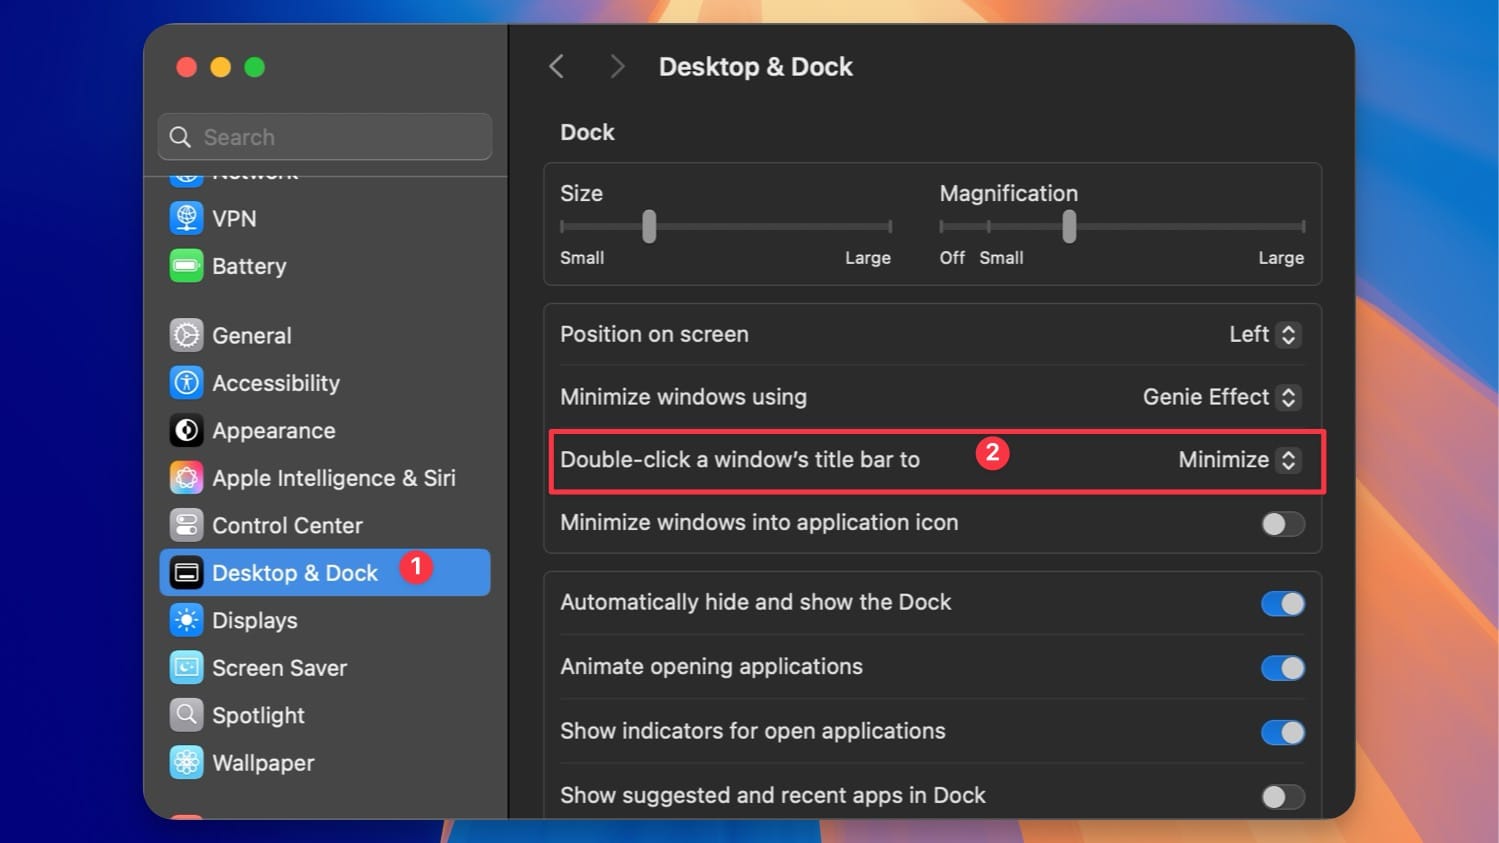
You can set it to Fill to make the window go full size when you double-click the title bar. I like the Minimize option as it allows me to easily minimize app windows without aiming for the tiny yellow button.
3. Apple Intelligence
If you have an Apple Silicon Mac and updated it to macOS Sequoia 15.1, you can use Apple Intelligence features that will give you a better Siri, access to writing tools, and more. To enable this feature, launch the System Settings app and click on Apple Intelligence & Siri.
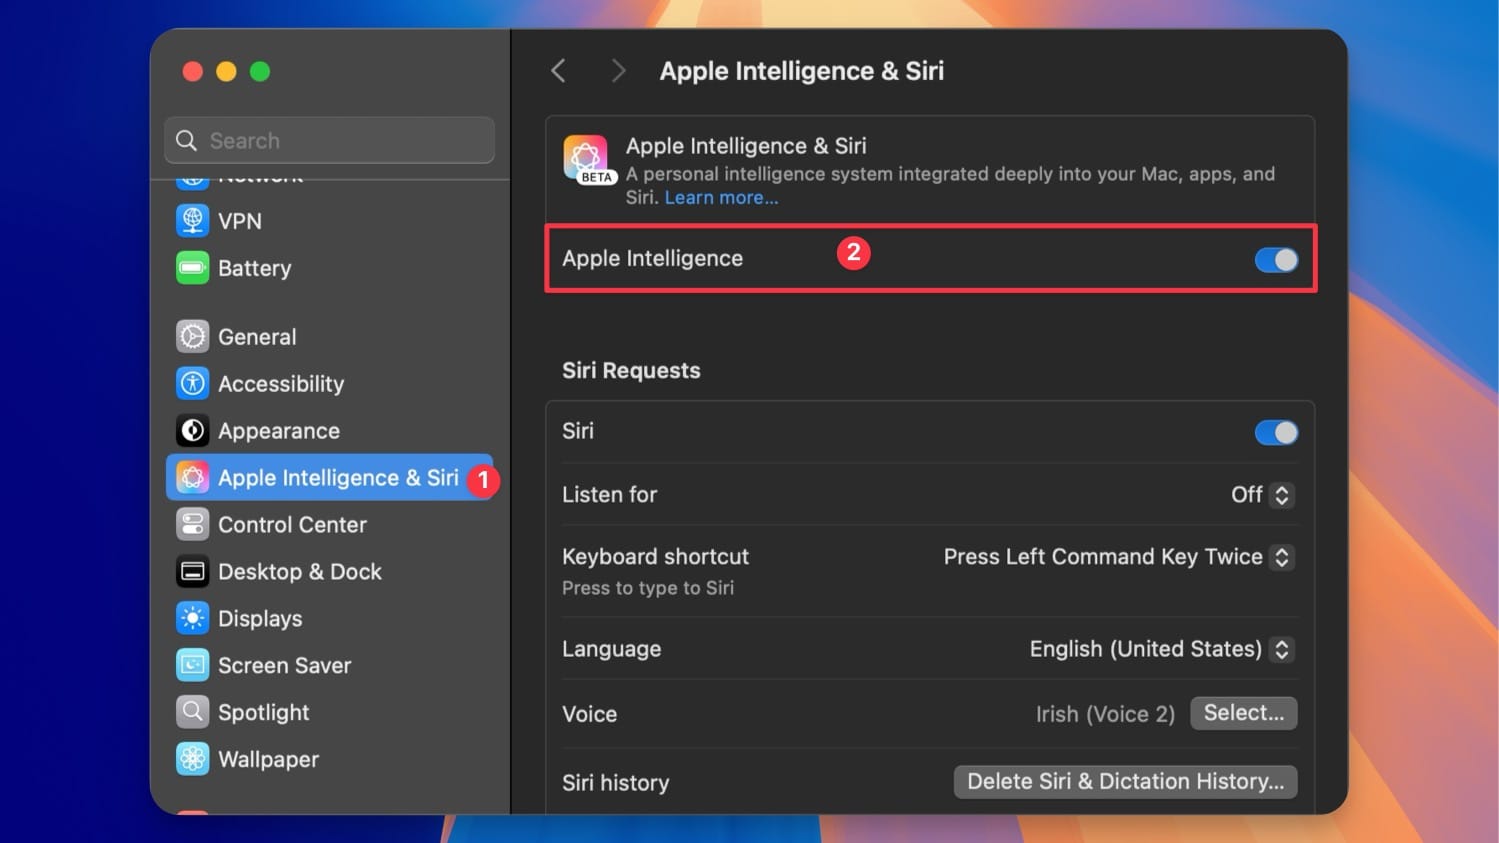
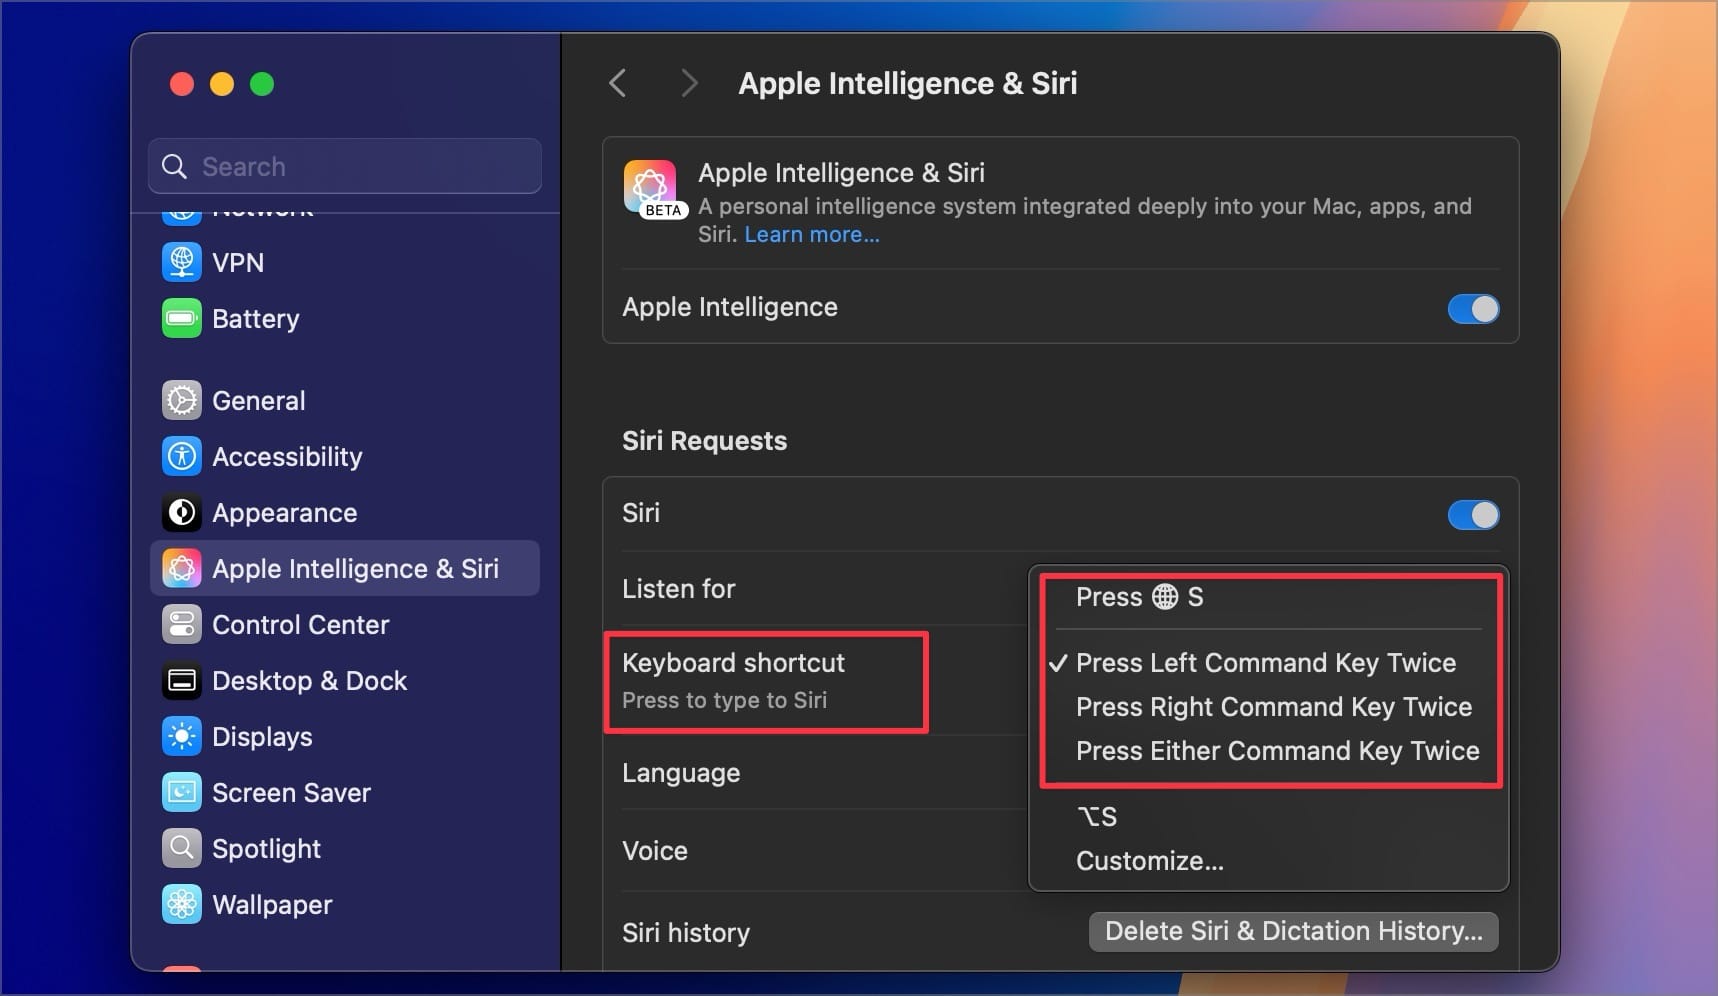
You will also notice that you now have the option to write to Siri while on this page. By default, it’s set to Press the Left Command Key Twice.
You can change this by clicking the dropdown menu next to the Keyboard shortcut and choosing a different option. You can even set up a custom keyboard shortcut. Click the Customize… button and set the shortcut.
4. Show passwords in the Menu Bar
With macOS Sequoia and iOS 18, we get a brand-new password manager app that lets you easily access your passwords without going through several hoops. But did you know you can make password access even faster by adding it to the Menu Bar?
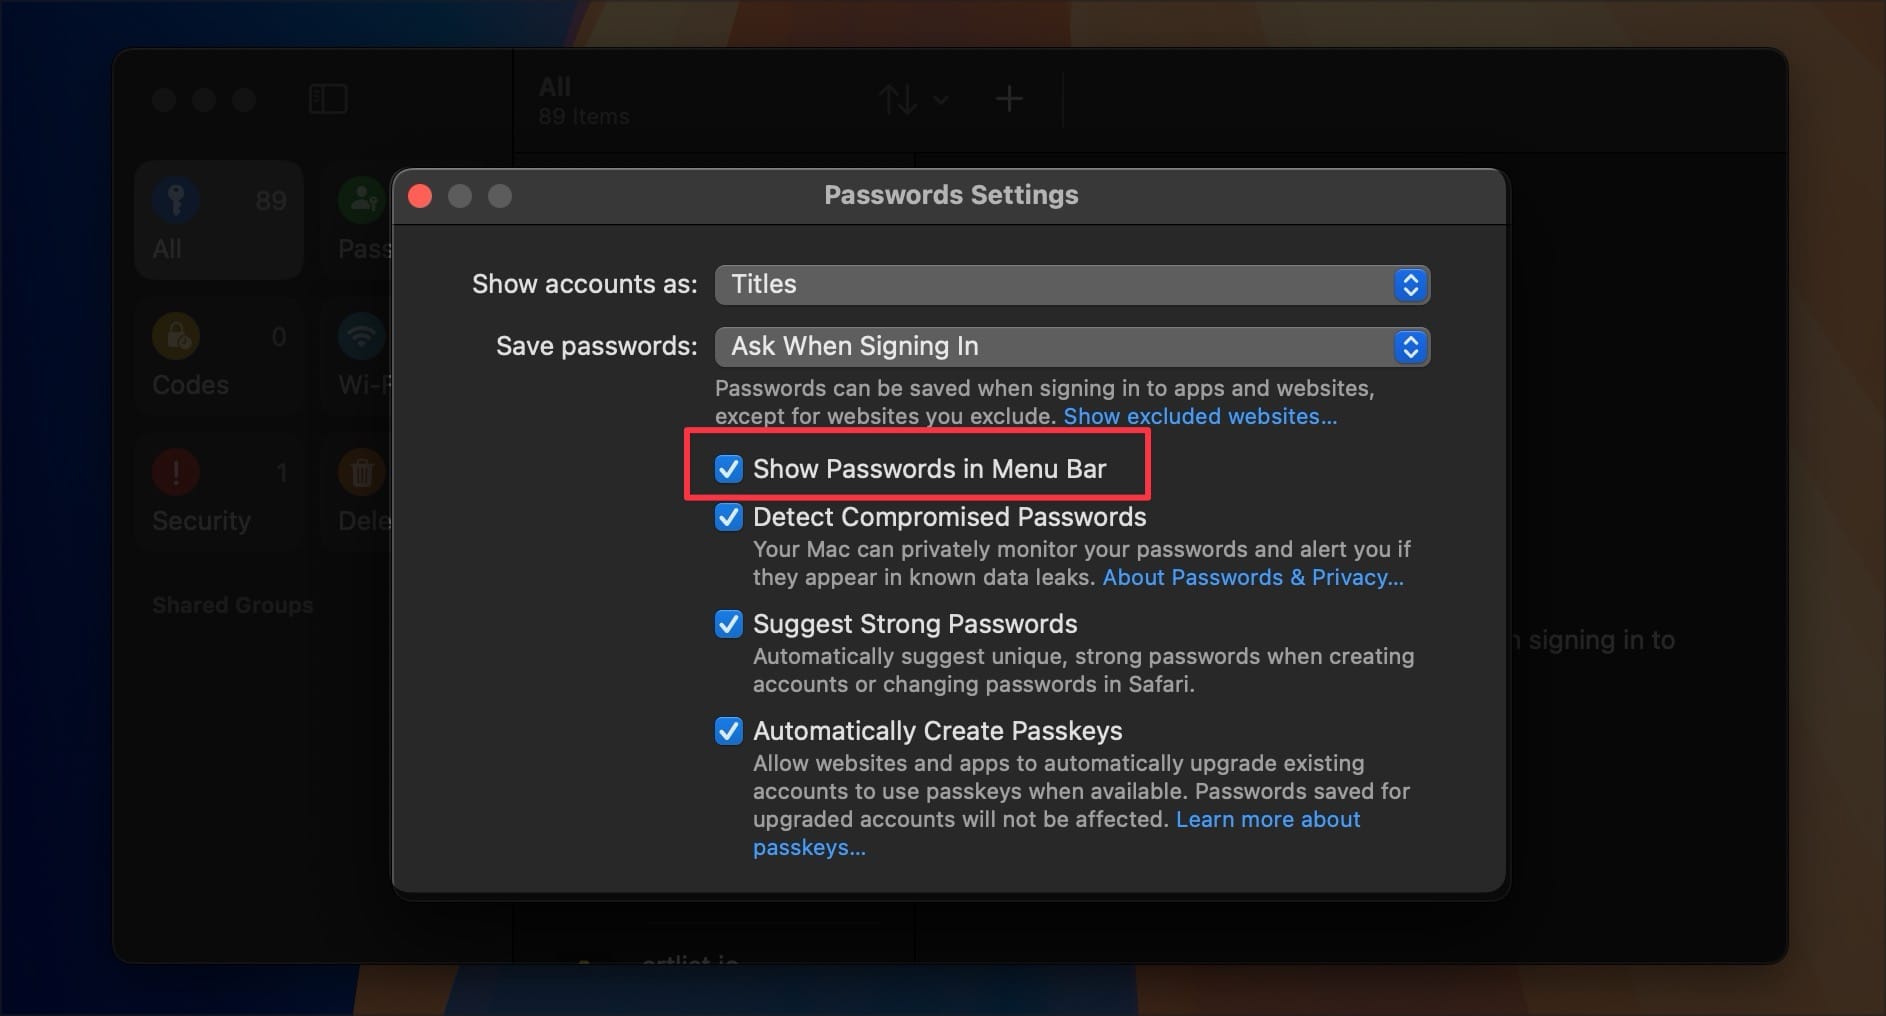
To do this, launch the Passwords app and hit the (⌘,) keyboard shortcut to open its settings. Alternatively, go to the Passwords menu and click on Settings. Now, enable the checkbox for Show Passwords in Menu Bar.
5. Show Background Sounds in Menu Bar
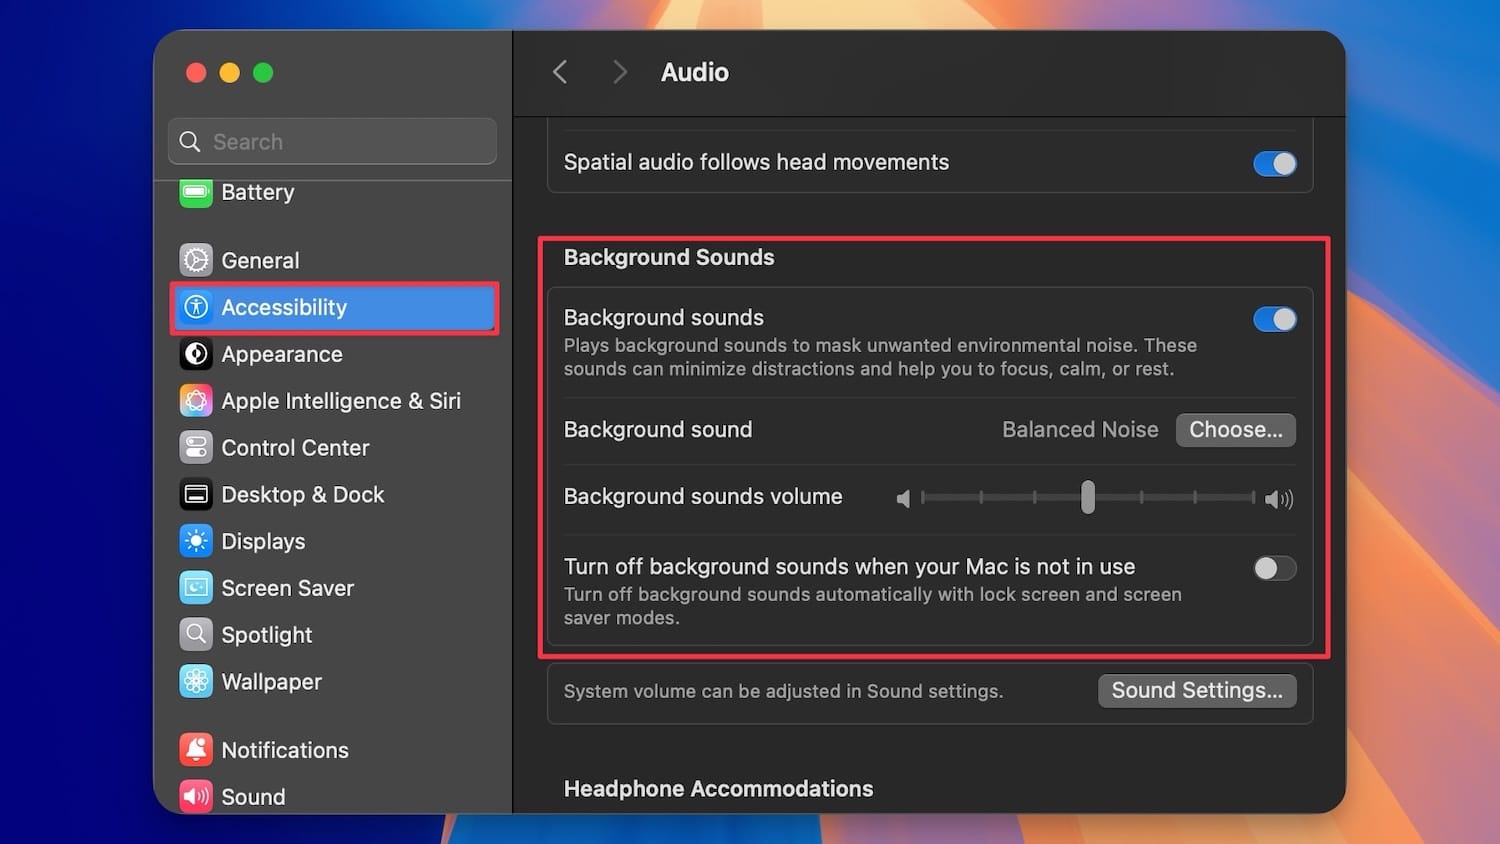
Apple released a new Background Sounds feature with macOS 13. The feature lets you play several background sounds, including fire, rain, and more, to help you focus on your work. However, accessing this feature is not easy.
You have to launch the System Settings app, go to Accessibility → Audio → Background Sounds, and then enable it from there. This process is cumbersome and makes it less likely that anyone would use this feature, but things have changed with macOS Sequoia.
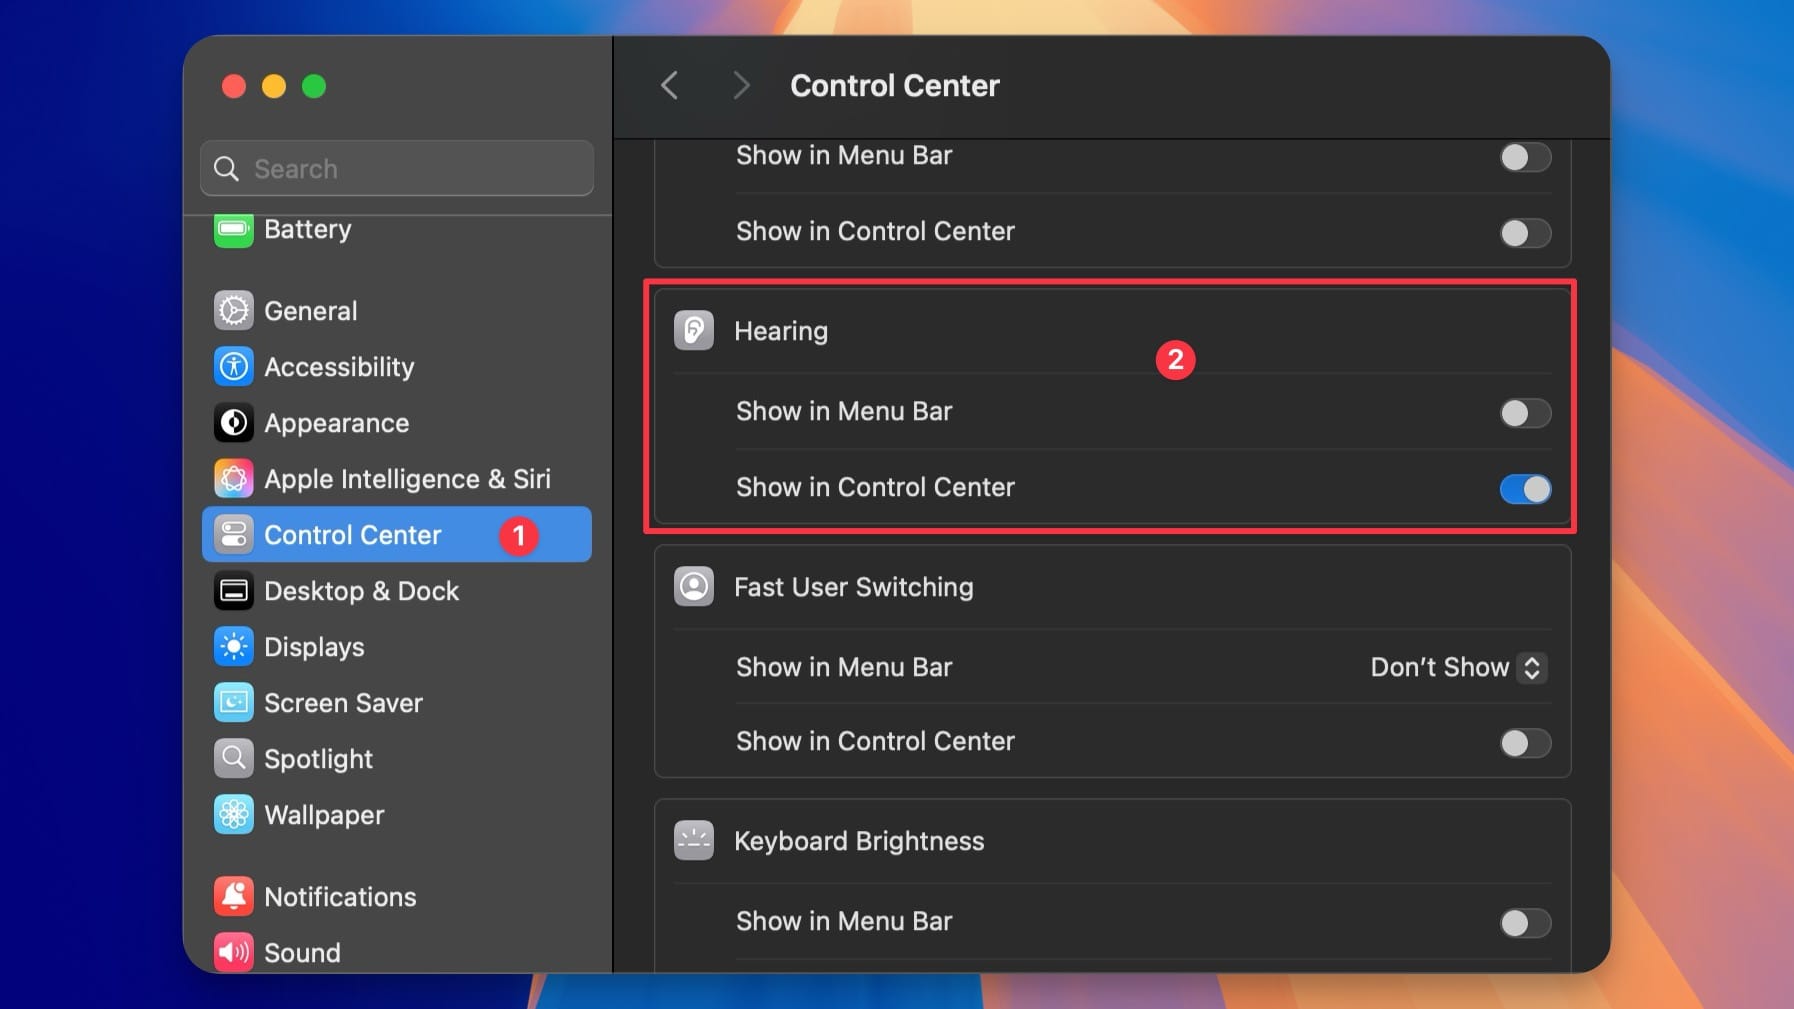
You can now add this feature to Control Center or Menu Bar. In the System Settings app, open Control Center and scroll down to the Hearing section. You can now enable the toggle for Show in Menu Bar or Show in Control Center.
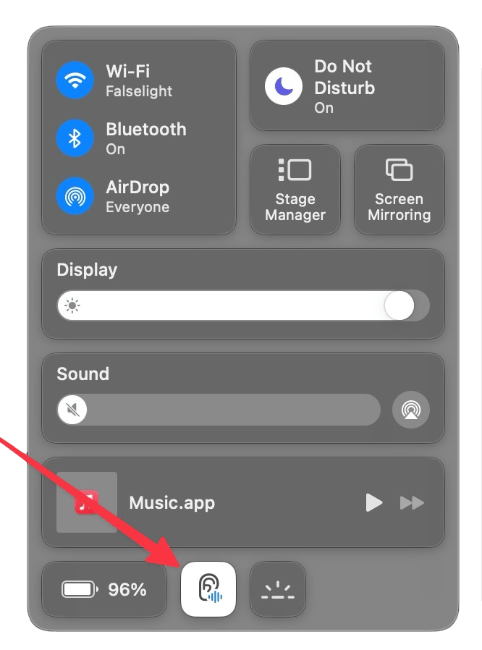
Since I enabled for Control Center, you can see an ear icon in the Control Center.
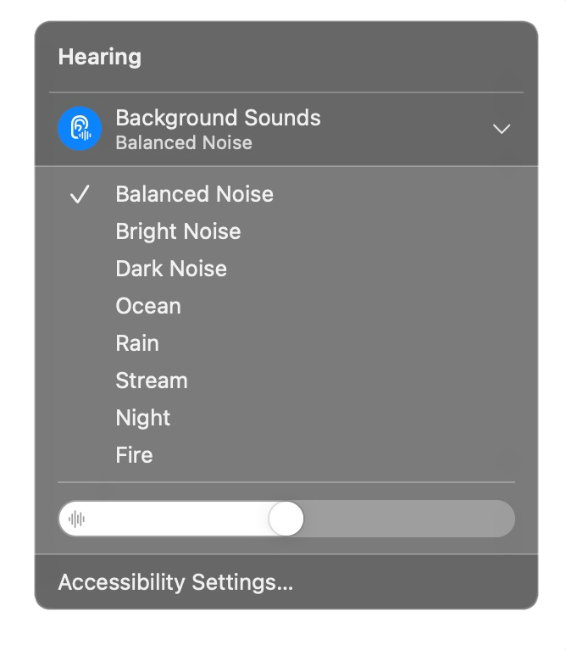
You can click it and then click on Background Sounds to start playing ambient sounds.
6. Manage iPhone notifications
One feature of the iPhone Mirroring app is that it sends your iPhone notifications to your Mac. While this sounds great in theory, it quickly becomes annoying when you start receiving dozens of social media notifications.
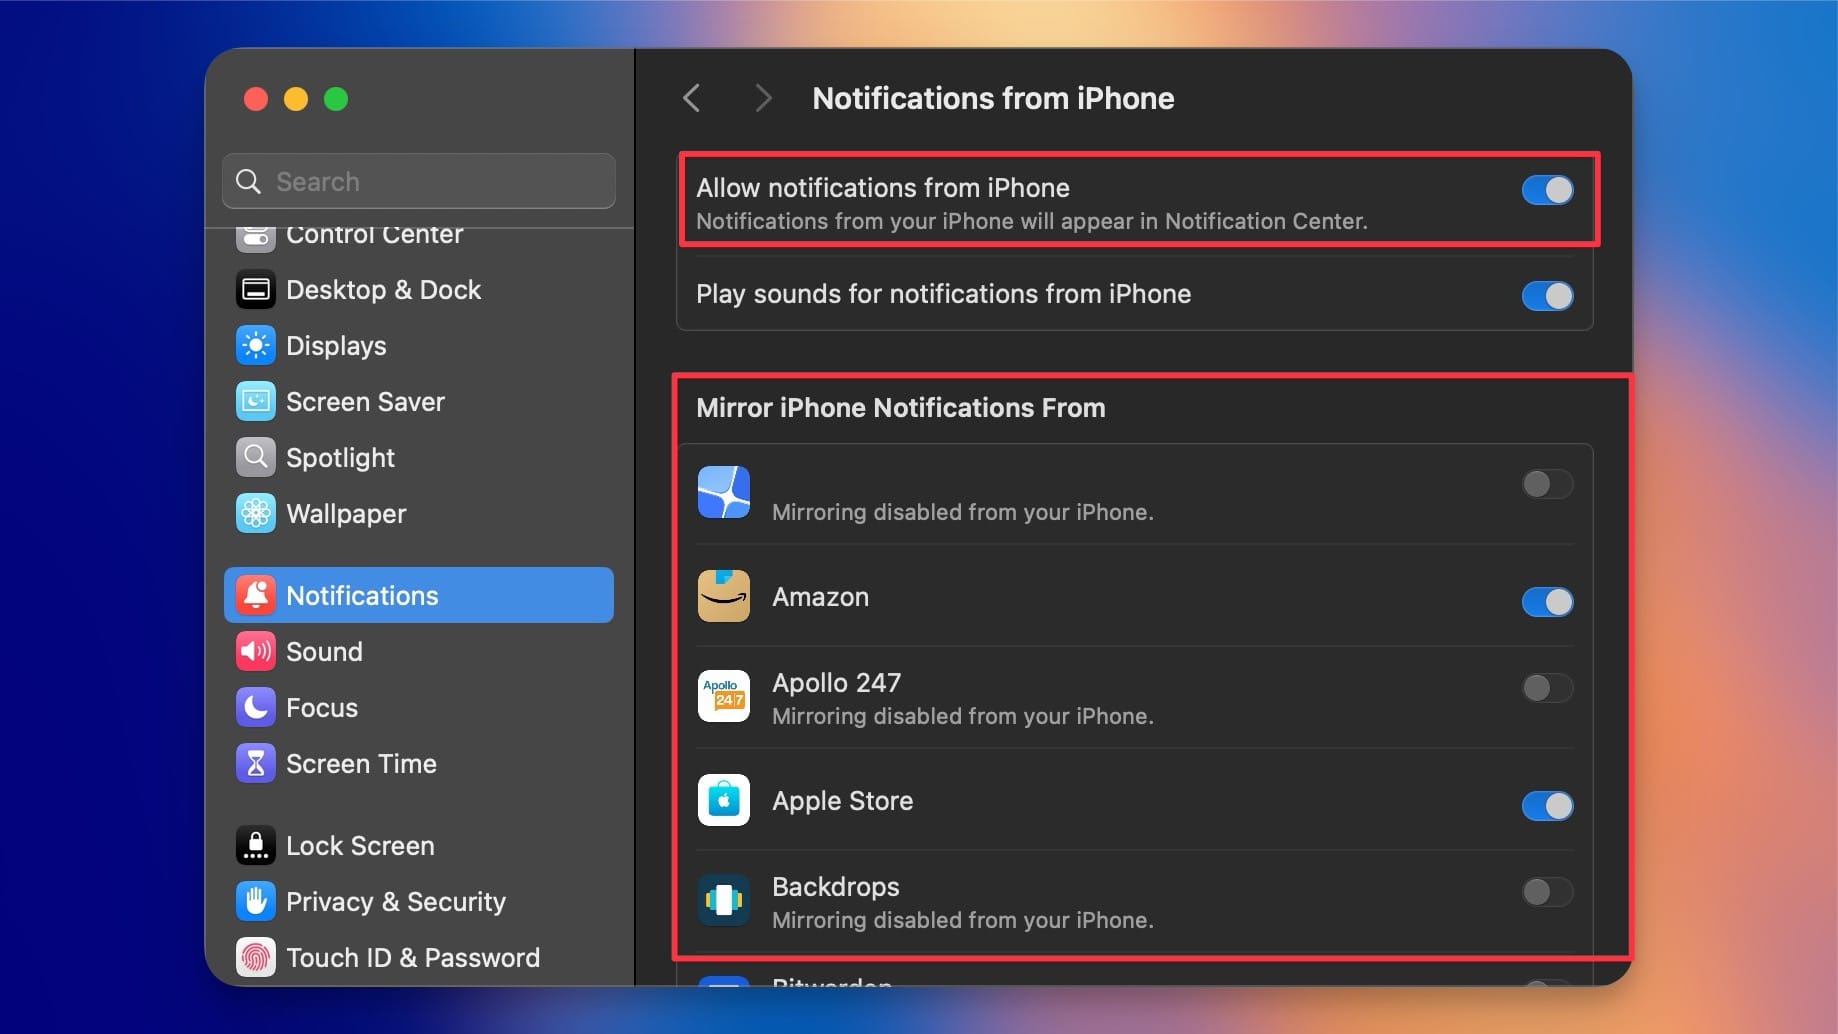
Also, if an app is installed on both your iPhone and Mac, it will result in duplicate notifications—one from each device. In the System Settings app, open Notifications settings. Click on Allow notifications from iPhone.
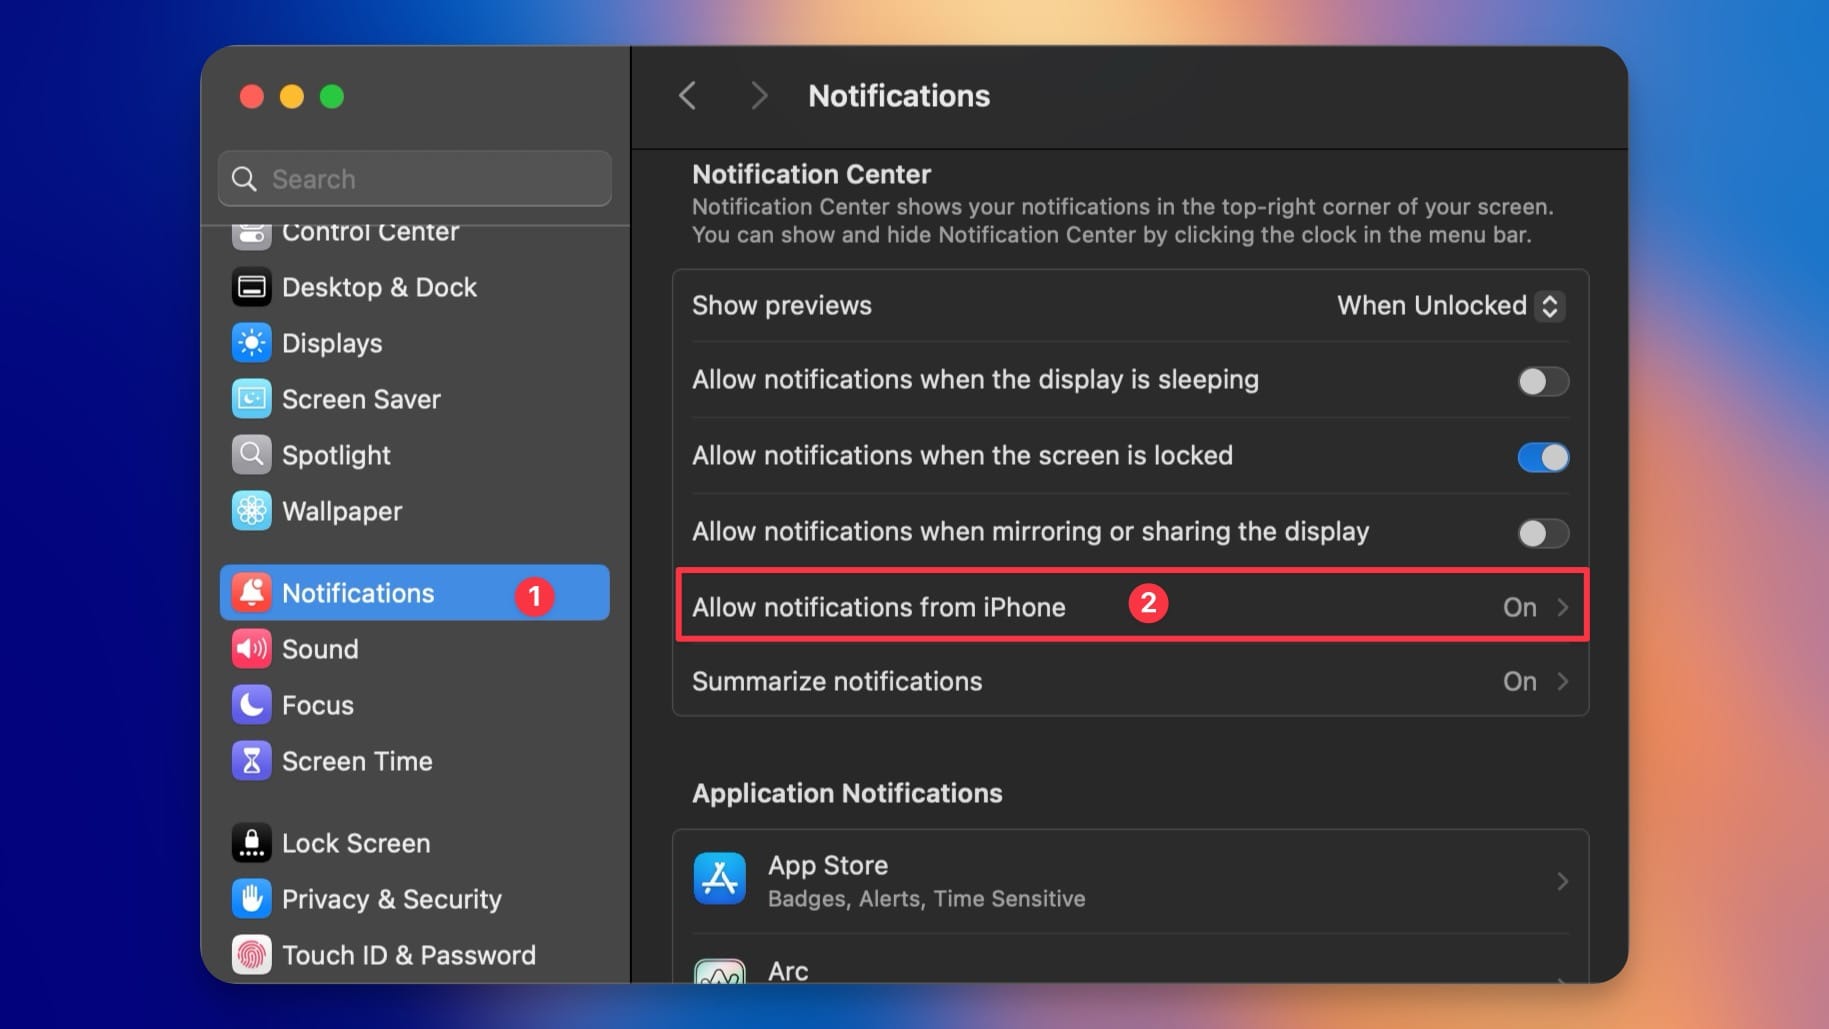
I recommend turning it off entirely but if you don’t want that, go through the list with a fine comb and disable notifications from all the culprit apps to limit distractions.
7. Use a rotating private Wi-Fi address
Every device that connects to the internet has to identify itself to the network with what’s called a Media Access Control (MAC) address. If your device is using the same MAC address, over time it can be used to track your device across different networks and locations.
To prevent this from happening, Apple has added a rotating Wi-Fi address that changes your MAC address to obscure your device’s identity. While you don’t need to use this feature at home, I recommend using a rotating Wi-Fi address when you travel and connect to a cafe or hotel WiFi-Fi.
To set it up, launch System Settings, click on Wi-Fi, and then on the Details… button next to the network name.
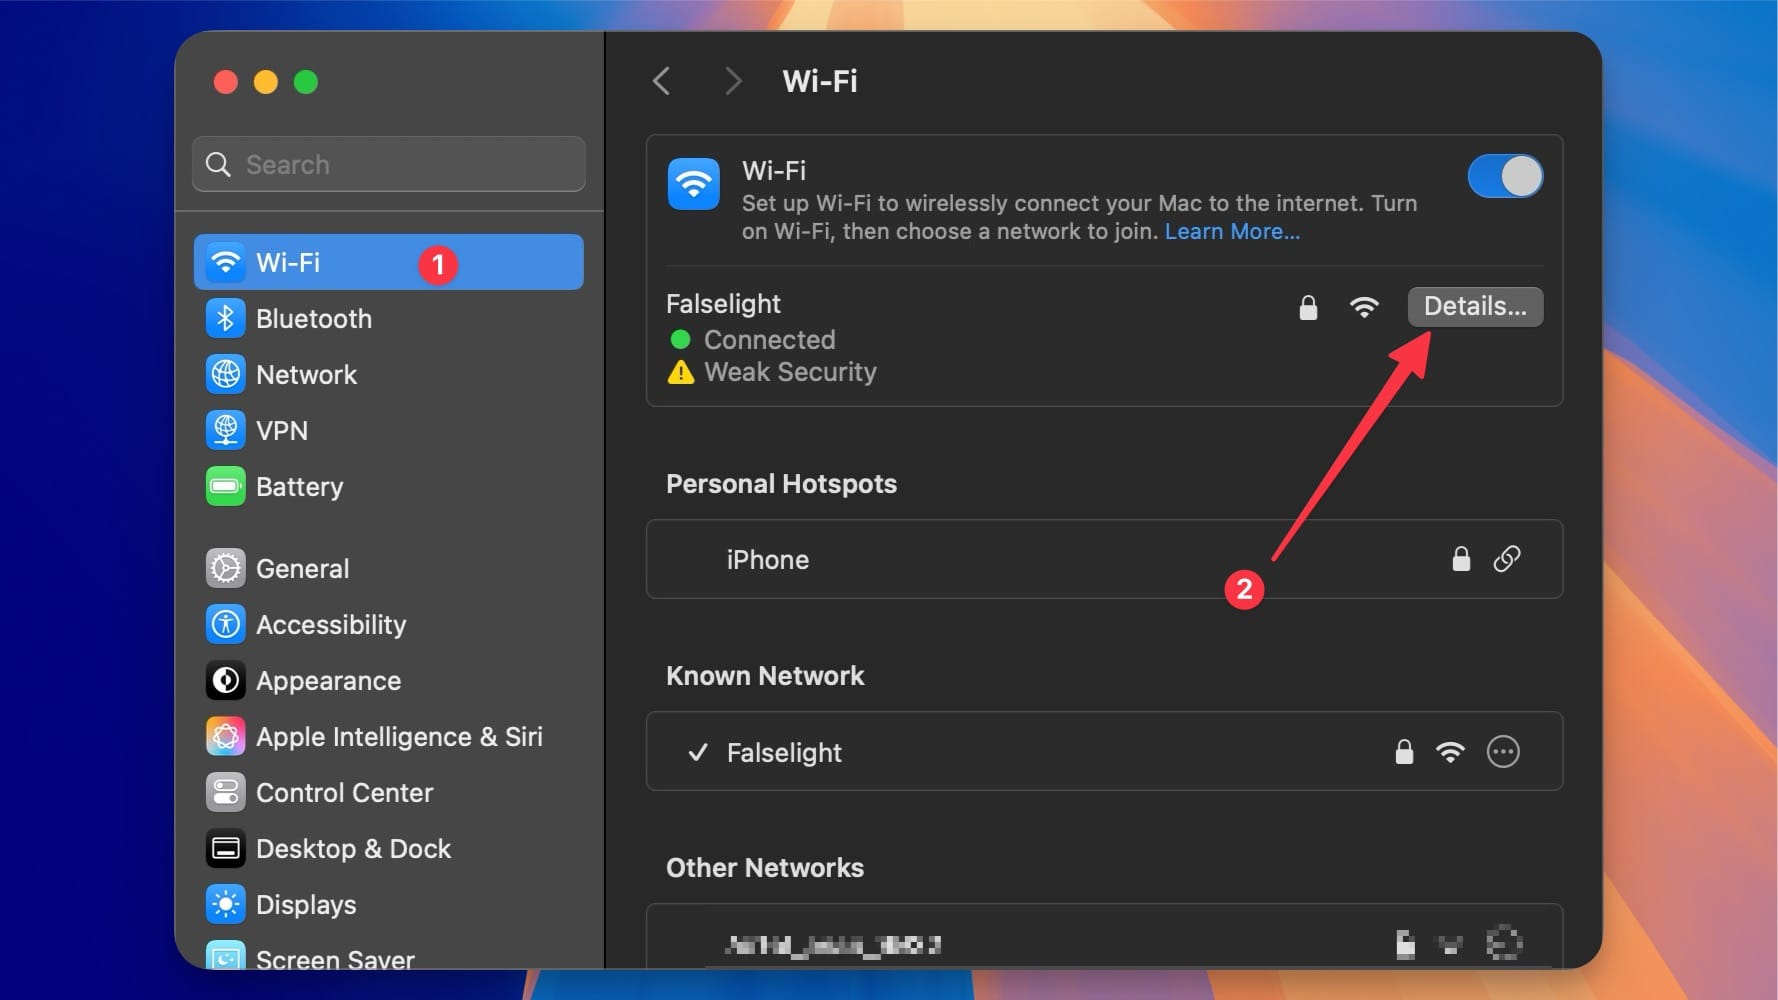
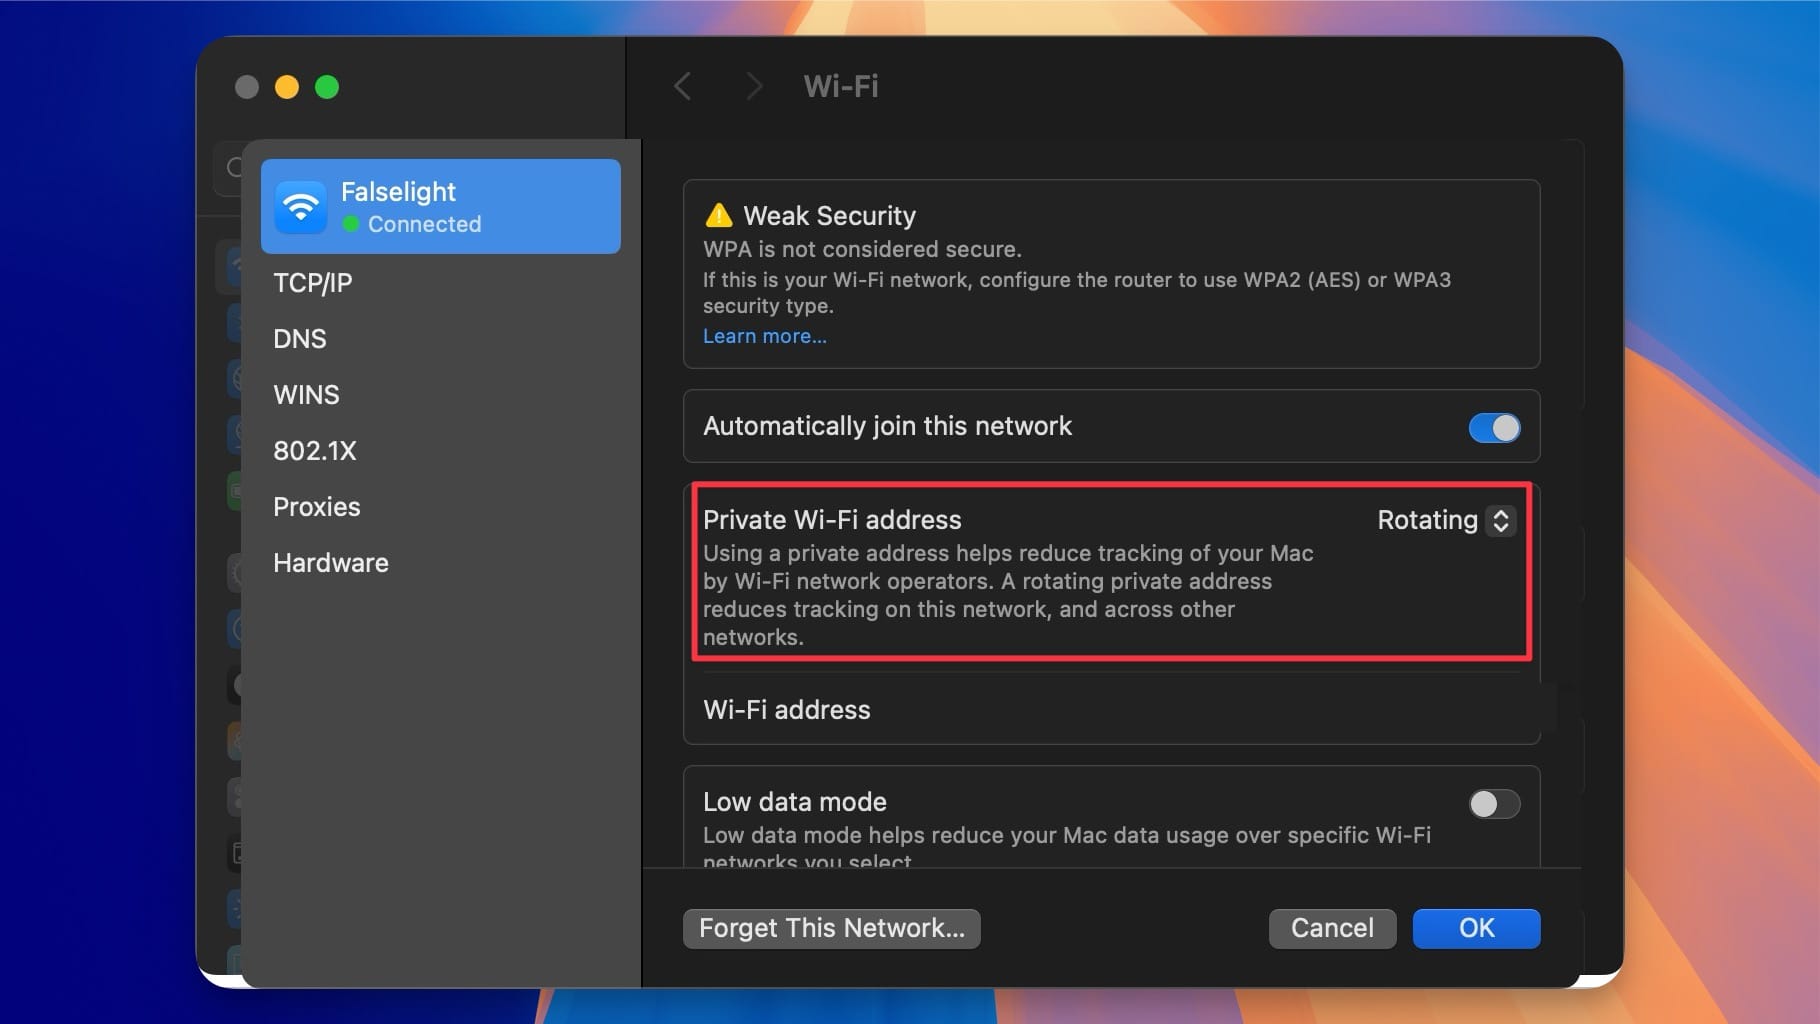
Click the dropdown menu next to the Private Wi-Fi address and change it to Rotating. Now click the OK button to save changes.
8. Remove Reminders from Calendars
With macOS Sequoia, you can see your reminders alongside your calendar events. I like this feature as it shows all my tasks and events in one place.
But what if you find it crowded and don’t want to see your reminders in the Calendar app? There’s a simple solution. Launch the Calendar app and click the Calendar icon in the top-left corner. Now, tick off the checkbox next to Scheduled Reminders, and the reminders will disappear.
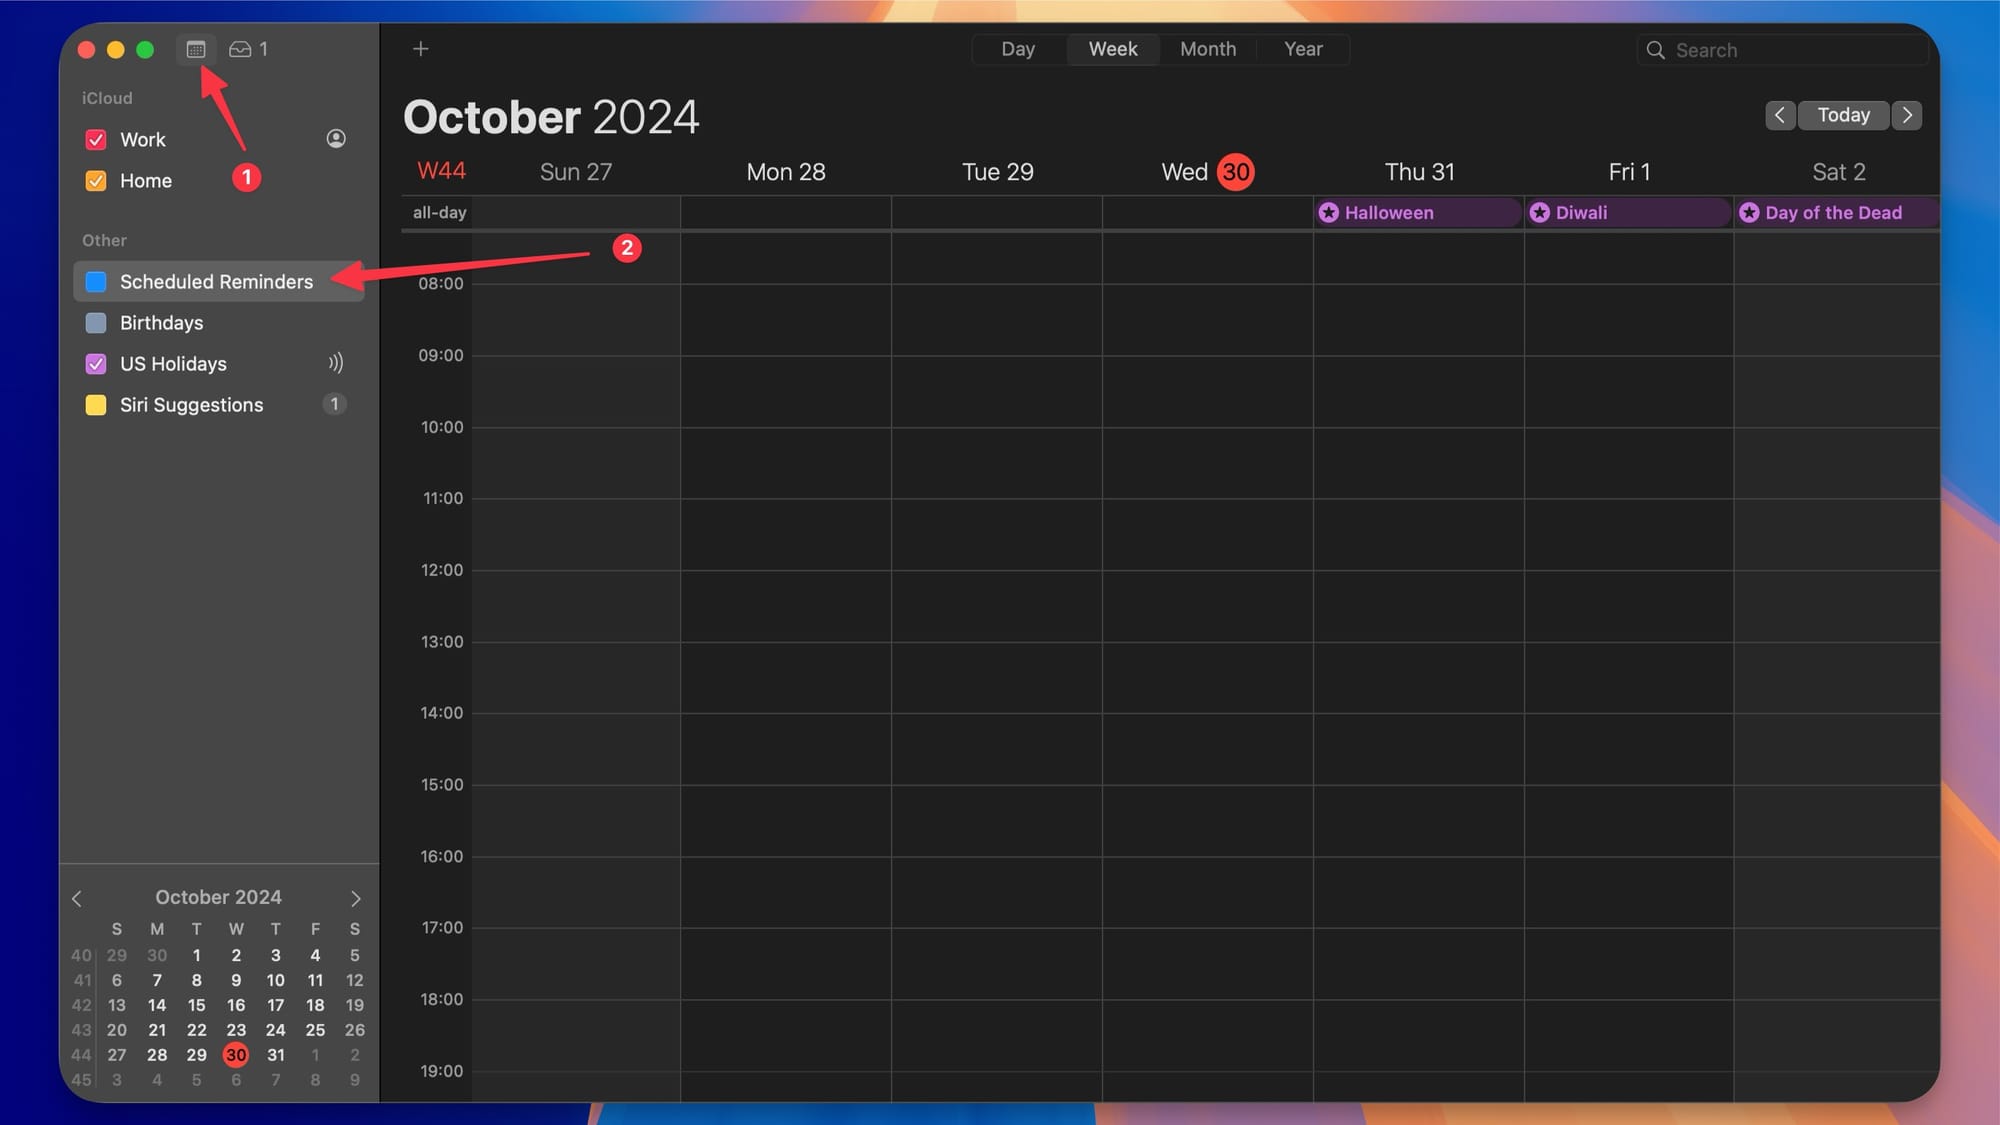
The good thing is that you will still be able to create reminders from the Calendar app. They just won’t be visible in the calendar app.
9. Store files locally on iCloud Drive
iCloud Drive periodically removes files from your Mac hard drive and keeps them only on the cloud to manage storage on your Mac. However, there may be some important files you want to be accessible without an internet connection, no matter how long you have not opened and used them.
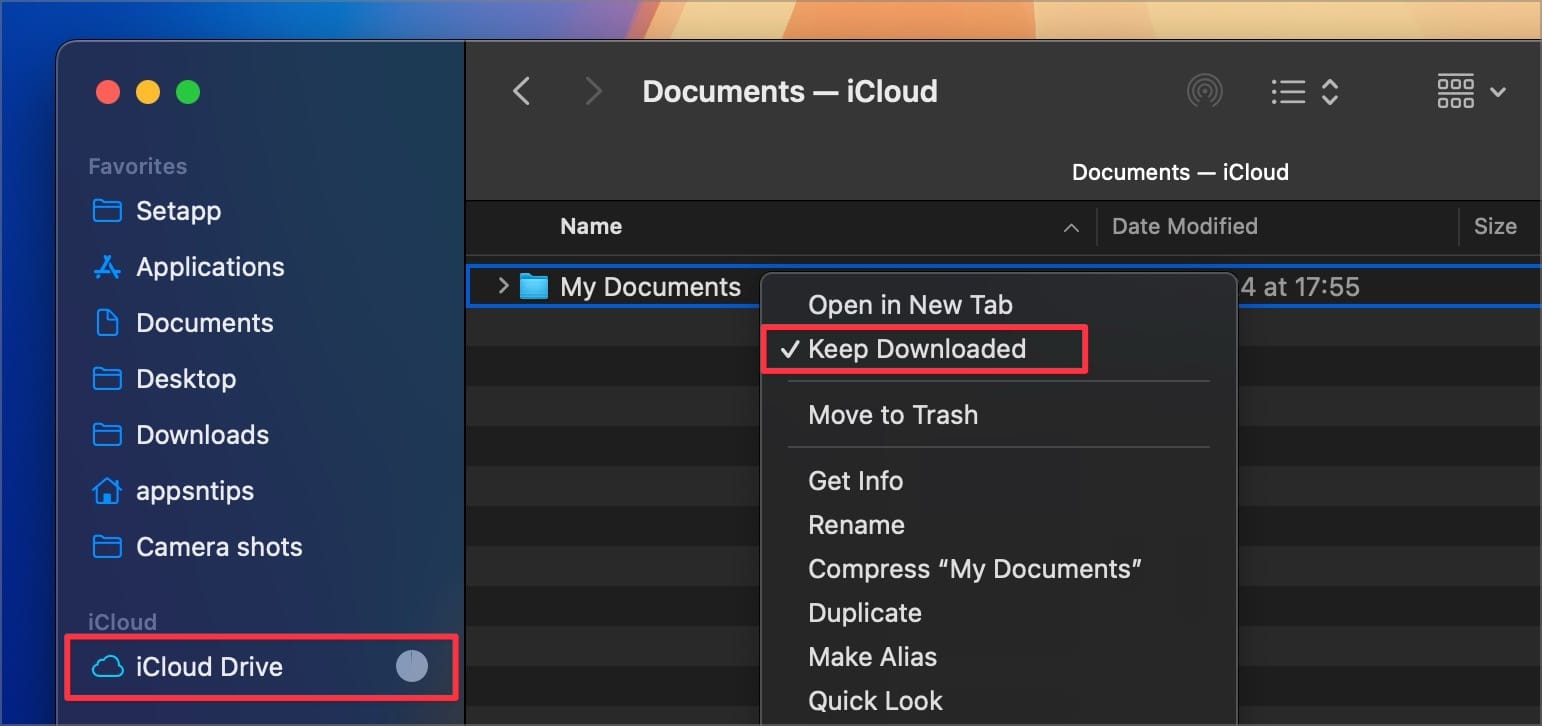
macOS Sequoia finally brings a setting that allows you to do that. Open the iCloud Drive and right-click on the file or folder you want to keep on your Mac. Click the Keep Downloaded option and the file will remain on your Mac’s hard drive.
10. Add low power mode option in the Menu Bar
Macs have a built-in low-power mode that allows you to extend battery life when you are away from a charger. But, enabling that takes a lot of steps. You have to navigate to System Settings → Battery and use the drop-down menu next to Low Power Mode to access it.
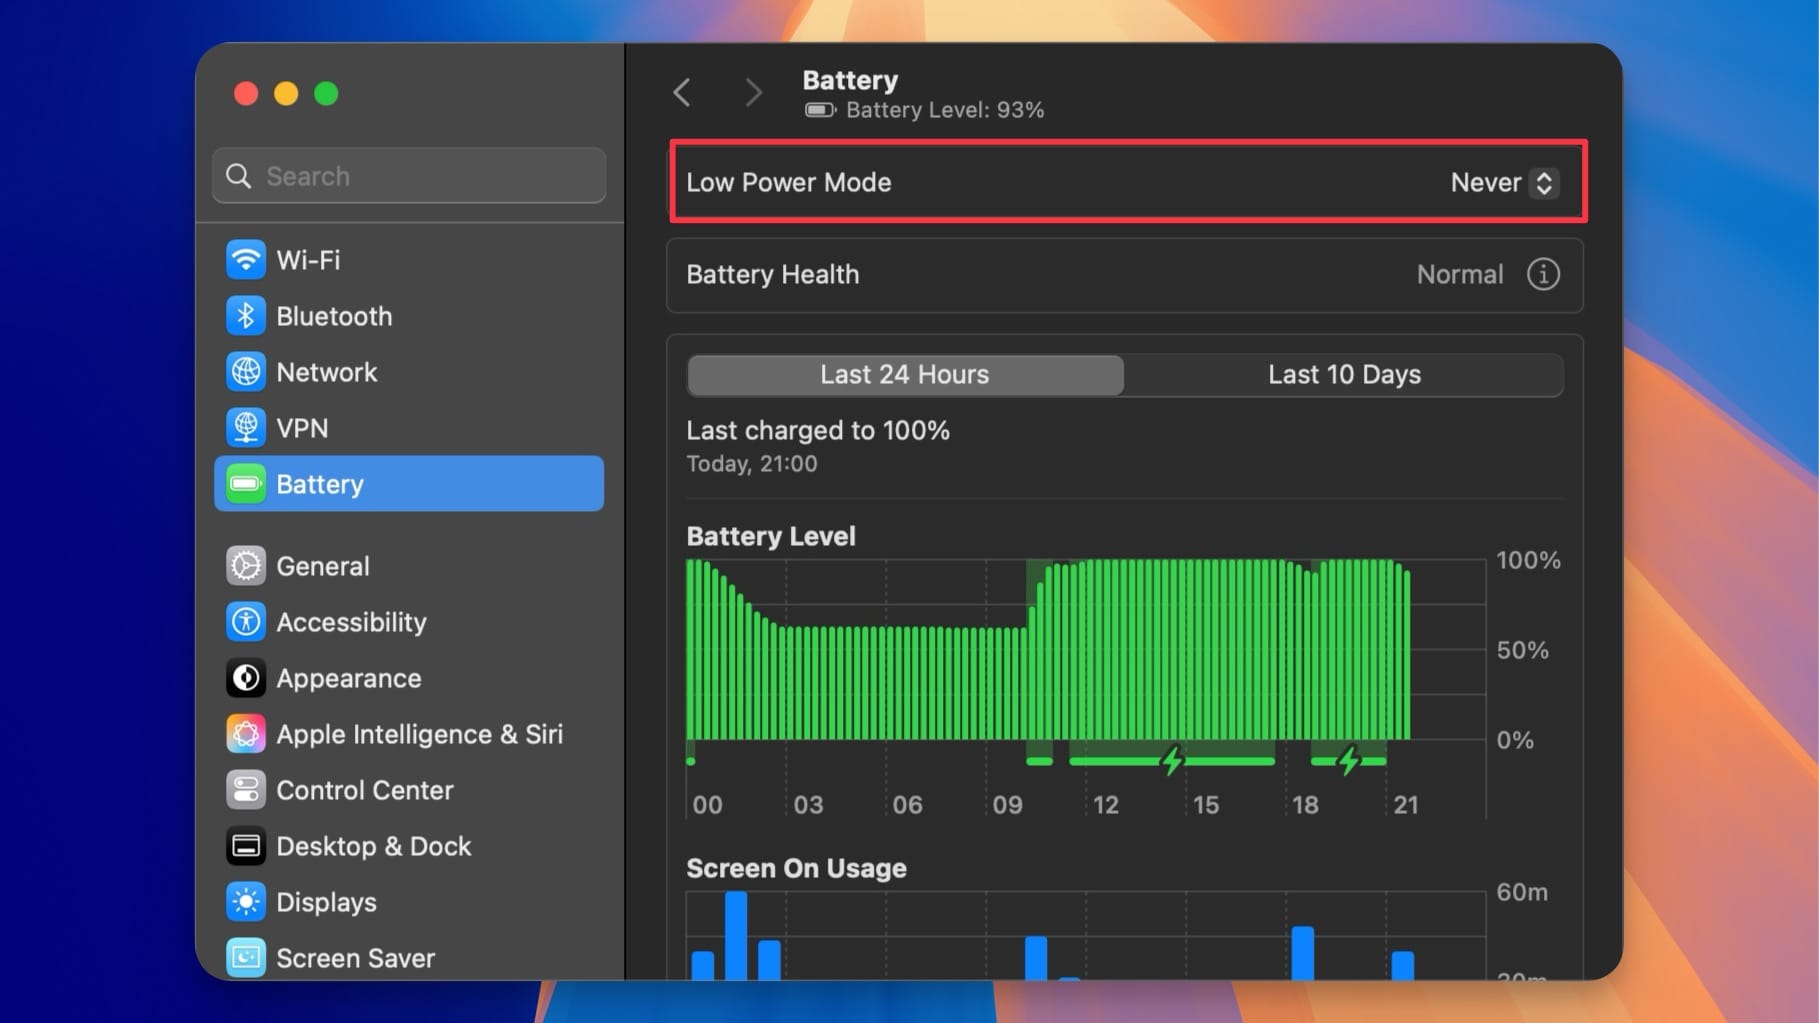
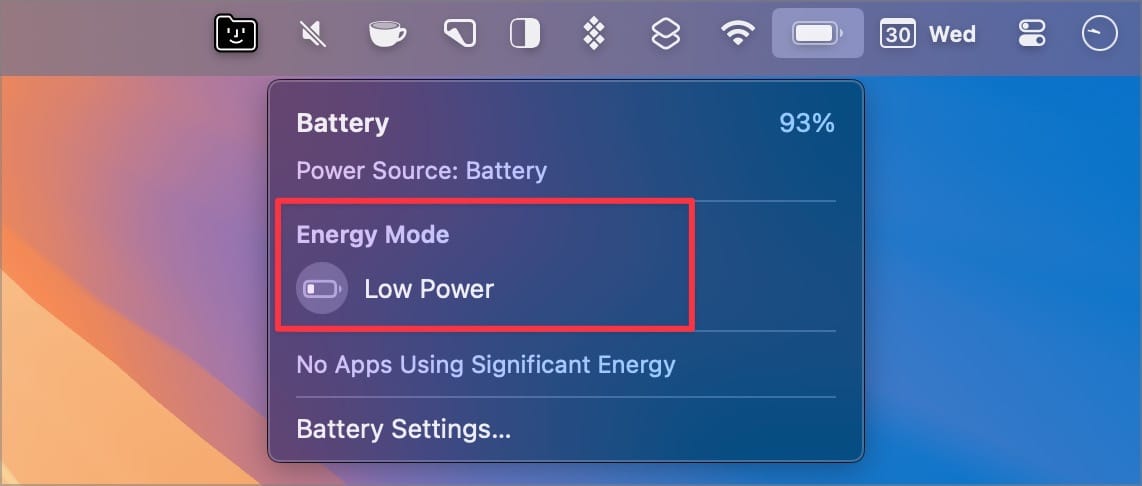
In macOS Sequoia, you can access this setting directly from your Mac’s Menu Bar. To enable this open the Control Center settings and scroll down to the Battery section. Click the drop-down menu next to Show Energy Mode and set it to Always.
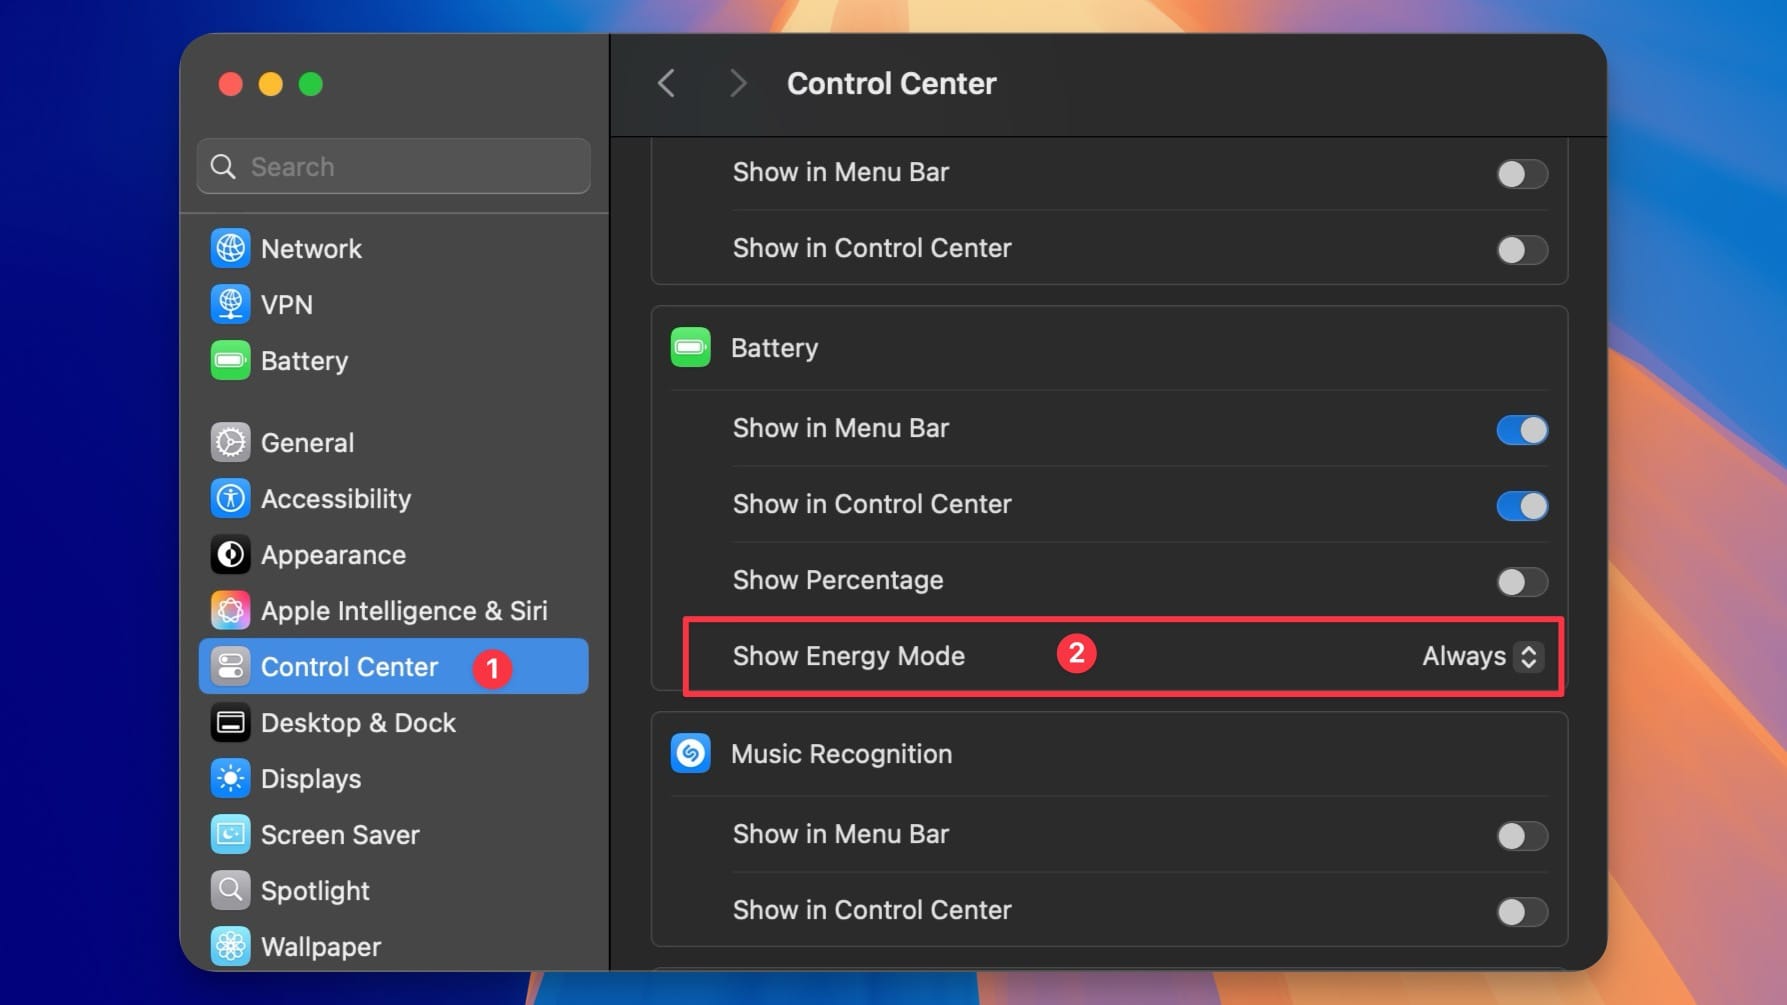
Now when you click the battery icon in the Menu Bar, you will see the option to turn on Low Power.
Change these settings in macOS Sequoia Now
These are the 10 macOS Sequoia settings you need to change right now to enhance your experience. If you liked this guide, share it with others to get the word out. I would really appreciate the gesture.


Comments ()